Multi-Flute End Mills Produce Thoroughly Modern Milling - 2 flute vs 4 flute
A masonry or concrete drill bit is the preferred option for drilling very hard materials like concrete, natural stone or granite. It has a carbide tip and is usually made from tool/carbon steel.
Sometimes you don’t want to drill all the way through a material – for example, if you want to make invisible holes for hanging things up, as with our children's crown-shaped coat hook project. This is called a blind hole. It’s easy to make one in wood using a wood twist drill that is shorter than the thickness of the material. If you only have one drill bit that is longer than the material thickness, you can mark up the depth of the hole on the drill with tape. That way, you’ll know how far down to drill. If you need a drill with a bigger diameter, the Forstner bit is your best option.
When you purchase through links in our articles, we may earn a small commission. This doesn't affect our editorial independence.
The table tools can also make lists a lot easier to customize and even reorganize later. For our example, we’ll turn a classic contact list into a table, using a list of names—first, middle, last—plus the city, state, region, and profession of each person on the list.
You can even insert formulas to calculate your numeric data. I added a Salary column to the table below and entered some dollars, plus a new row at the bottom for the salary totals. To calculate the total salaries, position your cursor in the last row and the last column cell, and click the Formula button under the Data group. In the Formula dialog box type the SUM() formula [or Count() or Average()] in the Formula field box. If you are unfamiliar with the formulas Word provides, click the down arrow under the Paste Function field, and choose a formula from the list.
The dialog boxes below also illustrate each feature. Click Table Tools > Layout > Insert or Delete (from Rows and Columns group) to add or remove them; Merge or Split Cells or Split a Table (from the Merge group); or Text Direction (from the alignment group) to rotate the text inside the table.
Make sure you clean out the hole you've drilled before inserting the anchor. For example, you can use a handheld vacuum cleaner to remove any dust or remnants from drilling.
Other features include Table Properties, which provides several options for aligning the table with the text or wrapping text around your table. Select Cell Margins to change the margins inside each cell. With the table still highlighted, click Table Tools > Layout > Data > Sort to sort the table data alphabetically or numerically, just like in Excel. You can sort by column numbers or by column headers, and it provides two sort levels. For example, you can sort by Last Name, then by First Name. The table below is sorted by Last Name.
If you need to drill all the way through a material, you need to make a through hole – a good example of this is our hanging lights project. If you’re making a through hole, the drill bit should be longer than the thickness of the material.
With the Convert Text to Table feature, you can separate the fields (Name, City, State, etc.) with paragraphs, tabs, commas, or other separator character, but use only one separator between each field.
Notice that once the table is created, a new option called Table Tools appears on the Ribbon bar with two new tabs: Design and Layout. See the Layout and Design section below for details regarding these options.
For eons, people have used tabs to separate the fields, adding a tab or two to accommodate longer strings of data. But if you do this, when you convert the table to text, it misplaces all the data.
Click Insert > Tables > Insert Table from the dropdown menu. In the Insert Table dialog box, enter the number of columns and rows you want in this table (four columns and five rows). In the AutoFit Behavior panel, select Auto, or click the down arrow to choose a specific size. You can also choose AutoFit to Contents (produces narrow columns that expand as you add data) or AutoFit to Window (expands the table to fit the document size). Check the Remember Dimensions for New Tables box if you want the sizes you’re entering now to become your defaults for future tables.
Under the Insert tab, click the Table button. The Insert Table dialog box will open, showing a basic grid pattern as well as traditional menu options below it. Place your cursor on the first cell in the grid and slide it down and over until you highlight (for this example) four columns and five rows, then click once.
The diameter of the drill bit you choose will depend on how big a hole you want to drill. Most drill bits nowadays have diameters of between 1 mm and 20 mm.
The type of drill you need depends on several factors: the type of material you’re drilling, the type of hole you want to make, and the size of the hole (depth and diameter).
The different types of drill chucks include a self-centring/three-jaw chuck, which holds the drill bit in place with three "jaws" (points of attachment). By turning the chuck, it can be adapted to the diameter of the drill shank to firmly secure the bit. There are also various SDS chucks: here the drill bit snaps into place when it's inserted into the chuck, with no need to tighten the chuck or size it to the diameter of the drill shank.
Microsoft now provides five different methods for creating tables: the Graphic Grid, Insert Table, Draw Table, insert a new or existing Excel Spreadsheet table, and Quick Tables, plus an option for converting existing text into a table. To start, open a blank Word document from the Home/New page. Position your cursor in the document where you want the table inserted.
When you go to the DIY store, you need to know which material you’re drilling, and what diameter and length drill you need: an image like the one above shows you what you can use the drill for. The diameter of the bit can usually be found in a box in the top-left corner, whilst the total and working length can be seen on the tape measure along the edge of the packaging.
To prevent the tip of the drill from wearing out (drilling at too high a speed or with too much pressure may cause it to turn blue), try using drilling fluid or cutting oil. You could also remove the drill from the hole at regular intervals, to allow it to cool down slightly.
Choose a Table Style with Banded Rows (i.e., every other row is different for easier viewing), then customize the fonts and paragraph spacing.
Generally speaking, drills can be divided up into metal drills, wood drills, masonry/concrete drills and multi-purpose ones. Most drill bits have a spiral shape – which helps to remove the drilled material from the hole.
If you want to drill holes with a particularly large diameter (i.e. greater than 10 mm) in wood – which are also called blind holes – it’s best to use a Forstner bit. However, this is not suitable for particularly deep holes or through holes.
You can also convert your table back to a text block. Just choose the separator you prefer, so when the table grid disappears, the data isn’t all jumbled together.

You can also determine the size of the drill bit based on the screws you want to use. The diameter of the hole you drill should be slightly smaller than the diameter of the screw. So, for example, if you’re using a 3.5 mm screw, use a drill bit with a diameter of 3 mm.
Deep holes are similar to blind holes, except here the holes are particularly deep (at least five times deeper than the drill diameter). It’s the most common type of drilling if you want to mount something on the ceiling or wall. To give an example, you’ll need to drill deep holes to create your own vertical garden so that you can hang your project on the wall.
For the best results with drywalls, you should use either a drywall anchor or a special hollow wall anchor made from plastic and metal. This is suitable for use with cavities of different sizes and holds securely. A universal anchor is also an option, as it expands behind panels and cavities.
For drilling soft to medium-density tiles, you can use a special tile drill bit with a diamond-ground carbide tip. To prevent the drill from slipping off the surface, try sticking some tape to the tiles first and then drilling the hole. Some advice: start on a low speed setting and then gradually increase it as the drill bores deeper into the material. To avoid cracking your tiles, it’s important to apply the right amount of pressure. Apply moderate pressure to begin drilling the hole, then light to very light pressure as you proceed.
MultiConstruction drill bits can be used to drill into plastic and a range of other materials – making them ideal for drilling cabinet doors, for example, which consist not only of wood, but may also feature metal elements/fixtures. They are suitable for use on all materials that you’re likely to work on in the home, including multi-layer materials, bricks, tiles and aluminium. However, where possible, it’s always better to use the special drill bit for a specific type of material than the MultiConstruction bit – because these are developed especially for the material in question.
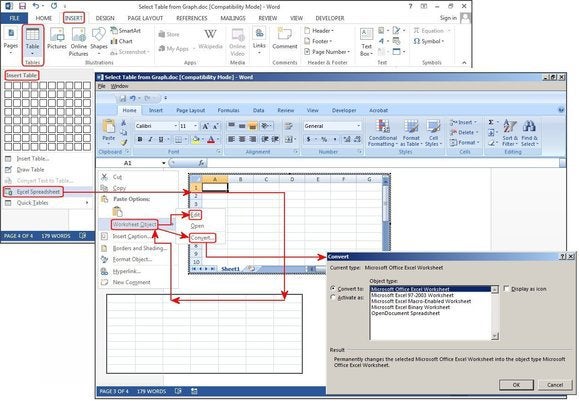
If you want to add, delete, or modify the spreadsheet, right-click anywhere inside the worksheet graphic, select Worksheet Object from the dropdown menu, then click Edit. The original spreadsheet reappears for editing. Notice the top menu has changed to an Excel menu for edits.
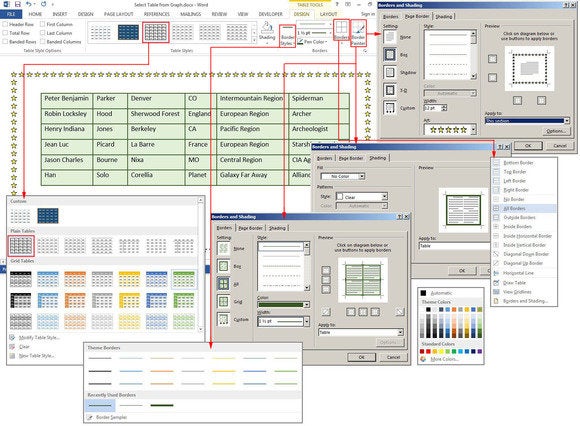
The Design tab is for adding borders, shading, styles, and customizing the header columns and rows. Highlight your table, then select Table Tools > Design> Table Styles, Shading, Border Styles, Borders, or Border Painter (see the graphic below for ideas). There’s no learning curve, just play with the features and see what happens. If you don’t like a feature you’ve added, just click the Undo button or press CTRL-Z.
To add or remove columns and/or rows later, click anywhere inside the table, then select the Design tab under Table Tools. Click the Draw Table button to add or continue drawing lines with your pencil cursor, or click the Eraser button to remove lines with the eraser cursor. To remove a line, just touch the line with the eraser cursor, and the line disappears.
What makes a wood drill bit so different from a masonry bit? And why is it so important to use the right type of wall anchors? We’ve put together some tips on choosing the best drill bits and anchors for any task – so you can avoid breaking any more drills and can make sure your shelves stay firmly on the wall.
The size of the anchor you need will depend on the size of the hole you’re drilling. For example, if you used a 6 mm drill bit, you should use the same size anchor. The screws you use should then have a slightly smaller diameter of around 4–5 mm, which is opposite to if you're not using anchors (see 1.2). The wall anchor packaging will usually specify the length and diameter of the screws you should use.
Also from the Worksheet Object dropdown menu, you can click Open to open the spreadsheet in Excel, so you can manipulate it in that program. Or click Convert to view a Windows dialog box that lists file-conversion options.
Click Insert > Tables > Excel Spreadsheet. An Excel spreadsheet inserts at your cursor location. You can continue using Excel and its menus and commands, but after you enter your data it converts to a non-editable graphic.
Do you want to stay up to date as well as receive information about new products and exciting ideas for DIYers and gardeners? Then subscribe to our newsletter, which has plenty of tips and tricks for keeping things exciting around your home and garden!
To ensure pictures and shelves remain firmly on the wall, it’s important you use the right wall anchors. And the same rule applies as for drill bits: the anchor must be a good match for the material you’re drilling into.
In the old days, Excel spreadsheets had to be imported into Word. Now you can just copy and paste. Open Excel, highlight the spreadsheet, and copy it. Then open Word, position your cursor at the desired location, and select Paste > Keep Source Formatting.
For walls made from plasterboard, also known as drywall, you can use a special spiral-shaped drywall anchor made from metal or plastic. Unlike standard anchors, this does not expand. You should also use hollow wall anchors made from plastic or metal.
In general, a screw should always be slightly longer than the anchor to ensure it protrudes out from the wall. The longer an anchor is, the greater the load it can bear. So, the higher the load, the longer a screw should be in comparison to the anchor. Depending on the load, the screw can be between 3 mm (low load) and 16 mm (high load) longer.
The other options on the Paste dialog menu are Merge Formatting, which changes the text format to match the file into which you pasted the spreadsheet, and Keep Text Only, which pastes the text without the Excel grid, meaning you will likely have to realign your columns with tabs.
Creating tables in Microsoft Word used to be so annoying that most people just did it in Excel, then imported it into Word. It’s worth giving Word 2013’s table tools a try, though, because the process is easier, and there are some new graphical options.
If you're not using anchors, use the length and diameter of your screws to determine the drill bit length and the hole depth and diameter.
Once the box is created, position the cursor inside the box and draw lines over and down for the columns and rows (one at a time). Don’t worry about crooked lines, either—Word straightens them as you draw.
Whether you’re drilling iron, steel, copper, brass or aluminium, it’s best to use a drill bit designed especially for metal. These are usually made from high-speed steel (HSS) and are cone-shaped at the top.
All of these methods are fast and easy, but using a combination of all three will always be quicker. For example, use your mouse to highlight, then right-click to copy with your right hand; then arrow down to the new location and press CTRL-V to paste with your left hand.
There’s also an option to add artwork borders to your pages. Select Table Tools > Design > Borders > Border Painter, and click the Page Border tab in the Borders and Shading dialog box. Click the down arrow in the field box under Art, then choose a border—mostly simple clip art—from the list.
In addition to the various tips, drill bits also differ in terms of their shank shape. The shank is the part that is inserted into the drill chuck.
If your walls are made from perforated brick (similar to solid brick, but with evenly spaced cavities), you should try to use anchors that bridge the cavities or fill them in. Anchors with grout are ideal, as are plastic anchors that expand.
Soft or hardwood, chipboard, plywood or MDF panels – for all these types of wood, you’re best off using a wood twist drill bit. This has a centring point that enables you to position the drill precisely. Furthermore, tapered drill bits help to avoid ripping up the wood.
Quick Tables are Word’s table templates. In addition to the nine templates provided, you can create your own designs and save them to the Quick Tables Gallery to use later. Click Insert > Tables > Quick Tables. Select a table template from the Quick Tables menu, then modify it to fit your project.
You can use a step drill bit to quickly and precisely drill holes in non-ferrous metals, sheet steel and plastics. Thanks to the different diameters on the bit, you can drill holes ranging from 4–20 mm. A centring aid helps you to drill accurately.
Sometimes you need to drill special types of holes or drill into unusual materials. Whatever your need, there’s a drill bit for the occasion.
Concrete is an ideal material for fixing or hanging items onto. Long wall anchors made from plastic and chemical solutions such as grout, with the right equipment, are especially suitable for this type of wall. For lightweight concrete, which is lighter than standard concrete thanks to the addition of Styropor or pumice, are ideal. These expand as the screw is tightened, ensuring they are firmly anchored in the wall.
Click Insert> Tables > Draw Table. The cursor turns into a pencil, which you drag down and across to draw a box. Don’t worry about the exact dimensions; you can modify it any time.
The table below uses one of the many preset styles that comes with Word. Select Table Tools > Design > Table Styles, then scroll through the gallery of styles. If you want to change the font or customize the paragraphs inside the table, use the Format Shortcut menu. Right-click anywhere inside the table, and this small menu pops up adjacent to the longer Table Options menu. If the formatting feature you need is not on the Shortcut menu (which is fairly limited), click the Home Tab and select the features you need from the Font or Paragraph group. All of the buttons and groups on the Home tab are available for formatting tables as well as documents. The options are endless.
Not sure how deep to drill into a wall? Then base the depth on the wall anchors you want to use. As a rule of thumb, use the following formula to determine the depth of the hole: anchor length + 10 mm. This will ensure the anchor is completely out of sight later on.
Type Above between the parentheses, choose a format under Number Format such as dollars, percent, or general, then click OK. Word calculates the column of numbers and places the calculation in the target cell (where your cursor resides). Review the Formula Format table in the graphic below for the correct commands that tell Word which direction to calculate (these go inside the parentheses).
The Layout tab lets you modify the structure of the table. The menu is fairly self-explanatory, and you can roll your cursor over a feature to get further clarification.


 18581906093