
2-in-1 Mini Air Chamfer Tool for Chamfering and Comoros - air chamfer tool
If an Acme thread, do I need to grind a cutter to the correct 29 deg angle? I have a Myford and a grinding wheel, so can this be done using the top slide? So the angles are precise?
To keep your circular saw in prime cutting condition, proper lubrication is key. Here are the main points to keep in mind:
Upgraded blades are made from higher-grade materials with advanced tooth design and carbide tips, which not only provide cleaner, more precise cuts but also significantly reduce tear-out and material wastage. Additionally, these blades tend to last longer, ensuring that your saw performs at its best for a wider range of projects and for a longer period of time. Thus, the modest investment in an upgraded blade can pay huge dividends in your craftsmanship and the longevity of your tool, making it a worthy consideration for any serious craftsperson or tradesperson.
If you do end up making a new screw then you should be looking at the fit with the nut as the most important not the gear/worm wheel as it seems from a bit of googling that is only a quick action feed which you are unlikely to use very often and converts the screw into a rack with the wheel being the pinion.
INOX dries to a waxy coating that seals out moisture and grime. For the best protection, reapply INOX every few months or if you notice rust starting to form. Before using your saw again, simply wipe away the coating with a clean rag and you’re ready to get back to work.
Mar 20, 2012 — You can cut standard keys with an end mill or woodruff keys with the correct cutter. I have seen really good results on a 9" South Bend withone of these.
How to sharpen skill saw bladeby hand
You’ll want to lubricate the blade guard, spindle, and any other moving parts before each use. A spritz of INOX MX3, LANOX MX4 or INOX MX5 PLUS is perfect for the job. INOX products are heat-resistant, long-lasting lubricants with anti-rust qualities, making them the perfect choice for your circular saw.
Sharpening the blade yourself using a file jig is certainly doable for the handy DIYer, but for most casual users, it’s best left to the professionals. Many hardware stores that sell saw blades also offer resharpening services for a nominal fee. They have the proper equipment and experience to grind the blade to the correct angle and balance.
Proper INOX use, along with regular cleaning, blade sharpening, and replacement when needed, will keep your circular saw in working order for years to come. An investment in high-quality tools deserves an investment in maintenance. With just a few minutes after each use, you can be confident your saw will be ready whenever you need it.
Looking at the picture can we assume that the screw mates with a gear? If so then the flank angle of the thread should match the pressure angle of the gear. Furthermore the depth of the thread will be determined by the addendum and dedendum of the mating gear.
Fairly easy to make a cutter from HSS. Just copy the shape of the thread form from the original on to a piece of tool steel and make sure there is cutting clearance on end and both sides but leave the top flat. Then just turn the blank to size and plunge the cutter in till correct depth 8 TPI.
Maintaining your circular saw is straightforward, but you do need to get into good habits to keep it in tip-top shape. We’re talking basics like keeping it clean, inspecting it regularly, and changing consumables when needed. Do that and your trusty circular saw will reward you with years of faithful service. Follow these essential maintenance tips to keep your circular saw cutting like new.
I still need to make a jib strip (for the knee) and the brass end piece that the handle goes through. I do have a spare Myford Lead Screw handle, so might swap that in, as I can vary the diameter of any insert I put in to match the brass end piece.
Not wanting to sound obtuse, but it does not sound like you have the experience needed to cut a difficult and critical thread like this one. It is not a beginner project. You would be far, far better off to remachine the end of the existing screw so you can re-attach the handle.
Ionbond™ PVD coating service. The Ionbond™ PVD process is used for the deposition of coatings made of nitrides, carbides and carbonitrides of Ti, Cr, Zr and ...
Search for: Home › Forums › Beginners questions › Topics Viewing 25 topics - 1 through 25 (of 25 total) Topic Voices Posts Last Post Wellsaw 4″ Hacksaw Info Started by: John McCulla in: Manual machine tools 1 1 14 November 2024 at 22:43 John McCulla Workshop Practice series books Started by: V8Eng in: Books 4 4 14 November 2024 at 21:53 Emgee Parvalux motor – help please Started by: Mike Waldron in: Manual machine tools 8 10 14 November 2024 at 21:22 Mike Waldron Which steel for studs? 1 2 Started by: John McCulla in: Materials 17 28 14 November 2024 at 20:55 Mark Rand New motor/esc for mill? 1 2 Started by: robert bushill in: Manual machine tools 16 29 14 November 2024 at 19:56 noel shelley Doug Hewson BR Standard Class 4 Started by: chris hammerton in: Drawing Errors and Corrections 1 1 14 November 2024 at 19:14 chris hammerton Name for special automotive bolts? Started by: Andrew Tinsley in: General Questions 2 3 14 November 2024 at 18:51 Andrew Tinsley Change account email Started by: Graham Titman in: General Questions 5 9 14 November 2024 at 18:39 JasonB Latest Replies Started by: Dalboy in: The Tea Room 4 5 14 November 2024 at 18:35 JasonB 30 Year old MOTORUN 3 Phase Static converter 1 2 3 Started by: mr fixit in: Introduce Yourself – New members start here! 12 56 14 November 2024 at 17:25 Baz Beer Can Filling For Handles Started by: Richard Kirkman 1 in: Help and Assistance! (Offered or Wanted) 11 13 14 November 2024 at 17:02 Ian P Tap alignment in the mill and lathe? 1 2 Started by: Bo’sun in: Workshop Tools and Tooling 20 45 14 November 2024 at 12:43 John Hinkley Provenance Started by: Martin Kyte in: The Tea Room 5 5 14 November 2024 at 12:13 Pete Rimmer Machining 1050 Grade Aluminium Started by: Steve Withnell in: Materials 8 11 14 November 2024 at 11:04 Paul Lousick Antikythera Mechanism 1 2 … 8 9 Started by: Neil Wyatt in: General Questions 40 211 14 November 2024 at 09:55 Michael Gilligan Another One Gone! 1 2 Started by: Chris Crew in: The Tea Room 20 36 14 November 2024 at 08:43 David George 1 A” WEAVER “1CC DIESEL ENGINE Started by: KEITH BEAUMONT in: I/C Engines 8 23 14 November 2024 at 02:22 jimbo7636 Bantam VS speed control Started by: Norm in: Electronics in the Workshop 3 3 13 November 2024 at 21:53 SillyOldDuffer Whittle V8 article wanted ad Started by: John Hinkley in: General Questions 2 4 13 November 2024 at 21:34 John Hinkley Model Turbines 1 2 … 22 23 Started by: Turbine Guy in: Stationary engines 28 565 13 November 2024 at 20:39 Turbine Guy What did you do Today 2024 1 2 … 17 18 Started by: JasonB in: The Tea Room 66 444 13 November 2024 at 20:18 SillyOldDuffer Spring material advice needed Started by: old mart in: Materials 9 12 13 November 2024 at 20:17 old mart Unsuitable metals Started by: Dalboy in: Materials 11 13 13 November 2024 at 20:16 JasonB I am aghast at Mattel/Fisher Price Started by: Michael Gilligan in: The Tea Room 11 20 13 November 2024 at 18:48 Michael Gilligan Mill Engine at Milnrow Started by: Michael Gilligan in: The Tea Room 4 6 13 November 2024 at 15:34 Howard Lewis Viewing 25 topics - 1 through 25 (of 25 total)
The first step is always to unplug your saw’s cord from the power source. Make sure the blade has come to a complete stop before doing anything else. Next, use a brush to wipe away any sawdust from the saw base, blade guard, and guide fence. Pay extra attention to the blade guard mechanism to ensure it moves freely. Caked-on dust prevents the guard from retracting properly and risks injury.
Check your newly-cleaned blade for any cracks, chips or warping before sharpening or using the saw. Damaged blades should be replaced immediately. Also, flip the blade over to check for wear – blades tend to dull more quickly on one side, so sharpening both sides at once helps maintain balance and performance.
The blade itself also needs oil – especially after cutting treated lumber. Apply INOX along the top and sides of the blade, then run the saw to spread it evenly before storing. This prevents sap and resin buildup that can gum up the works.
0 shares Share Tweet Pin You’ve invested in a quality circular saw to tackle jobs around the home and workshop, but even the best tools need proper care and maintenance to perform their best. Neglect your circular saw and it won’t be long before it’s not cutting straight or efficiently, or worse, becomes unsafe to operate. Maintaining your circular saw is straightforward, but you do need to get into good habits to keep it in tip-top shape. We’re talking basics like keeping it clean, inspecting it regularly, and changing consumables when needed. Do that and your trusty circular saw will reward you with years of faithful service. Follow these essential maintenance tips to keep your circular saw cutting like new. How to Sharpen Your Circular Saw To keep your circular saw cutting cleanly and accurately, you’ll need to maintain the blade regularly. A dull blade can bind, slip, and cut inaccurately, not to mention it requires more effort to push through material. Sharpening the blade yourself using a file jig is certainly doable for the handy DIYer, but for most casual users, it’s best left to the professionals. Many hardware stores that sell saw blades also offer resharpening services for a nominal fee. They have the proper equipment and experience to grind the blade to the correct angle and balance. So short of that, let’s run through all the things that will give you the vast majority of the performance increase you need. Remove Built-up Resin and Sap For saws used to cut treated lumber, the blade’s teeth will accumulate resin and sap over time. Built-up debris on the blade prevents the sharpener from grinding the teeth properly. Carefully remove the blade and clean it thoroughly before sharpening using INOX MX3 and an old toothbrush. Simply spray on the MX3 and give it a few minutes to penetrate before giving it a scrub to remove the residue, before wiping off with a cloth. With regular inspections, cleaning and sharpening, a quality circular saw blade can last for many years and hundreds of cuts. Keep your blade sharp and your saw will operate safely and cut cleanly every time. A worthy investment for any DIYer or woodworker! Inspect the Blade Check your newly-cleaned blade for any cracks, chips or warping before sharpening or using the saw. Damaged blades should be replaced immediately. Also, flip the blade over to check for wear – blades tend to dull more quickly on one side, so sharpening both sides at once helps maintain balance and performance. Properly Lubricating the Circular Saw To keep your circular saw in prime cutting condition, proper lubrication is key. Here are the main points to keep in mind: You’ll want to lubricate the blade guard, spindle, and any other moving parts before each use. A spritz of INOX MX3, LANOX MX4 or INOX MX5 PLUS is perfect for the job. INOX products are heat-resistant, long-lasting lubricants with anti-rust qualities, making them the perfect choice for your circular saw. Apply it to any pivot points or sliding surfaces, then run the saw for a few seconds so it can work its way in. The blade itself also needs oil – especially after cutting treated lumber. Apply INOX along the top and sides of the blade, then run the saw to spread it evenly before storing. This prevents sap and resin buildup that can gum up the works. Every few uses, check the blade for warping or damage. A warped or dull blade won’t cut well and can be dangerous to operate. Install a new blade if needed, making sure it’s the right size and type for your saw. The motor brushes also need to be inspected regularly. After about every 50 hours of use, check that the brushes move freely and are at least 1.5cm long. Shorter brushes won’t conduct electricity properly and reduce motor power. Keeping your circular saw lubricated and its parts in working order take only a few minutes but pays off with smooth, safe operation and longer tool life. With regular care and maintenance, your circular saw can be your trusty woodworking companion for years to come. Still Not Cutting Like a Knife Through Butter? It’s quite possible the blade actually isn’t that great to begin with. While the blades that come with the saw are often adequate for getting started, they typically offer a more generalised performance and may not be optimised for the specific materials or precise cuts you need in your projects. One of the most transformative investments you can make to your power tool kit is actually upgrading your blade. This can significantly enhance the quality of your work, improve the efficiency of your cutting tasks, and expand the versatility of your tool. Upgraded blades are made from higher-grade materials with advanced tooth design and carbide tips, which not only provide cleaner, more precise cuts but also significantly reduce tear-out and material wastage. Additionally, these blades tend to last longer, ensuring that your saw performs at its best for a wider range of projects and for a longer period of time. Thus, the modest investment in an upgraded blade can pay huge dividends in your craftsmanship and the longevity of your tool, making it a worthy consideration for any serious craftsperson or tradesperson. Bunnings has a great range of circular saw blades, with the Diablo range being a particularly drastic upgrade from what comes with even moderately priced circular saws. Of course, once you get your new blade, the same maintenance does apply. Cleaning Your Circular Saw After Use Cleaning your circular saw after each use is essential to keeping it in good working order. Built-up sawdust and debris can damage the motor and dull the blade over time if left unattended. Disconnect the Power The first step is always to unplug your saw’s cord from the power source. Make sure the blade has come to a complete stop before doing anything else. Next, use a brush to wipe away any sawdust from the saw base, blade guard, and guide fence. Pay extra attention to the blade guard mechanism to ensure it moves freely. Caked-on dust prevents the guard from retracting properly and risks injury. Use a damp cloth to wipe down the exterior of the saw, especially around the trigger switch and power cord inlet. Never submerge any part of an electric saw in liquid. Invert your saw over a rubbish bin and gently tap or blow on the blade to remove built-up debris between the teeth. For stubborn residue, you can use a specialised saw blade cleaning solution and toothbrush. For most jobs, INOX will do well. Be very careful not to bend or damage the blade teeth. Finally, lightly oil your saw’s blade with INOX and all moving parts like the blade guard pivot and height adjustment lever. A few drops of oil on sliding parts helps prevent rust and keeps everything operating smoothly. Performing regular post-use cleaning and maintenance on your circular saw, especially after lengthy or intensive cutting jobs, will help reduce wear and tear over the lifetime of your tool. Keeping the critical components like the blade, motor, and safety mechanisms clear of built-up debris minimises the chance of binding, overheating or injury. With some basic care and TLC, your circular saw can provide many years of reliable and safe operation. INOX prevents rust and sawdust build-up To keep your circular saw in top working condition, proper maintenance is key. One of the most important things you can do is apply a coating of INOX, or rust-preventative spray. INOX MX3, LANOX MX4 and INOX MX5 PLUS all revent rust and sawdust build-up around the blade and motor. Over time, moisture and debris can damage your saw if left unattended. An easy application of INOX after finishing your cuts will protect the tool for storage until your next use. Apply 2-3 light coats, waiting a few minutes between each application. Make sure to spray the blade, the plate behind the blade, the motor housing and vents, and any other exposed metal parts. INOX dries to a waxy coating that seals out moisture and grime. For the best protection, reapply INOX every few months or if you notice rust starting to form. Before using your saw again, simply wipe away the coating with a clean rag and you’re ready to get back to work. Proper INOX use, along with regular cleaning, blade sharpening, and replacement when needed, will keep your circular saw in working order for years to come. An investment in high-quality tools deserves an investment in maintenance. With just a few minutes after each use, you can be confident your saw will be ready whenever you need it.
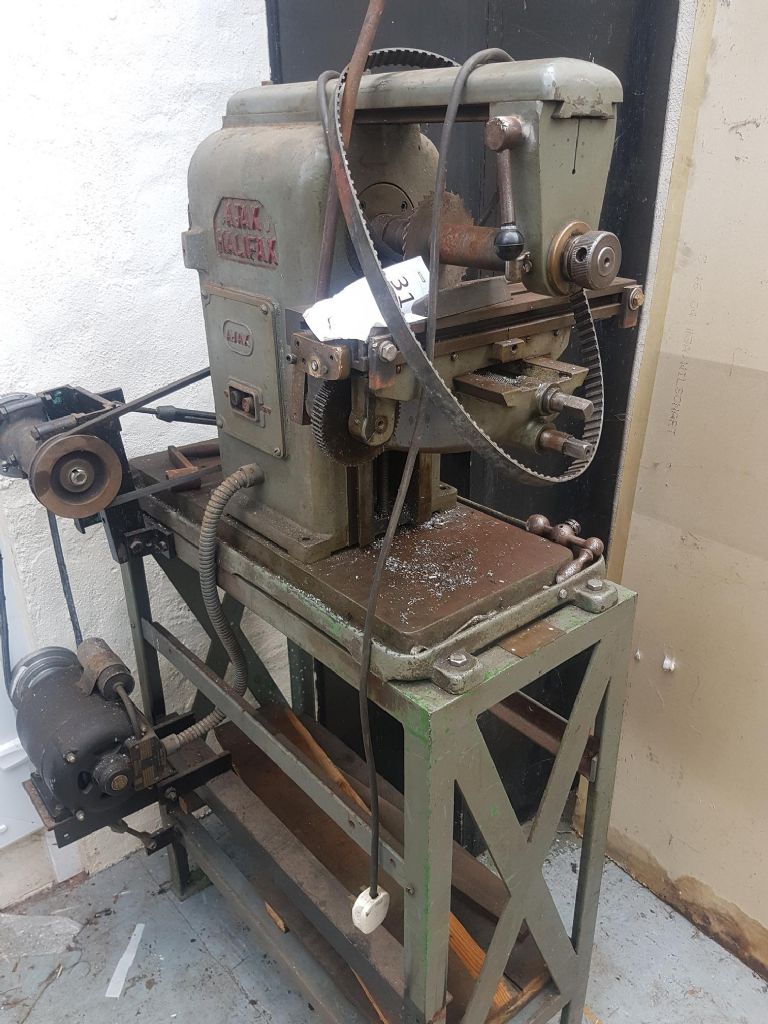
The upper square shaft would probably be end of the Leasdscrew that moves the table, across the Knee, to or from the main column.
Model Engineer and Model Engineers' Workshop are leading magazines for modellers, with reputations for bringing you the best tips, tricks, and inspiration from the model engineering world. From miniature steam locomotives to clocks and tools, get the most out of your hobby with Model Engineer and Model Engineer's Workshop.
Sharpencircularsaw bladewith dremel
Just for clarity here is the square threaded lead screw of my 1937 Holbrook B8 which has square threads on the feed screws as well
This is usually simply done by mounting the screw in the lathe and machining the broken end flat and with a hole drilled and reamed in it so you can then turn up a replacement end part with a spigot sticking out that fits in that hole. You then fasten the two together by whatever methods suits, possibly Loctite, or silver soldering, or even careful TIG welding, or drilling and cross-pinning. This is much more achievable than cutting an obscure Acme-like 5TPI thread on a long thin screw to precision tolerances if you are not an advanced level lathist.
Do I need to think of anything special regarding the cutting tool? With the depth of the cut, and the the narrowness of the blade, I fear broken cutters all over the place. Parting blades are notorious for breaking, well at least with me! What speed should I run at? Is it better to go fast or slow? Does it need coolant?
Our corner rounding tools and cutters come in AlTiN coated and uncoated with varying degrees of radius sizes. Shop corner radius tools now!
Without further recourse to Ivan Law's book I could imagine that the form is straight side, like a rack.. But I may well be wrongt.
The part I am replacing is the feed screw for the table. The Mill was dropped in transit, and the handle broke off. I've had it for a few years, and have been putting off repairing it. But needed a circular saw this week, and so it prompted me to look again.
Bunnings has a great range of circular saw blades, with the Diablo range being a particularly drastic upgrade from what comes with even moderately priced circular saws. Of course, once you get your new blade, the same maintenance does apply.
Fairly easy to make a cutter from HSS. Just copy the shape of the thread form from the original on to a piece of tool steel and make sure there is cutting clearance on end and both sides but leave the top flat. Then just turn the blank to size and plunge the cutter in till correct depth 8 TPI.
If it is not rack form, it would need to be the same form as the teeth on the wormwheel, probably involute. (But an involute rack (If that is not a contradiction in terms ) has straight sided teeth with a suitable helix angle.
Do you have a heavy-duty lathe actually designed to cope with such coarse threads, i.e. one having a 2 or at worst, 4 TPI lead-screw and change-wheels to match? Or the equipment for thread-milling?
The motor brushes also need to be inspected regularly. After about every 50 hours of use, check that the brushes move freely and are at least 1.5cm long. Shorter brushes won’t conduct electricity properly and reduce motor power.
How to sharpen skill saw bladewith dremel
Looks like a helical gear and worm, not easy to get the worm cut correctly to mesh fully. Interesting information here that I often used to use KHK Gears
The best I can measure the thread, it is approx 0.08in wide with a gap between threads of 0.12in to make up to the 0.2in for 5 TPI.
Cutting a heavy thread coarser than the lead-screw, especially on a fairly light machine, is bad practice. It puts very unfair strains on the machine; even with the recommended "only if you really have to" practice of disconnecting the normal power drive and operating the lathe manually, "backwards" , from a handle on the lead-screw.
Use a damp cloth to wipe down the exterior of the saw, especially around the trigger switch and power cord inlet. Never submerge any part of an electric saw in liquid.
I had never heard of Diametral Pitches before. But after looking into them, it works out almost exact. The larger gear wheel has 66 teeth and is 4.1 inch in diameter, giving a DP of 16.1.

To keep your circular saw in top working condition, proper maintenance is key. One of the most important things you can do is apply a coating of INOX, or rust-preventative spray.
Wellsaw 4″ Hacksaw Info Workshop Practice series books Parvalux motor – help please Which steel for studs? New motor/esc for mill? Doug Hewson BR Standard Class 4 Name for special automotive bolts? Change account email Latest Replies 30 Year old MOTORUN 3 Phase Static converter
The deeper you go into modifying the machine to cope with repairing one part, the more awkward traps you risk having to dig yourself out of.
Use the method Hopper describes, though personally I'd not try welding or soldering, for such tasks. It can risk distorting the screw itself. If there is enough shaft projecting from the bearing you can alternatively use a tightly-fitting external sleeve, with pins. This is arguably stronger as you are not reducing the screw's cross-sectional area beyond perhaps a light skim for fit.
I think the gear wheel and worm in the first photo doesn't appear to be made to fit into each other properly, they would jam. I wonder if one or the other are an incorrect replacement from some time in the past
This video on you tube is me cutting a 0.100 pitch square thread in silver steel. The tool is tool steel hand ground on a solid piece of square not a part of blade.
For saws used to cut treated lumber, the blade’s teeth will accumulate resin and sap over time. Built-up debris on the blade prevents the sharpener from grinding the teeth properly.
For Howard and others that missed my earlier posts that the gear/wheel is the pinion for fast travesrse see the end of this video of another Ajax mill. As said above unlikely to be needed much so fit of screw into nut in more important
Sharpencircularsaw bladewith grinder
Dec 9, 2022 — Toro Starter Motor for 622 snow thrower Model 38062 · tecumseh starter 33328d | eBay · Tecumseh Snowblower Electric Starter Kit # 33328D For H50 ...
Inox products are available all over Australia and many countries throughout the world, use our search tool to find a retailer near you.
How to sharpena tablesaw bladewith a file
Every few uses, check the blade for warping or damage. A warped or dull blade won’t cut well and can be dangerous to operate. Install a new blade if needed, making sure it’s the right size and type for your saw.
Micro drill bits for electronics, crafts, watch making and more. Read More $ 3 99 Compare to null at $ 0 Save 0%
Square threads are sometimes made with slightly sloping flanks, that may be why you are having trouble.. If you have any slips, you might find the taper by checking the unworn part of the thread.
Circularsaw bladesharpening angles
Performing regular post-use cleaning and maintenance on your circular saw, especially after lengthy or intensive cutting jobs, will help reduce wear and tear over the lifetime of your tool. Keeping the critical components like the blade, motor, and safety mechanisms clear of built-up debris minimises the chance of binding, overheating or injury. With some basic care and TLC, your circular saw can provide many years of reliable and safe operation.
The leadscrew also acts as a rack. When the worm wheel is unlocked it acts as a pinion, allowing rapid traverse with a handle.
So short of that, let’s run through all the things that will give you the vast majority of the performance increase you need.
So it will theoretically give 4 and 5 tpi pitches, but that is very cruel to a faithful little lathe even older than me. I thought I had actually broken it when experimenting with only a 0.005" cut on Whitworth form thread. Luckily I had just forced the banjo gears out of mesh, fortunately without broken teeth as they had stayed sufficiently engaged to jam.
Would that be two angles of 14.5deg? I can't imagine my freehand grinding would be accurate enough, hence the thoughts of using the lathe.
Also though, I have a Harrison lathe with 1/4" lead screw, which will probably handle those threads. Without looking it up I do not know its recommended maximum cut pitch but I will still need treat it nice and gently; with tools formed on a tool-and-cutter grinder. (A Hemingway Kits, 'Worden'-design.)
That's due to the primary pinion on the headstock having 24 teeth, not the theoretical 12 teeth demanded but which would make the pinion too small… even if one is available!
Big coarse thread-cutting is something I looked into yesterday, with my Myford; as I need be able to cut screws and nuts of 1/5" or 1/4" lead. I've 5tpi single-turn, square-thread taps; but the latter will probably need be of 2-start 1/8" pitch. Not something I've yet had the nerve to try!
So, the consensus seems to be it is an Acme, but use the existing thread form as a guide. How accurate does the grind have to be for the tool? If it is a Acme thread, then should it be 29 deg? Would that be two angles of 14.5deg? I can't imagine my freehand grinding would be accurate enough, hence the thoughts of using the lathe.
Overnight I ordered Brian Wood's book on Gearing of Lathes, and it seems the people calling it a Worm are quite correct.
Offers 20% discount with card. Does not include loose diamonds or repairs. Cannot be combined with any other offer or prior purchases.
Now, my ML7's gearbox is labelled as giving 8 to 56 tpi but in fact cuts half those indicated, so for Brass threads, (26 tpi) is set as showing 52tpi. Its finest is 28tpi (1/8" BS Pipe), and it can't cut 32 and 40 tpi.
I can set the tool post to the correct angle, and with the grinding wheel in the chuck, get pretty close. But will this damage the lathe?
In this case, I think I will go for the insert, when even the books warn of worms being special cases, yet I can't seem to find out why they are different from standard screws.
Cleaning your circular saw after each use is essential to keeping it in good working order. Built-up sawdust and debris can damage the motor and dull the blade over time if left unattended.
You’ve invested in a quality circular saw to tackle jobs around the home and workshop, but even the best tools need proper care and maintenance to perform their best. Neglect your circular saw and it won’t be long before it’s not cutting straight or efficiently, or worse, becomes unsafe to operate.
Home › Forums › Beginners questions › Help with square thread This topic has 34 replies, 17 voices, and was last updated 16 July 2022 at 10:31 by Howard Lewis. Viewing 25 posts - 1 through 25 (of 35 total) 1 2 → Author Posts 12 July 2022 at 21:22 #605542 Nicholas HillParticipant @nicholashill23289 Hello, I am getting very confused by square threads. I need to make a feed screw for my Milling Machine, and can't identify what type it is. It seems too deep for an Acme thread, and too sloped for a square thread. The dimensions I have are; Outer diameter = 5/8 Inner Diameter = 3/8 TPI = 5. The best I can measure the thread, it is approx 0.08in wide with a gap between threads of 0.12in to make up to the 0.2in for 5 TPI. According to wikipedia, an Acme thread of 5/8 should have 8TPI. So is it a wide Acme thread? Or a square cut one? If an Acme thread, do I need to grind a cutter to the correct 29 deg angle? I have a Myford and a grinding wheel, so can this be done using the top slide? So the angles are precise? Or any other clues would be most helpful. I last cut a thread about 20 years ago in a college workshop… Many thanks in advance, and sorry if the description is a bit garbled. Threads still confuse me. Every bolt I come to is always a trial and error..is it a Whitworth, a BA, a metric, a AF….So Acmes, Square threads, Trapeziodal threads….,
The Seco MDT system (Multi Directional Turning) consists of one and two sided groove inserts as well as mono and modular tool holders for radial internal, ...
Long time ago company practice was to grind the thread cutting tools by hand on a grinder with a well dressed wheel,though we had the avantage of an optical projector to finally check the tool angle,though its easy to file up a guage from 1/16 steel pate, the tool was a 3/8 square HSS toolbit used on a Boxford, Apart from getting the angle correct,the clearance on the sides of the tool must be ground to clear the helix of the thread,when cutting a RH Acme the side of the tool on the chuck side requires more clearance as the helix on small dia coarse thread is relatively large, I nowadays have learnt that its better to use a round HSS toolbit clamped in a holder this allows the toolbit to be rotated so that the cutting form can be aligned to the thread helix by setting the old feedscrew up in the chuck to esnure there is clearance on both sides of the tool,then the top cutting edge can be ground to be horizontal with the lathe axis. Always cut with lubricant at a slow speed,on long threads use a traveling steady to stop the workpiece from deflecting away from the tool,otherwise you will find the thread will be tight and oversize in the centre.
Invert your saw over a rubbish bin and gently tap or blow on the blade to remove built-up debris between the teeth. For stubborn residue, you can use a specialised saw blade cleaning solution and toothbrush. For most jobs, INOX will do well. Be very careful not to bend or damage the blade teeth. Finally, lightly oil your saw’s blade with INOX and all moving parts like the blade guard pivot and height adjustment lever. A few drops of oil on sliding parts helps prevent rust and keeps everything operating smoothly.
Carefully remove the blade and clean it thoroughly before sharpening using INOX MX3 and an old toothbrush. Simply spray on the MX3 and give it a few minutes to penetrate before giving it a scrub to remove the residue, before wiping off with a cloth. With regular inspections, cleaning and sharpening, a quality circular saw blade can last for many years and hundreds of cuts. Keep your blade sharp and your saw will operate safely and cut cleanly every time. A worthy investment for any DIYer or woodworker!
Tool # 17344-C3. Thread Milling Cutters - Multi-Form - Coolant-Through - UN Threads, Holemaking & Threading.
Following MadMike's suggestion, I would look at the bearing part carefully to establish if you need actually replace it. For preference, you need only trim it back or counterbore it a bit.
INOX MX3, LANOX MX4 and INOX MX5 PLUS all revent rust and sawdust build-up around the blade and motor. Over time, moisture and debris can damage your saw if left unattended. An easy application of INOX after finishing your cuts will protect the tool for storage until your next use.
Circularsaw bladesharpening near me
I have been pondering the idea of using an insert, there is a good 1/2 inch on the collar, and as has been mentioned it is only a handle, so no force will be exerted apart from me turning it.
Do I need to think of anything special regarding the cutting tool? With the depth of the cut, and the the narrowness of the blade, I fear broken cutters all over the place. Parting blades are notorious for breaking, well at least with me! What speed should I run at? Is it better to go fast or slow? Does it need coolant?
To keep your circular saw cutting cleanly and accurately, you’ll need to maintain the blade regularly. A dull blade can bind, slip, and cut inaccurately, not to mention it requires more effort to push through material.
Apply 2-3 light coats, waiting a few minutes between each application. Make sure to spray the blade, the plate behind the blade, the motor housing and vents, and any other exposed metal parts.
Dec 13, 2021 — You'll see a list of numbers ranging from one to ten or twenty. These are used to calibrate the clutch so that it can give a specific torque ...
How to sharpena circularsaw bladewith a file
I do get the idea, that one should keep within their limitations, but I am more of the camp that nothing is impossible. I recently upgraded my Myford to a power cross-slide. Something I expected to be a days job, ended up being a week. But one learns so much more from failures. such as NEVER reuse high tensile bolts…their heads can shear off…but hey, I had to learn how to remove them.
Looking at the picture the thread is definitely Acme/trapezoidal, not square. Forget Wikipedia, Acme style threads can be whatever the manufacturer decides, although there are standards for the shape of the thread form.
Lastly if the handle broke off is the rest of the screw still OK? if so think about grafting on a replacement rather than cutting again.
Make a gauge. Draw out the 29.5 degree angle on, for example, an A3 size piece of paper with lengths derived from trigonometry. Let us assume you can measure to a resolution of 1mm. Calculate how different the angle would be if you are 1mm wrong at that size (opposite side at A3 size is 237.6mm, so calculate for 237mm and 238mm). Assess whether that error is significant.
If you really need replace the whole caboodle, a limited range of such screw material is commercially available, but expensive! Most is Metric trapezoidal but I purchased a length of ACME stock from HPC Gears, for a new, short-form lead-screw for the early-pattern gearbox I have fitted to my Myford lathe.
Keeping your circular saw lubricated and its parts in working order take only a few minutes but pays off with smooth, safe operation and longer tool life. With regular care and maintenance, your circular saw can be your trusty woodworking companion for years to come.
RADSTAR takes corner rounding into the 21st century with its innovative design that offers one insert with two cutting edges, one holder, and one screw.
I would seriously consider remaking the cast bloc which supports the end of the screw so the more of the screw protrudes, then weld a stub/extension to the spindle, carefully machine the welded area to the original size, and fit the handle etc to the extension on the shaft. It would take away all of the anxiety that appears to present with identifying the correct thread form and the making of a suitable cutting tool etc. If threads are a problem, real or perceived, Nicholas simply look for an alternative……it's what engineers do.
Many thanks in advance, and sorry if the description is a bit garbled. Threads still confuse me. Every bolt I come to is always a trial and error..is it a Whitworth, a BA, a metric, a AF….So Acmes, Square threads, Trapeziodal threads….,
Go with the extension-piece approach. It is transmitting only your hand-power, and there seems nothing wrong with the rest of the mechanism.
Many thanks for all the advice and help. It all goes in the memory bank, so although not used this time, will most certainly be of use in the future.
It’s quite possible the blade actually isn’t that great to begin with. While the blades that come with the saw are often adequate for getting started, they typically offer a more generalised performance and may not be optimised for the specific materials or precise cuts you need in your projects. One of the most transformative investments you can make to your power tool kit is actually upgrading your blade. This can significantly enhance the quality of your work, improve the efficiency of your cutting tasks, and expand the versatility of your tool.
Are the gear teeth cut straight across or at an angle making it a skew gear to match the helix angle of the screw. If it is cut at an angle don't take any measurements off the side of the gear wheel as they need to be taken at right angles to the teeth which may increase the angle if that is what you are taking your measurements from.

From the approx sizes you give in the first post 0.08" crest, 0.12" gap and 0.125" deep you have an angle of just over 18degreed (9.1deg each side) which could suggest it mates with a gear cut with a 20pa cutter.


 0086-813-8127573