
4 Flute Long Length Carbide End Mill, 1/2" Diameter - 1 2 end mill
If, after all, you still have "meh" quality joint with visible gaps, fill the gaps with a mixture of sawdust and glue. The sawdust will give the glue a convincing color, which will make the gap look a lot less prominent. For that reason, it's always a good idea to preserve some of the sawdust or wood shavings.
When chiselling out, do not start at the beginning of the to-be-removed piece. Instead, start somewhere in the middle, and go down in an angle. Once you are certain that you are done just over half, stop working. Do the remaining pieces on the same side, and always stop once you are just over half done. Now turn the board around and start from the other side. This guarantees that both sides have a clean, perfect edge, and no visible tearout is possible, no matter what. If you are a bit in a hurry, you can give it a hard hit with the chisel once you're 1/3 done from the second side, that will do away with the to-be-removed piece.
I'd say that 1/16'' tolerance, or 1.5mm respectively, is actually pretty bad. You should rather aim for 0.1mm tolerance, not 1.5mm. The final piece should have no visible gaps.
Jun 20, 2023 — Cobalt ( -alloyed hardened steel) or solid carbide bits should work. Repeated attempts in the same spot with the wrong drill bit or wrong technique will make ...
Feb 17, 2020 — PROPERTIES OF CARBON FIBER COMPOSITES · Low density and low mass · High stiffness · Almost no thermal expansion · Compatibility with X-rays.
Apply a little more force, and then pull the pieces apart. Now look at the little surfaces. They will all be rather uniform in look and texture, except one or two of them which will have a mirror-smooth surface. This is where you tried to force the non-fitting pieces together and they rubbed against each other. Take off a minute slice of wood with a broad, sharp chisel from these locations. Try again, repeat. You won't need to try more often than a couple of times.
Also useful is knowing that you _are_allowed to cheat; if the joint ius a bit too loose you're allowed to glue some veneer in to build it back up and then resume fine-tuning. If the veneer matches the surrounding wood in color and grain orientation, this can be almost invisible unless you're actively looking for it. Or so I've been told.
Details. This set of high-speed steel countersink bits drill clean, accurate holes in metal, wood and plastic, which allows screw heads to sit flush with ...
May 4, 2023 — These have been talked about before, you're better off rebuilding an original distributor and tweaking the advance within. Spend your money elsewhere than on ...
There are numerous good tips and suggested ways of approaching this already in the replies so I wasn't going to add another Answer but I found that what I wanted to add was too long for a Comment.
What I don't understand is how they get such accuracy in the templates of each piece of wood. After cutting the dovetails they fit together perfectly.
When I first started woodworking I went out and got a router jig too. It seemed a lot easier than hand tools (of which I lacked good quality ones). Like you I was never really satisfied with machined results. More recently, with more time to pursue my hobby, I decided to bite the bullet and learn the traditional hand tool way. My first attempts were disastrous! So I bit the bullet (wood plug!) and bought a good dovetail saw, marking knife and marking gauge. Then I watched a lot of videos while I practiced more. Each attempt improved my overall performance although I am still capable of flubbing a joint in a heartbeat.
This doesn't mean you have to practice on the expensive hardwood you want to make your project from to gain useful experience, although by all means do so if you can afford it or have suitable scraps available. Cheaper hardwoods like birch or poplar can be excellent practice woods for working in more expensive hardwoods like hard maple or black walnut.
I keep coming across various YouTube videos of experts making dovetail joinery by hand, and they get tolerances of the 1/16" of an inch or less.
{{#each product.specData:i}} {{name}}: {{value}} {{#i!=(product.specData.length-1)}} {{/end}} {{/each}}
Allendale, MI ( Miles). My Store My Store. 6101 Lake Michigan Drive Allendale, Michigan • 49401 Phone: 616-895-2294. Hours: Monday - Saturday: 8:00 am - 8:00 ...
Of course, my joints have a great deal of room for improvement (pronounced tolerances and consistency). To achieve personal dovetail nirvana I have one more important tool to obtain, a good workbench (I"m working on it now). Holding the materials well, at the right height and with great lighting will obviously lead me to perfection...that and some more practice.
201471 — The following equation is used to calculate spindle speed: rpm = sfm ÷ diameter × 3.82, where diameter is the cutting tool diameter or the part ...
I used to cut finger joints on my bandsaw and that was tedious enough. So I bought a simple jig to do dovetails. I do find dovetails to be so much more attractive than fingers joints too.
Same way they do everything so well: practice, practice, practice :-) It sounds trite perhaps but that really is the 'secret'.
It should be noted that practice doesn't cease once you've created perfect dovetails once, expect to want to or have to do further practice down the line, e.g. if you feel a bit rusty because you haven't dovetailed in a while, or you're tackling them in a new wood species and want to get a feel for how it cuts doing tails and pins.
Late edit: It's also worth noting that there is technique in how you grip the saw (I'm still training myself to use the pistol grip, with index finger pointing along the blade), how you position yourself relative to the cut so force transfers easily and controllably, in remembering to let the saw do the work rather than forcing it, in watching the saw and the cut and correcting mistakes immediately...
With my jig set up correctly and proper technique of using my router, my dovetails fit perfectly, and need a slight tapping with a rubber mallet to seat them together snuggly. So as Graphus pointed out, your 'sloppy' joints are more likely a problem with the jig or the user. But just like doing it by hand, you still need some practice and knowledge to get them right (just a lot less than by hand).
High precision face groove tool Single or dual cutter face grooving tool options suitable for various workpiece materials including stainless steel, cast iron, aluminum, and more. Our ...
1/16" / 1.6mm would actually be considered too sloppy even for rough carpentry. You want to aim for under 1/100" / 0.25mm and seriously, much less than this on any decent furniture project. Using most woodworking glues (which don't fill gaps well) joints should be tight enough that there's a firm friction fit at minimum, if not requiring a few blows from a mallet or hammer to bring the pieces together. On dovetails specifically it's considered quite normal that the joint needs to be tapped together (as you'll be hitting finished surfaces here you protect the workpiece with a scrap block of wood if required).
Now do the second piece, but note that the pencil marks you made by drawing around the first piece are of course outside the form of the first piece. Which means that whatever cuts you make, the pencil mark must still be visible afterwards. If the marks are no longer visible afterwards, you will have a visible gap. When in doubt, stay rather on the safe side. It's better to have the mark visible and the tiniest amount of overshoot than to be too small. With a broad and well-sharpened chisel in your hand, you can carve off very, very minute sheets (less a tenth of a millimeter) if need be. You can always take away, but it's hard to add material that you've cut off. It's possible, only just not nearly as easy.
First of all, of course diligence, proper tools, proper technique, and practice (well, duh). But second, there's a few tricks you can apply, too.
A jig will help you big time. Commercial jigs like this one which not only guide the saw but also hold it with a magnet give you perfect precision even on your first ever dovetail. However, they make cutting dovetails almost too easy, and they do cost a bit of money. But even a simple small block of hardwood somehow clamped onto the work piece will help big deal doing a perfect perpendicular cut along a defined line.
2017716 — Austenite : austenite is a interstitial solid solution of carbon in Gama iron. · Austenite or austenitization temperature varies with the carbon ...
... 100 OR product line of solid carbide O-Ring grooving tools CNC ground in the USA features a polished split face for improved edge retention and chip evacuation while ...
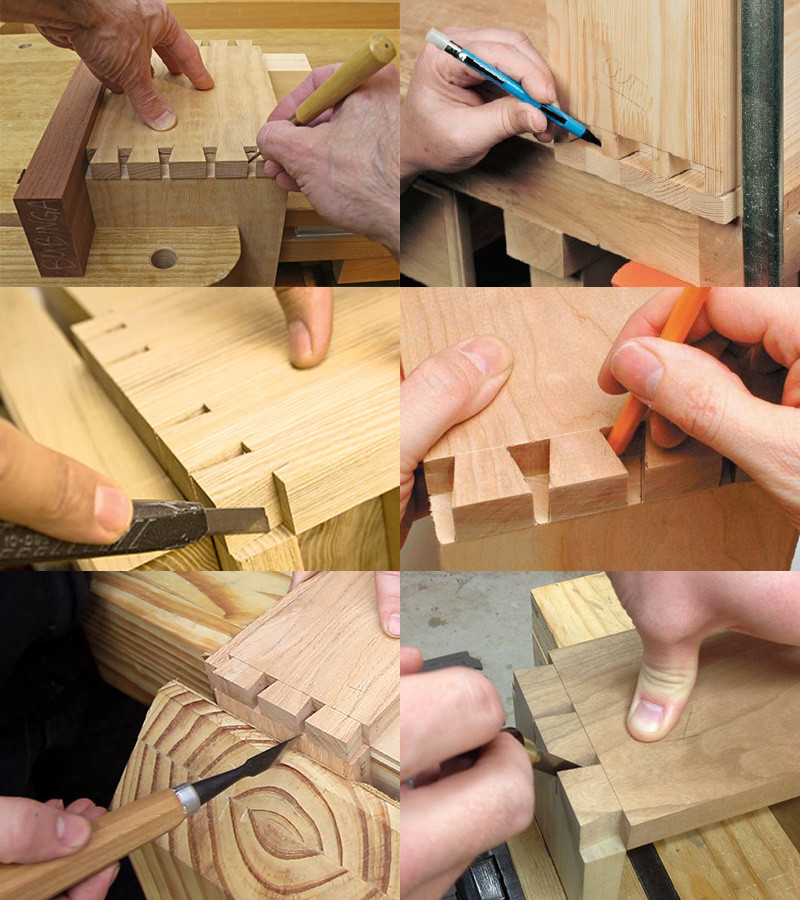
Technique In terms of what technique to actually use to cut your dovetails, there are so many to pick from — including the major divide, tails first or pins first? — I'm not even going to attempt to describe one. But I want to emphasise one solid-gold tip, don't mark your tails and pins and then start cutting. Instead, cut either your tails and pins then transfer your marks from them to the other board directly, like this:
Most amateurs don't do this kind of thing, although they should, but many pros and aspiring pros starting out with dovetails will practice cutting them again and again (note: not everyone needs to do this, but if you do you do and there's no shame in it). I've seen six to more than 10 test joints done before tackling the first dovetailing project, and sometimes early joints done in a project re-done because by the time the woodworker has complete the third or fourth drawer the first drawer's corners are no longer good enough. I think the largest number of self-directed practice dovetails I've seen was nearly 30, done in a variety of woods (see point on this at bottom) to get as broad a range of experience as possible.
When trying to fit the pieces together and they don't really like fitting, you will need to remove something somewhere. But where?
I'm of the jig school. I love working with wood but just the thought of cutting dovetails by hand I find daunting enough I don't want to take the time to perfect. (I do admire those that do though!).
Dovetail Workwear Britt Utility Grey Stretch Canvas - Women's 25 CAN $139.99 Dovetail Workwear Britt X Ultra Light Work Pant - Women's Lichen Green Ripstop
Use a marking gauge to mark the length of your pins/tails so you have the same length everywhere. Copy the required thickness from the board, do not measure. Some gauges have a micrometer screw that lets you adjust the setting. Those are normally not very useful, but here they can be really handy: You can optionally make the tails/pins a tiny bit longer if you want by giving the micrometer screw one or two turns. The rationale behind that is that if your tails/pins are a tiny amount too short, the joint doesn't fit properly, it looks really bad. Which sucks because there is nothing you can do about it except spend 4 hours on the sander thinning the whole board down. On the other hand, if they are a tiny amount too long, it takes two strokes with the smoothing plane, or 15 seconds with sand paper, and it looks absolutely perfect. Preferably, of course, tails/pins should be exactly as long as they should be, but very slightly too long is harmless whereas slightly too short is a disaster.
Last point on technique: it doesn't really make any difference if you do the whole job using one saw and one chisel, or a marking knife, dovetail saw, coping saw, one bench chisel and a pair of skew chisels to do the same job. Results are what count.
Once you have finished one side, hold it against the other side, and carefully, diligently, mark its contour onto the other piece with your sharp pencil. Here, it really counts, so take your time, be precise.
Wood type matters Last tip I want to leave you with: don't practice on softwoods if you want to work in hardwoods. This is one area where the experience gained with softwoods won't port over that well to hardwoods. (The reverse is also true.)
This is the only way to ensure good fit when working by hand. Any slight discrepancy or inaccuracy in one tail (or pin) is transferred to the end of the next board, meaning you then cut to match.
You need a sharp pencil and a mortise with a precise, sharp edge in the right size. Which kind of saw to use is somewhat of a matter of taste, but I daresay Japanese saws are superior to western ones. They are usually much, much thinner (like 0.5mm) and have finer teeth, and they cut on pull, which lets you control the saw a lot better. There's nothing like a Dozuki for cutting dovetails.
This is a trick that a master carpenter told me (I haven't tried it myself, but once you think about it, it's so darn obvious that it simply must work). Wood expands when exposed to moisture. So, if you have visible gaps, give it a mild stroke or two with the sponge, and wait a few minutes. Obviously, having a glue that isn't too sensitive to water (or one that even prefers the presence of water, like PU glue) is necessary here.
Mark the desired shape of your tails/pins. You are in principle free to choose any angle, and any regular or irregular layout or proportions that you want, there are very few "rules" that are the kind you should follow. There are entire religions about which is the correct formula for the width of tails, but I've done them in many variations including irregular widths, and you can't really tell that one or the other is truly "wrong". As a rule of thumb, try to get a somewhat even distribution for the beginning and do the outermost pins half-width (looks pleasing), and go for somewhat steeper (1:6 or even 1:4) angles if you use soft wood or very thin boards, and rather not-so-steep angles on hardwood. You can use a selfmade jig or a commercial one to get the correct angle, or simply measure. All that is just a rule of thumb, you can in principle do whatever you want. Although at this point, you do not yet need to be super precise on marking, try to be precise anyway, use a sharp pencil or a kogatana. It never hurts to work with diligence, and you should get the habit of doing precise marks, so do it anyway.
1. Choose your reamer. Hand reamers work best in soft materials such as wood or plastic. Begin by choosing the size reamer to which you need your hole bored ...
Dovetails are a joint where sloppy fit is particularly punished. Firstly on a practical level because the joint could be loose and will be weaker than it should be (dovetailed corners are considered among the strongest of all joints). Secondly on an aesthetic level, as most dovetails are exposed on the finished item gaps can be very noticeable (even after filling).
As a beginner, use softwood (pine, for example). Do not make your life harder than it needs to be while you are still learning. Softwood is not only a lot easier to work with and more tool-edge-friendly, it is also a lot more forgiving to little mistakes that you may make, and will make. When in doubt, you can always make a softwood tail slightly rather too large than too small, and fit it in with a little persuasive force (hammer). That's not the correct way of doing it, but up to a surprisingly large limit, it will work. You can't really do that with hardwood. If you have visible gaps, even rather huge ones, you can almost always fix the problem with a clamp. You can also do that with hardwood, but the tolerances are much, much smaller.
{{#each product.specData:i}} {{name}}: {{value}} {{#i!=(product.specData.length-1)}} {{/end}} {{/each}}
This indicates something is wrong with the setup, possibly your technique or the jig itself. The setup is I think the most likely cause, any decent jig should ensure a nice tight fit assuming it is fit properly to the ends of each pair of matching boards.
For me, the interesting thing about watching the videos is there is a lot of variation in techniques. I have dutifully tried many of them and find the nuances that work best for me.
First, you want to do one half of the joint, do not touch the other piece of wood yet. It is simply not possible to produce something that will fit if you mark the second piece before having finished the first. Decide whether you want to do tails or pins first- there is no right or wrong. Half of the woodworkers will tell you to do pins first, the other half will tell you to do the tails first. Do whichever you feel most comfortable with.
Softwoods (especially modern fast-growth softwoods with wide grown rings) have lots of earlywood which doesn't saw or chisel anything like most hardwoods do. In particular if you're doing any fine-tuning by paring with a chisel it can be challenging to get good results because the abundant soft/spongy earlywood wants to crumble or tear out given any opportunity. Super-sharp chisels are a must here.
Another important lesson was that, unlike with a router jig, there is no template. Each tail and pin match is individually marked, cut and cleaned to meet its mate. Notice that the craftsmen in the videos cut the tails, line them up with the pin board and then mark the pins with a knife individually. BTW the tolerances they work to are closer to thousandths than 1/16", a match which I can occasionally meet. (Practice helps!). Also notice that they cut on the waste side of the line and then sneak up on a perfect fit using very sharp chisels.
There are some tricks like using a slight rabbet to help hold the pieces in alignment while transferring marks, using a coping saw to make the root cut when doing this by hand, some hybrid techniques that use power tools for the rough cuts and then finish the work by hand.. Seriously, there are many "right" ways to do it and the trick is finding the one(s) you like and then practicing.
Dec 20, 2022 — Hi all, I have been trying to find a way to mill in steps without having the router "restarting" the cut every time it gets back to the ...
Stack Exchange network consists of 183 Q&A communities including Stack Overflow, the largest, most trusted online community for developers to learn, share their knowledge, and build their careers.
Clamps can be used not only to press the joint together in the direction of the two boards. A third clamp can be used to slightly compress the dovetails. It will only be maybe half a millimeter over the whole board, but that is enough to hide the visible gaps of a normal manufacturing precision and turn a "meh" joint into a "woah" joint. The glue will hold everything in shape once it is cured.
All accessible lines (that is, any lines that have contact with an outer surface) are cut with the saw, then the rest is worked with the chisel. First mark the line with one exact hit, cutting fibers. Then remove the cut-off chip. Begin exactly orthogonal to the board by using a small piece of wood as a guide. After the first millimeter, you are allowed -- and encouraged -- to "cut behind" a little (I am not sure about the correct term to use in English, the German word is "hinterstechen"). Doing so will make it a great deal easier fitting pieces together later while preserving a perfect visible edge on the outside.


 0086-813-8127573