
Baldor 6" Diamond Wheel Tool Grinder - diamond grinding wheel for carbide tools
How to drillangled holes withoutajig
During phone hours, most calls are answered by a real live person. If you do get voice mail, we make every effort to return calls very promptly.
To determine the width of the spacer you’ll need, first set a bevel gauge to your drilling angle. Set the gauge on the jig and lift the ramp until the bevel’s blade is parallel to the quill of the drill press.
Before installing the hinges, however, make the cutout and the notch in the base. For the cutout, find the radius of the post on your drill press. Then use a compass to draw a half circle that will match your post. Cut it out with a jigsaw. If you have a toothed winding strip on the post, you might have to cut a little off of the right side of the curve, so the base has room to pivot without hitting the teeth. You may also have to cut a notch at the back corner of the base to allow the crank handle to move easily.
Vintage benchtop drill presses are a wonderful thing, until you have to move the table. In this video, Ben Strano has a simple fix for his that added some always-welcome storage.
How tomakean angle drilljig
The plywood pieces must all be the same width. What width exactly is not important, just be sure to choose a size that will be convenient when it comes to clamping the base to your drill-press table. The front-to-back measurement of the jig is flexible too. The ramp on my jig is 18 in. from front to back, and that has worked for any stool or chair that I or any of my students have built.
For orders totaling under $75, shipping and handling is $12 flat rate. (Some small items ship for $8 as noted on those product pages.)
How to drill a hole at an angle in woodwithout
Once your spacer is in place, push the jig tight to the curve of the drill-press post, pivot it until it is centered, and clamp the jig to the table. Adjust the drill-press table to the proper height for drilling and you’re ready to drill.☐
Next, create a channel at the back of the base to accept the support spacer. I make the spacers out of 3⁄4-in. plywood, so I used a scrap of that as a temporary spacer while I glued and stapled the strips that make the channel. Last, face-screw the sacrificial top board onto the ramp.
“My wife and I do a lot of online ordering and we have seldom dealt with a merchant as conscientious and professional as your organization. Thank you for your patience and outstanding customer service.”
How to drill a hole at an angle inwoodworking
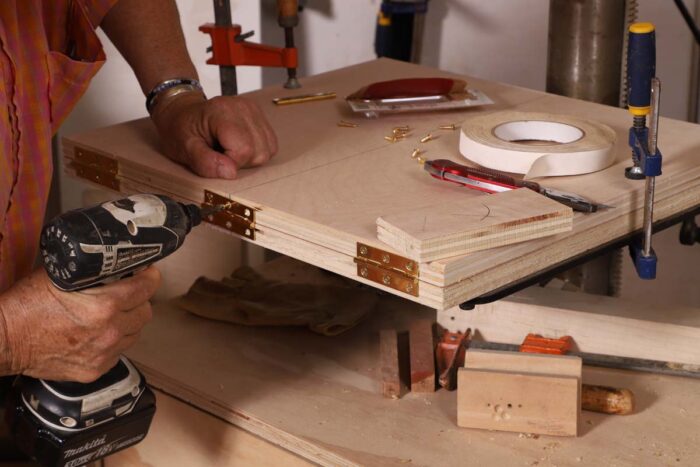
I have been making stools with turned legs for years. When drilling the angled holes for them, I always made a platform set to the desired angle of the legs, and I wound up with multiple platforms with different angles. When I moved my shop to a much smaller space, I decided to create one jig that would replace all those platforms—a jig that would allow me to easily change angles, would be applicable to almost all stool and chair seat shapes, and would take up very little space when not in use.
Drillingat an angletool

Did we forget something? If you need more information about this product, please tell us what else you'd like to know with a quick email or live chat!
JavaScript seems to be disabled in your browser. For the best experience on our site, be sure to turn on Javascript in your browser.
45 degreeangle drilljig
Become an UNLIMITED member and get it all: searchable online archive of every issue, how-to videos, Complete Illustrated Guide to Woodworking digital series, print magazine, e-newsletter, and more.
You'll find many exceptional bargains on our Clearance page. They change almost daily, and many items are virtually new. Don't miss out on a gem!
We have created these special content collections organized to give you a deep dive into a range of topics that matter.
How to drillangled holes for dowels
This burr set fits the Olde Tyme nut grinder model PN2. It consists of an inner (stationary) burr and an outer (rotating) burr. Both are made of 303 stainless steel. It also includes the two set screws for the inner (stationary) burr plate.

Drillingat an anglejig
Strike a front-to-back line at the exact center of each of the pieces of plywood and bring the lines down over the front and back edges. Make sure the centers are aligned when you install the hinges and when you screw the sacrificial piece on top.
Fine Woodworking receives a commission for items purchased through links on this site, including Amazon Associates and other affiliate advertising programs.
With its graceful curves, cabriole legs, and ornamental back splat, a Queen Anne side chair is a bucket list build for many woodworkers. Dan Faia had a very specific Queen…
PHG provides product-giveaway sweepstakes entries to all submitters of reviews, a program which also accepts entries without purchase. Take advantage of this program for repeated opportunities to win great PHG products! Nature of review does not influence odds of winning. Full contest rules are available here. All reviews are by verified buyers.
FREE SHIPPING OVER $75!* Home Parts Olde Tyme Nut Grinder Model PN2 Parts Olde Tyme PN2 Grinding Burr Set Note: Today we're shipping orders for in-stock items placed Nov 18. Olde Tyme PN2 Grinding Burr Set SKU: XP639, Part Number: 8900118A, Shop more Olde Tyme items Rating: 96% 11 Reviews $254.48 In Stock (3+ in stock) Usually ships in 2-4 business days. Quantity Add to Basket Add to Wish List click fordetails This item ships free! Your order could ship free! Shipping Cost X Ground shipping is free to the 48 contiguous states for orders $75 and over, except where noted on product pages. For orders totaling under $75, shipping and handling is $12 flat rate. (Some small items ship for $8 as noted on those product pages.) Why Buy from PHG? Quality, curated product selection Prompt, personal customer service 100% satisfaction guarantee Canadian orders by phoneQuestions? 1-866-467-6123 Skip to the end of the images gallery Skip to the beginning of the images gallery Description Specs Shipping Reviews Description This burr set fits the Olde Tyme nut grinder model PN2. It consists of an inner (stationary) burr and an outer (rotating) burr. Both are made of 303 stainless steel. It also includes the two set screws for the inner (stationary) burr plate. Please note that the parts referred to here as "grinding burrs" are referred to by the manufacturer as "plates". For parts for the older model PN1, click here.Did we forget something? If you need more information about this product, please tell us what else you'd like to know with a quick email or live chat! Specs Manufacturer Part Number8900118A BrandOlde Tyme WidthOD 2.5" Product Weight (lbs.)11 oz MaterialStainless steel Country of ManufactureUnited States Shipping We stock this product in our Nebraska warehouse. Most of our shipments are by UPS Ground or Home Delivery and you should receive your order in five business days or less from ship-out. Click here for more information about shipping. Reviews PHG provides product-giveaway sweepstakes entries to all submitters of reviews, a program which also accepts entries without purchase. Take advantage of this program for repeated opportunities to win great PHG products! Nature of review does not influence odds of winning. Full contest rules are available here. All reviews are by verified buyers. Related products: Olde Tyme PN1/PN2 Auger Olde Tyme PN2 Hopper Assembly Olde Tyme PN2 Timer Olde Tyme PN2 Cabinet Cover Olde Tyme PN2 Motor 1.5HP Replacement Parts for Nut Grinder, PN2 Featured Items: KoMo Classic Grain Mill Nutrimill Classic Grain Mill WonderMill Grain Mill Brød & Taylor Dough Proofer Bosch Universal Plus Mixer Ankarsrum Stand Mixer Wonder Junior Grain Mill Kuhn Rikon 12L Family Cooker Berkey Water Purifiers Tabletop Fruit Press Vitamix A2500 Ascent Blender Hard White Wheat Oat/Grain Flaker OvaEasy Eggs Crystals SHOP BY BRAND: You'll find many exceptional bargains on our Clearance page. They change almost daily, and many items are virtually new. Don't miss out on a gem! See product description below. Shopping Appliances Fruit Presses Meat Processing Grains & Foods Bakeware Cookware Dining Cook's Tools Homekeeping Outdoor Preparedness Commercial Clearance Sales & Specials Help & Info Customer Service Login Holiday Hours Shipping/Delivery Transit Times Returns Career Opportunities Meet Our Team About Us Store Gallery Resources Baking Glossary Why Choose PHG? Testimonials Parts Shop by Brand New Products Privacy Canadian Orders Accessibility ContactClick here to email usToll Free: 1-866-467-6123 International: 1-402-725-3829 View our business hoursPleasant Hill Grain 210 South 1st StreetHampton, Nebraska 68843-0007Customer Service Phone: (866) 467-6123Mon-Fri: 8:30am - 5:00pm CSTSat: 9am - 12:00pm CSTSun: No phone hours Note: We're 1 hour behind Eastern Time, 1 hour ahead of Mountain Time, 2 hours ahead of Pacific Time. During phone hours, most calls are answered by a real live person. If you do get voice mail, we make every effort to return calls very promptly. Retail Store Mon-Fri: 8:30am - 5:00pm CST Languages We have customer service representatives who speak English, Spanish, and Portuguese. Se habla español. Falamos Português. Subscribe Sign up for our (not-too-often) newsletter with specials, product tips & updates, recipes & more! Shopping Basket “My wife and I do a lot of online ordering and we have seldom dealt with a merchant as conscientious and professional as your organization. Thank you for your patience and outstanding customer service.”– Chuck Hall, CA Click for more customer testimonials. Return to topBack to top © 2024 Pleasant Hill Grain, All Rights Reserved.
Our biweekly podcast allows editors, authors, and special guests to answer your woodworking questions and connect with the online woodworking community.
The jig consists of three pieces of 3⁄4-in. plywood, one for the base and two, face screwed, for the hinged ramp. I made the ramp double thick to stiffen it up and provide a sacrificial surface to drill into.
To get the workpiece ready, you draw lines across it representing the approach angles of the holes to be drilled. Then you align both ends of one of the pencil lines on the workpiece with the centerline on the jig. Adjust the workpiece up or down the incline until the bit is centered over the hole you’ll drill. Some drill presses have laser lines for centering, but you can also simply put a small-diameter twist bit in the chuck and use that as a centerpoint finder. Then clamp down the workpiece, switch the twist bit to a Forstner bit, and drill.
The heart of the jig I designed is the U-shaped cutout centered at the back of the base that gives the jig its controlled pivoting action. The base is hinged at the front edge to the ramped work surface, and spacers of different widths are slid into a channel at the back to adjust the drilling angle while supporting the ramp. The thing is so simple I can’t believe I did not see it sooner.
Insert a scrap below the ramp as a shim to hold the ramp at that angle. Then measure from the bottom of the spacer channel to the underside of the ramp, and cut a spacer to fit.
Get instant access to over 100 digital plans available only to UNLIMITED members. Start your 14-day FREE trial - and get building!
The spacer can be angled to match the ramp (as I show in the photos), but it doesn’t have to be. It just needs an edge to be the proper height to hold the ramp at the desired angle.
To get the jig ready for use, you place it on the drill-press table, slide it back so the cutout straddles the post, pivot the jig until its centerline is directly beneath the quill, and clamp it to the factory table. Then you raise the ramp and slide the appropriate support spacer into place beneath it.


 0086-813-8127573