
C6 Hydro Lite Ceramic coating - c6 coating
Despite being versatile and cost-efficient, cut taps also typically have a shorter tool life and will have to be replaced more often. Because the cut tap is literally cutting the material, it can become dull and worn rather quickly.
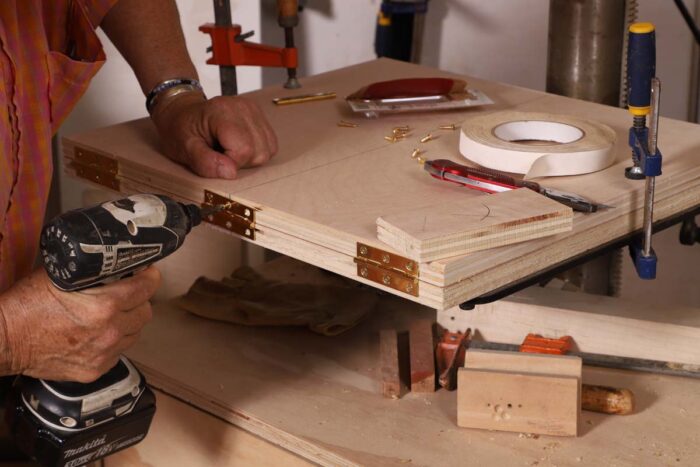
Strike a front-to-back line at the exact center of each of the pieces of plywood and bring the lines down over the front and back edges. Make sure the centers are aligned when you install the hinges and when you screw the sacrificial piece on top.
“A cut tap is actually going to cut away material after you’ve drilled the hole,” Butler says. “As it puts threads inside the material, it will cut away a portion and give you a very defined, more of a diamond-shaped thread.”
Insert a scrap below the ramp as a shim to hold the ramp at that angle. Then measure from the bottom of the spacer channel to the underside of the ramp, and cut a spacer to fit.
We have created these special content collections organized to give you a deep dive into a range of topics that matter.
John Butler, a Martin Supply Regional Account Manager and Certified Fastener Specialist, explained some of those differences on the Fully Threaded Radio Podcast.
To get the jig ready for use, you place it on the drill-press table, slide it back so the cutout straddles the post, pivot the jig until its centerline is directly beneath the quill, and clamp it to the factory table. Then you raise the ramp and slide the appropriate support spacer into place beneath it.
The heart of the jig I designed is the U-shaped cutout centered at the back of the base that gives the jig its controlled pivoting action. The base is hinged at the front edge to the ramped work surface, and spacers of different widths are slid into a channel at the back to adjust the drilling angle while supporting the ramp. The thing is so simple I can’t believe I did not see it sooner.
The jig consists of three pieces of 3⁄4-in. plywood, one for the base and two, face screwed, for the hinged ramp. I made the ramp double thick to stiffen it up and provide a sacrificial surface to drill into.
Cut taps are generally a cheaper option than roll taps and can be used in a wide variety of materials. However, the material being threaded will also chip and create debris. Those chips can be pulled out of blind holes by using a spiral flute cut tap.
Next, create a channel at the back of the base to accept the support spacer. I make the spacers out of 3⁄4-in. plywood, so I used a scrap of that as a temporary spacer while I glued and stapled the strips that make the channel. Last, face-screw the sacrificial top board onto the ramp.
The plywood pieces must all be the same width. What width exactly is not important, just be sure to choose a size that will be convenient when it comes to clamping the base to your drill-press table. The front-to-back measurement of the jig is flexible too. The ramp on my jig is 18 in. from front to back, and that has worked for any stool or chair that I or any of my students have built.
Vintage benchtop drill presses are a wonderful thing, until you have to move the table. In this video, Ben Strano has a simple fix for his that added some always-welcome storage.
Our biweekly podcast allows editors, authors, and special guests to answer your woodworking questions and connect with the online woodworking community.
Roll taps, also called ‘form taps,’ have one continuous spiral thread on the tap and do not have flutes. They reform the material inside the hole rather than cutting it away. This typically makes them more durable than cut taps and provides a stronger thread in the material.
Get instant access to over 100 digital plans available only to UNLIMITED members. Start your 14-day FREE trial - and get building!
Just like with most other tools, the right tap for your job depends on a number of outside factors including material, application, and desired thread characteristics.
With its graceful curves, cabriole legs, and ornamental back splat, a Queen Anne side chair is a bucket list build for many woodworkers. Dan Faia had a very specific Queen…
“You can use it more often, we’ll say, before you’ll want to replace it,” Butler says. “That’s why so many machine shops want to use a roll tap.”
Once your spacer is in place, push the jig tight to the curve of the drill-press post, pivot it until it is centered, and clamp the jig to the table. Adjust the drill-press table to the proper height for drilling and you’re ready to drill.☐
Roll taps should not be used when dealing with a material that is especially hard, such as cast iron, or soft, such as nylon or plastics. If the material is too hard, it may fracture and break. If it is too soft, it may eventually become displaced.
When forming an internal thread, cut taps and roll taps are two of the most popular options. Both taps have advantages and disadvantages, and the right option for you may depend on the material being threaded.

To get the workpiece ready, you draw lines across it representing the approach angles of the holes to be drilled. Then you align both ends of one of the pencil lines on the workpiece with the centerline on the jig. Adjust the workpiece up or down the incline until the bit is centered over the hole you’ll drill. Some drill presses have laser lines for centering, but you can also simply put a small-diameter twist bit in the chuck and use that as a centerpoint finder. Then clamp down the workpiece, switch the twist bit to a Forstner bit, and drill.
The spacer can be angled to match the ramp (as I show in the photos), but it doesn’t have to be. It just needs an edge to be the proper height to hold the ramp at the desired angle.
To determine the width of the spacer you’ll need, first set a bevel gauge to your drilling angle. Set the gauge on the jig and lift the ramp until the bevel’s blade is parallel to the quill of the drill press.
Fine Woodworking receives a commission for items purchased through links on this site, including Amazon Associates and other affiliate advertising programs.
Become an UNLIMITED member and get it all: searchable online archive of every issue, how-to videos, Complete Illustrated Guide to Woodworking digital series, print magazine, e-newsletter, and more.
I have been making stools with turned legs for years. When drilling the angled holes for them, I always made a platform set to the desired angle of the legs, and I wound up with multiple platforms with different angles. When I moved my shop to a much smaller space, I decided to create one jig that would replace all those platforms—a jig that would allow me to easily change angles, would be applicable to almost all stool and chair seat shapes, and would take up very little space when not in use.
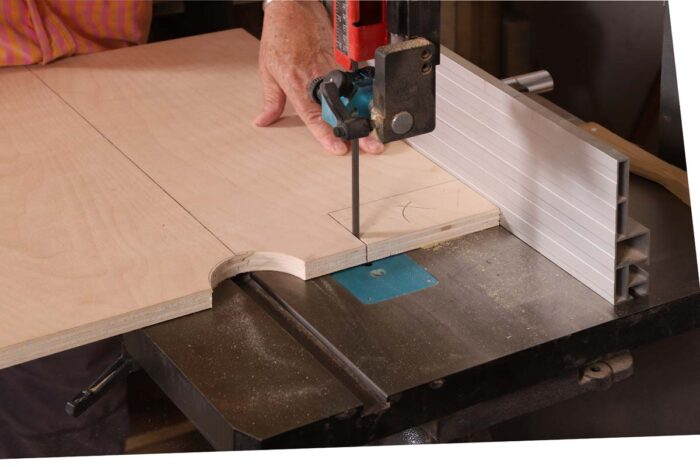
Before installing the hinges, however, make the cutout and the notch in the base. For the cutout, find the radius of the post on your drill press. Then use a compass to draw a half circle that will match your post. Cut it out with a jigsaw. If you have a toothed winding strip on the post, you might have to cut a little off of the right side of the curve, so the base has room to pivot without hitting the teeth. You may also have to cut a notch at the back corner of the base to allow the crank handle to move easily.
You can see how this popup was set up in our step-by-step guide: https://wppopupmaker.com/guides/auto-opening-announcement-popups/


 0086-813-8127573