
Climb Milling vs Conventional Milling: The Detailed ... - climb milling
Dovetail meaning
Using a square and a marking knife, transfer the tail marks across the ends of the tail boards. From there, bring the angled tail layout lines down the other face of the tail board.
Once you’re satisfied with the fit, apply glue to all the mating surfaces and press the joint together. With the glue applied, you may have to be a bit more forceful with your mallet.
Pare the pins to their layout lines. Again, be careful to pay attention to both sides of the board to keep everything square.
Types of dovetail joints
I’ve cut lots of dovetails over the years, both by hand and using dovetail jigs and a router. If I’m doing a run of drawers, I’ll use the jig and router 10 times out of 10. But for a small project, I’ll still cut them by hand. Why? First, in the time it takes to get the jig and router set up and dialed in, I could be well into the process of cutting them by hand. Second, hand-cutting dovetails is fun and rewarding. There are many “right ways” to cut them—I’ll just show you the method I learned. The most important thing is to work as accurately as you can, but don’t be concerned with perfection. Enjoy the truly handcrafted look!
After milling your parts to their final dimensions, use a marking gauge to lay out the depth of the dovetails on each piece. For “through” dovetails like these, that depth is equal to the board’s thickness.
Dovetail joint uses
Staying just outside your layout marks, saw down each line to just shy of the depth line. If you’d like, you can mark the waste areas to be cut out so you don’t cut on the wrong side of the lines. (No, of course I’ve never made that mistake.) Cut off the half-pin space waste on the outer edges now as well.
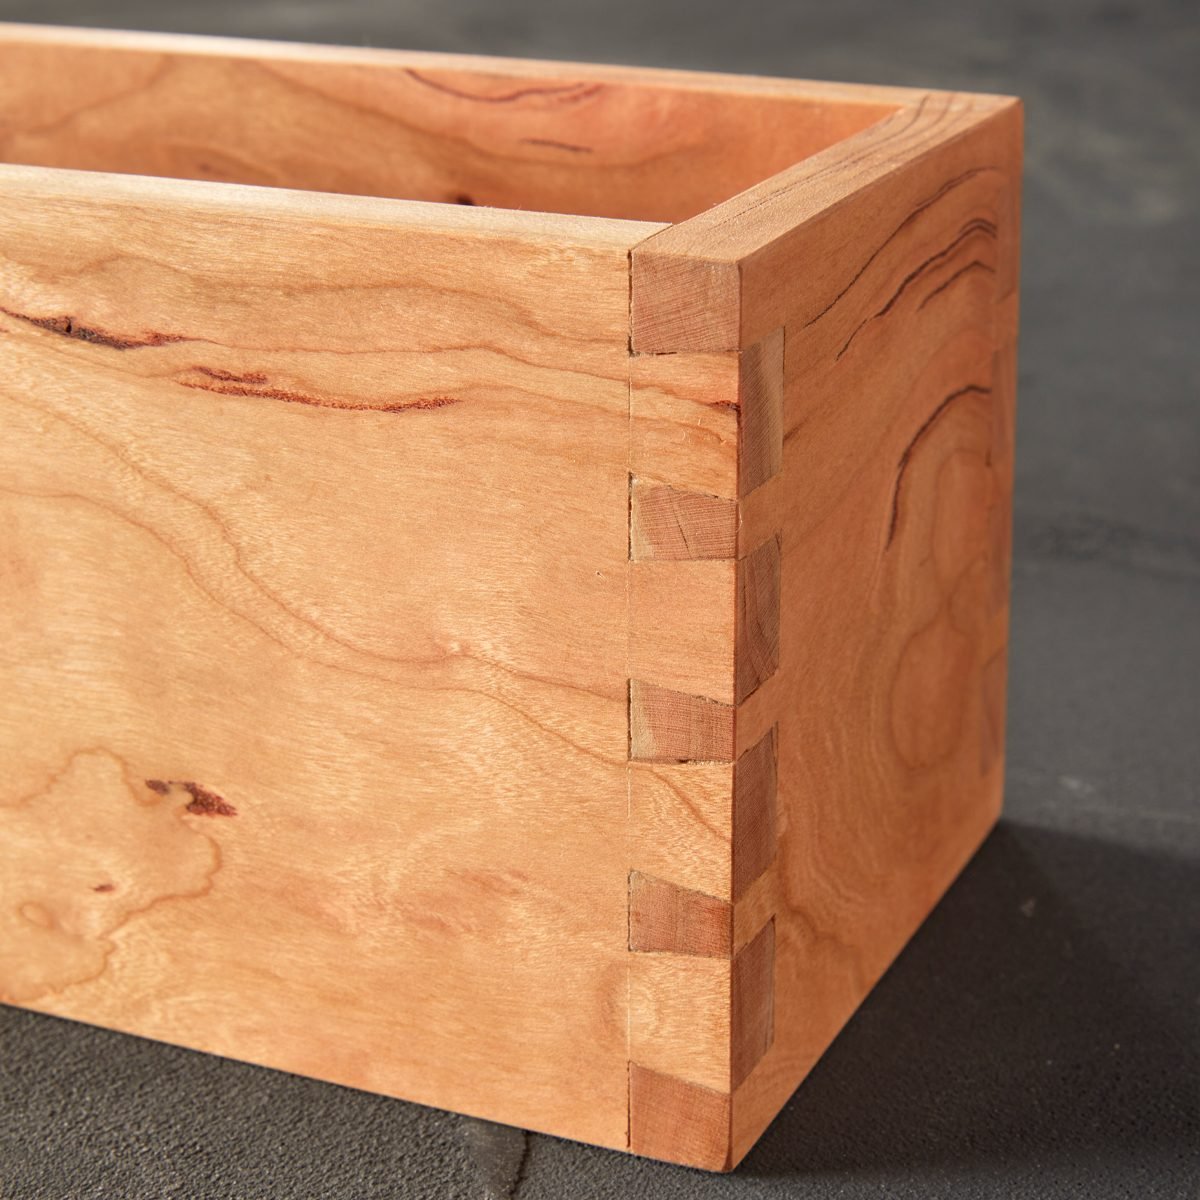
A dovetail joint is made by cutting interlocking parts on two pieces of wood. The tail board has the dovetails. The pin board has pins that slide in between the dovetails. Each outer edge of the pin board has a half pin, meaning only one face of the pin is angled. It’s a strong joinery method because the parts mechanically resist being pulled apart and have a lot of gluing surface.
Dovetail Jig
With the sliding T-bevel on the end of your board, set the dovetail angle—given in a “rise and run” format instead of degrees. Softwoods are traditionally 1:6 and hardwoods 1:8. Lay out the tails with a marking knife. Unlike a line marked by even a sharp pencil, a line marked by a knife is exact. You can choose your dovetail size, but there should be a half pin on both edges of the pin boards.
I’ve cut lots of dovetails over the years, both by hand and using dovetail jigs and a router. If I’m doing a run of drawers, I’ll use the jig and router 10 times out of 10. But for a small project, I’ll still cut them by hand. Why? First, in the time it takes to get the jig and router set up and dialed in, I could be well into the process of cutting them by hand. Second, hand-cutting dovetails is fun and rewarding. There are many “right ways” to cut them—I’ll just show you the method I learned. The most important thing is to work as accurately as you can, but don’t be concerned with perfection. Enjoy the truly handcrafted look!
Flip the pin boards over and start the second side as you did the first, just wiggling up to the line. Then chop each pin space all the way through. Go lightly as you reach the end.
Once you’ve chiseled down about 1/8 in., you can chop more aggressively. Leave the outer ends of the pin waste intact and proceed until you’re about halfway through the board’s thickness. The outer ends will give the pin waste support when you’re chopping from the other side, helping to prevent tear-out.
The Chamfer Tool attaches to an electric or cordless drill (not included) to deburr and chamfer both the inner and outer diameters of plastic pipe such as PVC, CPVC, ABS and PE. Plastic pipe joints fit best with a chamfer and REED's PB series chamfer tools create a smooth, consistent 15° chamfer in seconds. REED's chamfer tools for plastic pipe are available in a kit consisting of 2", 3" and 4" sizes in a jobsite quality case or individually by size.
Dovetail joint
Starting inside the depth line, just wiggle the chisel up to the line. Next, set the chisel on the layout line, press down lightly and then wiggle the chisel up to the depth line again. This method sets the dovetail depth accurately. If you chop in hard right on the line, the chisel will push its way past your depth mark.
Cut small wedges from an extra board. Make several vertical cuts, then saw the wedges free by cutting in from the side. Make wedges with grain going vertically as well as across the grain so you can easily match the grain at the gaps.
Clamp your tail boards in a vise and use a chisel to pare the tails to their layout lines. Be sure to look at the layout lines on both sides of the board so you keep the tails perfectly square.
Dovetails clothing
Chop out the first side of the tail waste exactly as you did the pin waste, wiggling the chisel to get an accurate start.
Flip the tail boards and chop out the rest of the tail waste. It’s trickier than pin waste; you’re chopping an angled cut.
Spread a little glue on the wedge and slip it into the gap. When the glue dries, cut off any extra material and sand the repaired area.
Press the joint together to check the fit. Chances are you’ll need to adjust it. Mark the areas that need material removed and carefully pare off a bit at a time, checking the fit often so you don’t overdo it. A good fit requires only a light tapping with a mallet.
Single dovetail joint
Dovetails Pants

Rest assured, there likely will be some gaps that bug you. I almost always have a couple, especially if I’m a little out of practice. Don’t worry. You can fill them and make them disappear.
Set your tails on the ends of the pin boards and transfer their layout with a marking knife. Next, use a square to mark the pins down to the depth lines on both sides of the pin boards.
We are no longer supporting IE (Internet Explorer) as we strive to provide site experiences for browsers that support new web standards and security practices.


 0086-813-8127573