
CVE-2024-21690 - NVD - 21690
The final test fit, as shown in Figure 6, should go together with minimal resistance. A little glue on the leading edges of the pins is enough for assembly.
With the tail board still in the vise, you’re ready to butt the pin board tightly against it and draw layout lines across both pieces (Figure 4). Be sure to mark the waste areas with an “X”.
With the layout work complete on both the pin and the tail board, you can now remove the waste sections. Whichever workpiece you begin with, the process is much the same.
Medtorque elmhurstsalary
Personally, I prefer to do all of the layout work on both the pin board and the tail board before breaking out the saws and chisels. This is especially true when the dovetail joint I’ll be making only has a couple of tails and just a few pins, like the one shown in this article. With everything laid out up front, I can focus on one operation at a time. And when it’s time to remove the waste, it doesn’t really matter if I start with the pin or tail board.
Medtorque elmhurstjobs
We're sorry, but Med-Stop website requires JavaScript to function properly. Please enable JavaScript in your browser settings or try a different browser to access our website.
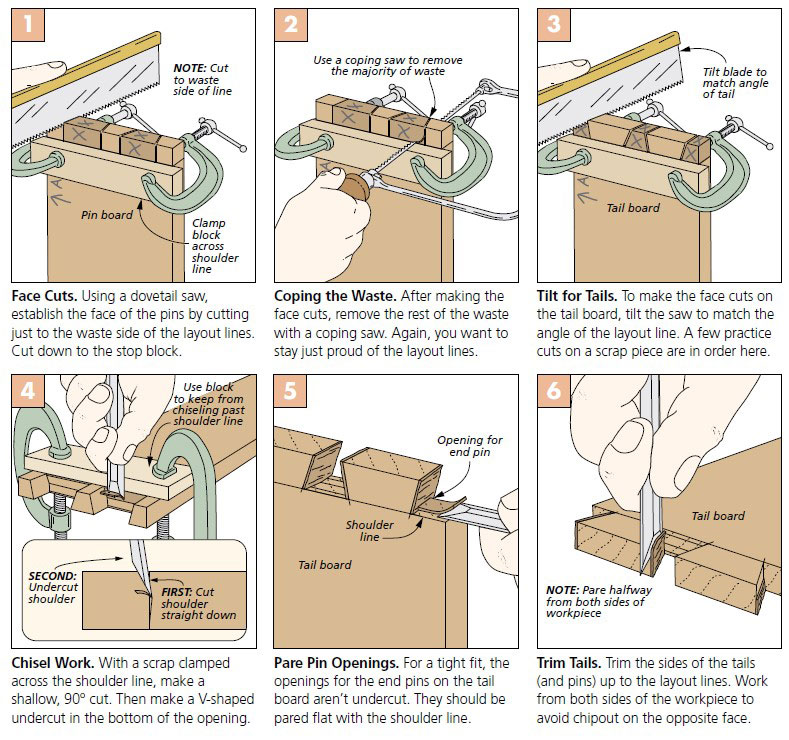
CHISEL WORK. Figures 4 through 6 show the remaining steps for finishing one dovetail joint. Again, a piece of scrap wood is clamped across the baseline to guide the chisel (Figure 4). Work toward the center from both sides of the workpiece, being sure to just “split” the layout lines. A slight undercut helps create a tight fit (Figure 4a). However, don’t undercut the end pins on the tail piece (Figure 5). This would create a gap when the joint is assembled. Figure 6 shows the last step for cleaning up the tail walls.
You’ll start by establishing the face cuts of the pins (Figure 1, below) and the tails (Figure 3), being sure to stay about 1⁄64" to 1⁄32" to the waste side of the cut lines. For the tails, you’ll need to tilt the saw to match the angle of the tail walls. Also, to provide a visual stopping point, I use a scrap piece as a stop block. It gets held in place with a couple of C-clamps.
STOCK PREPARATION. Regardless of the method you choose, you’ll want to start with square stock that’s consistent in thickness. Any variation in thickness will throw off the layout process. After cutting my parts to size, I also take the time to orient my pieces for the best look.
PINS OR TAILS FIRST? Along with the angle choice, it’s best to decide which side of the joint you’d like to make first, the pins or the tails. Traditionally, many craftsmen would lay out and cut the pins first. There are a couple of reasons for this. First, the pins are generally perceived as being easier to cut (and easier to square to the baseline if they are off a little bit). Second, it’s very easy to lay out the tails using the completed pin board as a guide.
gSource ARCH Medical
Here are some supplies and tools we find essential in our everyday work around the shop. We may receive a commission from sales referred by our links; however, we have carefully selected these products for their usefulness and quality.
Next, you’ll flip the pieces so the inside faces are held at a 90°, as shown in Figure 3 and 4. Check the fit, and pare away any excess. Forming a slight hollow on the sides of the pins allows the pieces to go together a little easier without affecting the fit (Figure 5).
Finally, lay the pin board flat on the workbench, and using the same bevel gauge setting, draw angled lines across the end of the piece (Figure 6). Then use a square to continue the lines on the opposite face of the workpiece, down to the baseline.
But if there is one drawback to machine-cut dovetails, it’s that it requires a fair amount of time to get a router dovetail jig set up properly before you can make the first cut. So for situations where I only need to join a few parts, it often makes sense to go with hand-cut dovetails.
ARCH Medical SolutionsElmhurstIL
With enough practice, the test fitting part of the process will become increasingly unnecessary. But if you’re just starting out, it’s best to go through the process shown in Figures 1 through 6. You’ll end up with a tight-fitting joint without having to force the pieces together and possibly causing damage.
Now raise the tail board up in the vise. Using a compass, set a bevel gauge for the tail angle (8° for the till parts), and draw the lines that mark the sides of the tails. You’ll do this on both faces of the workpiece, as shown in Figure 5.
MedTorquecatalog
Another option is to use the workpieces themselves as guides to mark the baseline around the face and edge of each part. For this method, you simply butt one piece flush against the end of the other and mark the line. This method, however, leaves less room for error.
If this Test Site operation hours, services or other information is updated or invalid, please click here to let us know. Thank you.
ANGLE CONSIDERATIONS. Before jumping right in and getting to work, a few decisions must be made up front. And that starts with what angle to make the dovetails. If you’re working from an existing plan (like I’m showing in this article), then the decision is already made for you.
ARCH Medical Solutions locations
When creating original work, it’s best to keep the angle ratio between 1:8 (7°) and 1:6 (9.5°). If the tail angles are too shallow, you’ll lose the classic dovetail look (not to mention holding power). And if they’re cut too steep, they’ll appear exaggerated and be prone to chipping.
Another school of thought advocates for cutting the tails first. The reason for this method is that the tail layout is somewhat easier to figure out. Plus, the tail layout on the face of the board gives a visual representation of the joint’s final appearance, allowing you to make any necessary adjustments before any wood is cut.
To avoid any confusion during the layout process, I start by spending a few minutes marking which boards receive the tails and which get the pins. I also indicate the top edge and both faces of each piece, along with a letter to designate the mating corners, as shown in Figure 1 below.
Mon: 8:00am-4:00pm Tue: 8:00am-4:00pm Wed: 8:00am-4:00pm Thu: 8:00am-4:00pm Fri: 8:00am-4:00pm
Medtorque elmhurstlocations
BASELINE. Next up, a baseline serves as a “depth stop” for how deep to cut the pins and tails. If you’re new to this process, it’s best to use a marking gauge set just slightly thicker (1⁄64") than the workpiece to mark the baseline shoulder (Figure 2). This will make the pins and tails proud of the sides when they’re assembled, and can be sanded smooth.
Dovetail joinery made with a router and jig is the go-to method for many woodworkers. And I’ll admit, it’s my preference as well, especially if I’m working with more than a handful of project parts. It’s just hard to beat the level of uniformity that can be achieved using this method.
Due to this wedge design, the joint will only slide together in one direction, creating an incredibly strong connection. And while it does take a little practice to get the proper method down when hand-cutting dovetails, the results (and satisfaction) are well worth it.
First, orient the boards as shown in Figure 1. Then, check that the narrow part of the pins will fit the openings on the outside of the tail piece. Mark any excess on the pins and pare off the waste. Now do the same process for the wide part of the pins (Figure 2).
Medtorque elmhurstreviews
If you’ve never cut a dovetail joint before, the premise is simple: On one board, there are a series of wedgeshaped openings that “fan out” at the end to form the tails. On the other board, there’s a matching set of corresponding pins that interlock with the tails.
MARKING PINS & TAILS. Figures 3 through 6 will show you the sequence for the rest of the layout process. I start by placing the tail board in a vise and marking the widest part of the tails on the end of the board using a ruler, as shown in Figure 3.
Now you can switch to a coping saw to free the rest of the waste, as shown in Figure 2. Again, you want to stay to the waste side of the layout lines. Do this same procedure on the pin and the tail boards.


 0086-813-8127573