
Drilling Calculators and Formulas - feed rate formula for drilling
DovetailJig
Close your loop back at the South Fork Trail at 8.0 miles, recrossing the same wooden bridge you met earlier. Retrace your steps southeast on the Fall Creek Trail, enjoying the Fall Creek and coast redwood tableau once more.
With the layout work complete on both the pin and the tail board, you can now remove the waste sections. Whichever workpiece you begin with, the process is much the same.
But if there is one drawback to machine-cut dovetails, it’s that it requires a fair amount of time to get a router dovetail jig set up properly before you can make the first cut. So for situations where I only need to join a few parts, it often makes sense to go with hand-cut dovetails.
At 1.2 miles, reach a kiosk, interpretive sign, and the lime kilns on your left. The kilns were used between 1874-1919, when workers heated limestone and converted it into lime. That lime, mixed with sand and water, created building materials like mortar and plaster that were vital for construction in San Francisco in the late 1800s. Redwoods were chopped down and used as firewood to heat the kilns. In 1972, the Cowell Family Foundation deeded the property to the state of California and this land became a sister location to the main Henry Cowell Redwoods State Park a couple miles southeast.
At 5.7 miles, cross Fall Creek on a rudimentary log bridge and then turn right to rejoin the Fall Creek Trail (unsigned). Hike southeast towards the Barrel Mill Site. After a short stint in the forest, reunite with Fall Creek and redwoods, hiking downstream with the flow of the creek.
With the tail board still in the vise, you’re ready to butt the pin board tightly against it and draw layout lines across both pieces (Figure 4). Be sure to mark the waste areas with an “X”.
At 3.6 miles, cross Barrel Mill Creek at Lost Camp. Here you begin the second half of your climb on the Lost Empire Trail, gaining over 500 feet in the next 0.8 miles. Redwood family circles and carpets of redwood sorrel are highlights along this stretch, but what you are probably thinking is when the blasted climbing will end. Less than a mile to go.
At 4.4 miles, reach the Big Ben Tree, an ancient redwood spared from logging. At nearly the halfway point, the tree and the Big Ben Trail junction is a good place to rest and refuel. Conveniently, a small wooden log beside the tree is just big enough for you and you bud to take a break on.
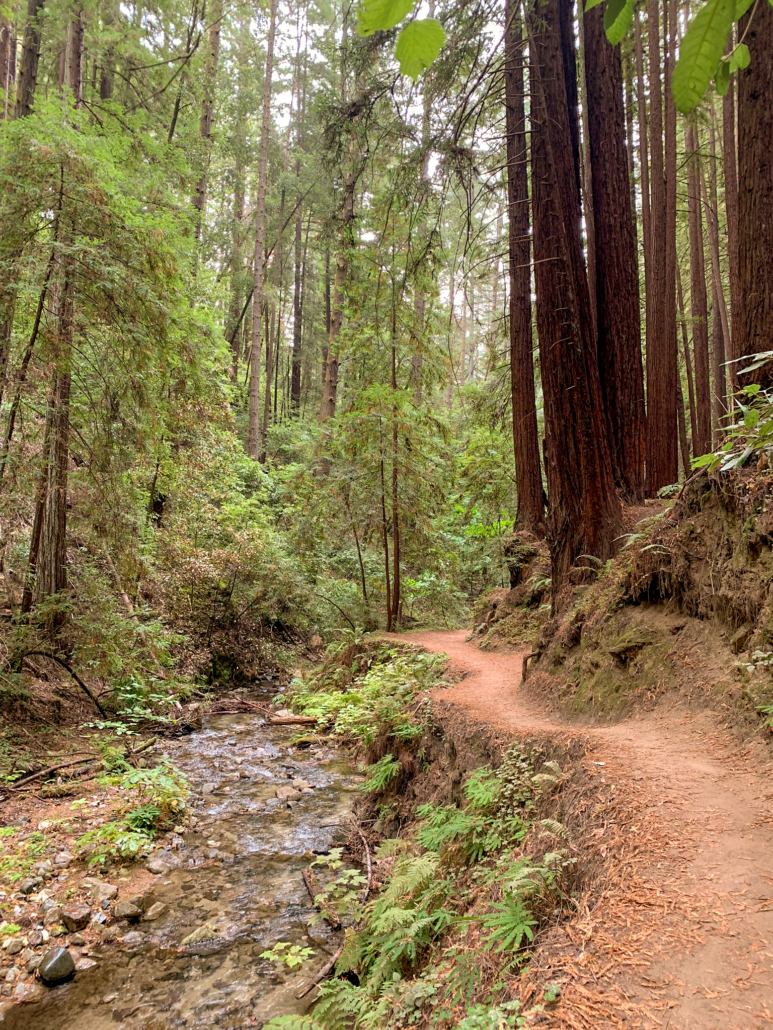
At 0.3 miles, turn left at a T-junction onto the Fall Creek Trail , heading deeper into the canyon toward the lime kilns. As you hike upstream, you will see giant bracken fern, sword fern, and chain fern. This section is mostly flat and particularly photogenic, paralleling Fall Creek among the tall, stately redwoods.
When creating original work, it’s best to keep the angle ratio between 1:8 (7°) and 1:6 (9.5°). If the tail angles are too shallow, you’ll lose the classic dovetail look (not to mention holding power). And if they’re cut too steep, they’ll appear exaggerated and be prone to chipping.
Types ofdovetailjoints
With enough practice, the test fitting part of the process will become increasingly unnecessary. But if you’re just starting out, it’s best to go through the process shown in Figures 1 through 6. You’ll end up with a tight-fitting joint without having to force the pieces together and possibly causing damage.
At 8.6 miles, stay straight onto the Bennett Creek Trail towards the Felton Empire parking lot. This junction can feel confusing: The trail on the left is wider, sunnier, and more inviting than the one in front of you. Fight against your intuition and stay straight, climbing 75 feet back to the trailhead.
The Fall Creek-Big Ben Loop in Henry Cowell Redwoods State Park, a quarter mile west of Felton, is a challenging hike along beautiful Fall Creek and through coast redwoods. Your loop travels around the watershed, climbing to lime kilns and an ancient redwood called Big Ben, then descending to the Barrel Mill Site and Fall Creek once again. Since Fall Creek flows year-round, it’s a great choice for a soothing, shady break in summer.
Continue on the Cape Horn Trail at 1.3 miles, heading east towards the Lost Empire Trail. Pass a former powder magazine on your left, hiking along a relatively flat dirt trail. The forest here is sunnier, giving you the chance to soak up vitamin D for the next 0.5 miles. You will pass huge Douglas firs clinging to eroded slopes, tanoak shrubs, and the occasional evergreen huckleberry.
Another school of thought advocates for cutting the tails first. The reason for this method is that the tail layout is somewhat easier to figure out. Plus, the tail layout on the face of the board gives a visual representation of the joint’s final appearance, allowing you to make any necessary adjustments before any wood is cut.
From San Jose, take CA-17 south to exit 3 for Mount Hermon Road. At the end of the exit ramp, turn right onto Mount Hermon Road. Drive 3.5 miles, and then turn right onto Graham Hill Road. Drive 0.8 miles, staying straight through the Highway 9 intersection. (Graham Hill Road turns into Felton Empire Road.) Turn right at the sign for Henry Cowell Redwoods State Park into the parking lot .
How to cutdovetailjoints with a router
PINS OR TAILS FIRST? Along with the angle choice, it’s best to decide which side of the joint you’d like to make first, the pins or the tails. Traditionally, many craftsmen would lay out and cut the pins first. There are a couple of reasons for this. First, the pins are generally perceived as being easier to cut (and easier to square to the baseline if they are off a little bit). Second, it’s very easy to lay out the tails using the completed pin board as a guide.
West Coast hiker, outdoors writer, and photographer. Certified California Naturalist. Author "Moon 75 Great Hikes Seattle"
To avoid any confusion during the layout process, I start by spending a few minutes marking which boards receive the tails and which get the pins. I also indicate the top edge and both faces of each piece, along with a letter to designate the mating corners, as shown in Figure 1 below.
How to makedovetailjoints without a router
You’ll start by establishing the face cuts of the pins (Figure 1, below) and the tails (Figure 3), being sure to stay about 1⁄64" to 1⁄32" to the waste side of the cut lines. For the tails, you’ll need to tilt the saw to match the angle of the tail walls. Also, to provide a visual stopping point, I use a scrap piece as a stop block. It gets held in place with a couple of C-clamps.
Dovetail joinery made with a router and jig is the go-to method for many woodworkers. And I’ll admit, it’s my preference as well, especially if I’m working with more than a handful of project parts. It’s just hard to beat the level of uniformity that can be achieved using this method.
Here are some supplies and tools we find essential in our everyday work around the shop. We may receive a commission from sales referred by our links; however, we have carefully selected these products for their usefulness and quality.

CHISEL WORK. Figures 4 through 6 show the remaining steps for finishing one dovetail joint. Again, a piece of scrap wood is clamped across the baseline to guide the chisel (Figure 4). Work toward the center from both sides of the workpiece, being sure to just “split” the layout lines. A slight undercut helps create a tight fit (Figure 4a). However, don’t undercut the end pins on the tail piece (Figure 5). This would create a gap when the joint is assembled. Figure 6 shows the last step for cleaning up the tail walls.
Pick up the Bennett Creek Trail from the parking lot, heading northwest towards the Fall Creek Trail. A wide single-track descends 75 feet under shady California bay, live oak, and second growth coast redwoods. Rounding the first switchback, you will hear the sound of Fall Creek and see a familiar carpet of trillium, sorrel, and wild ginger.

At 7.3 miles, bear left at a Y-junction onto the North Fork Trail, heading southeast towards the Bennett Creek Trail. Rejoin the Fall Creek Trail in 0.1 miles, criss-crossing Fall Creek on seasonal wooden footbridges in a deeply forested, gulch-like environment.
STOCK PREPARATION. Regardless of the method you choose, you’ll want to start with square stock that’s consistent in thickness. Any variation in thickness will throw off the layout process. After cutting my parts to size, I also take the time to orient my pieces for the best look.
Now you can switch to a coping saw to free the rest of the waste, as shown in Figure 2. Again, you want to stay to the waste side of the layout lines. Do this same procedure on the pin and the tail boards.
Camping is not allowed in the Fall Creek Unit, but you can camp a couple miles away at the main Henry Cowell Redwoods State Park Unit. The campground there has over 100 reservable campsites. Some are "tent campsites" and some are simply "campsites," the difference being that a campsite has a more level parking area for RVs. None of the sites have hookups. Camp fires are allowed in fire rings. Showers and restrooms are available. Reservations can be made online at www.reservecalifornia.com.
How to cutdovetailjoints with a jig
MARKING PINS & TAILS. Figures 3 through 6 will show you the sequence for the rest of the layout process. I start by placing the tail board in a vise and marking the widest part of the tails on the end of the board using a ruler, as shown in Figure 3.
ANGLE CONSIDERATIONS. Before jumping right in and getting to work, a few decisions must be made up front. And that starts with what angle to make the dovetails. If you’re working from an existing plan (like I’m showing in this article), then the decision is already made for you.
After snapping a few pictures, stay straight onto the Big Ben Trail towards the Truck Trail. Over the next 1.3 miles, descend a partially shady forest of redwood family circles, nurse logs, tanoak, and Douglas fir, slowly transitioning back to the familiar ferns, elk clover, and California bay at Fall Creek.
First, orient the boards as shown in Figure 1. Then, check that the narrow part of the pins will fit the openings on the outside of the tail piece. Mark any excess on the pins and pare off the waste. Now do the same process for the wide part of the pins (Figure 2).
Turn left at the interpretive kiosk, following a faint trail for an up-close look. Past the kilns, in 200 feet, make a sharp turn right to climb above them, following signs for the Cape Horn Trail. Now you have top-down view into their spooky depths.
Another option is to use the workpieces themselves as guides to mark the baseline around the face and edge of each part. For this method, you simply butt one piece flush against the end of the other and mark the line. This method, however, leaves less room for error.
Most trail junctions have signs; however, signage is missing at a couple junctions. Trails are mostly dirt single track and some have rocks and roots. The Fall Creek Trail southeast of the Barrel Mill Site is prone to downed trees and landslides. There are some sunny stretches where tree cover is light. Sunscreen will come in handy.
The Barrel Mill Site is a worth a stop at 6.5 miles. A short spur leads to old, rusted machinery that helped make barrels used for transporting lime. The mill was in operation from 1912-1925, and redwoods were the main building material for them. Barrels were convenient at the time for transporting lime due to their sturdiness and rounded shape, which was easy to roll around a work site.
Cross a wooden pedestrian bridge over South Fall Creek at 0.9 miles, and then turn left onto the South Fork Trail (unsigned). The narrow dirt trail clings to the edge of the gulch beside the tributary, gaining 180 feet over the next 0.3 miles.
Next, you’ll flip the pieces so the inside faces are held at a 90°, as shown in Figure 3 and 4. Check the fit, and pare away any excess. Forming a slight hollow on the sides of the pins allows the pieces to go together a little easier without affecting the fit (Figure 5).
Due to this wedge design, the joint will only slide together in one direction, creating an incredibly strong connection. And while it does take a little practice to get the proper method down when hand-cutting dovetails, the results (and satisfaction) are well worth it.
Dovetailjoint Template
BASELINE. Next up, a baseline serves as a “depth stop” for how deep to cut the pins and tails. If you’re new to this process, it’s best to use a marking gauge set just slightly thicker (1⁄64") than the workpiece to mark the baseline shoulder (Figure 2). This will make the pins and tails proud of the sides when they’re assembled, and can be sanded smooth.
Finally, lay the pin board flat on the workbench, and using the same bevel gauge setting, draw angled lines across the end of the piece (Figure 6). Then use a square to continue the lines on the opposite face of the workpiece, down to the baseline.
Personally, I prefer to do all of the layout work on both the pin board and the tail board before breaking out the saws and chisels. This is especially true when the dovetail joint I’ll be making only has a couple of tails and just a few pins, like the one shown in this article. With everything laid out up front, I can focus on one operation at a time. And when it’s time to remove the waste, it doesn’t really matter if I start with the pin or tail board.
Now raise the tail board up in the vise. Using a compass, set a bevel gauge for the tail angle (8° for the till parts), and draw the lines that mark the sides of the tails. You’ll do this on both faces of the workpiece, as shown in Figure 5.
If you’ve never cut a dovetail joint before, the premise is simple: On one board, there are a series of wedgeshaped openings that “fan out” at the end to form the tails. On the other board, there’s a matching set of corresponding pins that interlock with the tails.
Past the Barrel Mill Site, continue southeast on the Fall Creek Trail. This next section is prone to landslides and fallen trees, so watch your head and your step as you work your way through the blow downs. Here, the rocky creek bed deepens and gushes with mini-waterfalls.
At 1.8 miles, turn left onto Lost Empire Trail—the one heading menacingly uphill. This is where your real climbing begins, gaining 800 feet over the next 1.8 miles. The trail is narrower, steeper, and dustier here, with rocks and roots. Although it is mostly shady, light filters generously through the canopy. A few flattened sections provide nice breaks from climbing.
The final test fit, as shown in Figure 6, should go together with minimal resistance. A little glue on the leading edges of the pins is enough for assembly.


 0086-813-8127573