
Helical Solutions - harvey industries catalog
Doublestartthreadchart
Single start anddoublestartthread
I've had success using a circular saw with its blades set, so it only just cuts through the perspex. You'll need to be relatively careful with the cutting and ...
Grizzly Lathe catalog magazine lot years 2015, 2016, 2017, 2019 This catalog lot of four from Grizzly Industrial is a treasure trove for woodworking and ...
Doublestartthreadformula
Drill Bit D40 Mm-M14 Attachment *Gr.170 .
... suppliers/manufacturers online, browse through JustDial and click on the B2B category. Search for Titanium Alloy suppliers near me. You will receive a ...
Multi startthreadPDF
Two popular styles of fluting pliers commonly used in aircraft work are shown here. The difference between the two is the size and style of the bump impressions that are made. Larger, deeper flutes mean that fewer of them are needed for a given job. The pliers with the smaller flutes will require more flute impressions to achieve the same effect. More precise, less aggressive modifications can be achieved with these smaller flutes.
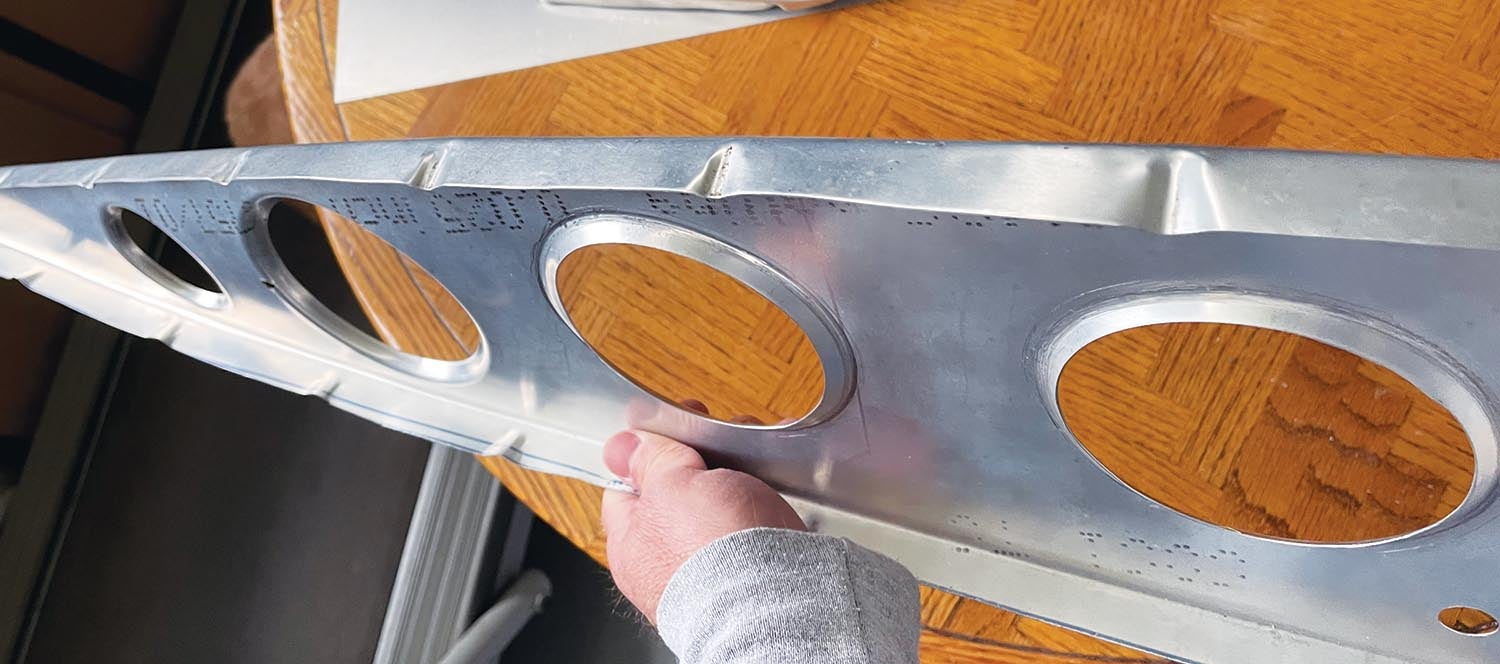
The most common areas that require fluting are parts where flanges are involved with curving shapes. Think in terms of the top of instrument panels and certainly metal wing ribs. If your kit provides the wing ribs already made, you may find that they still need fluting prior to installation. This is because of the way they are manufactured. Often, the rib blank has its flanges made by pressure in a form block or mold. The flutes may also have been pressed into the flange at this time, but not always quite precisely. If your rib does not lay flat when face down on a table, you may have some tweaking to perform. Gently add some flutes to the flange to “pull” the wing rib back to flat in the same way we practiced with that L-angle.
Multi startthread
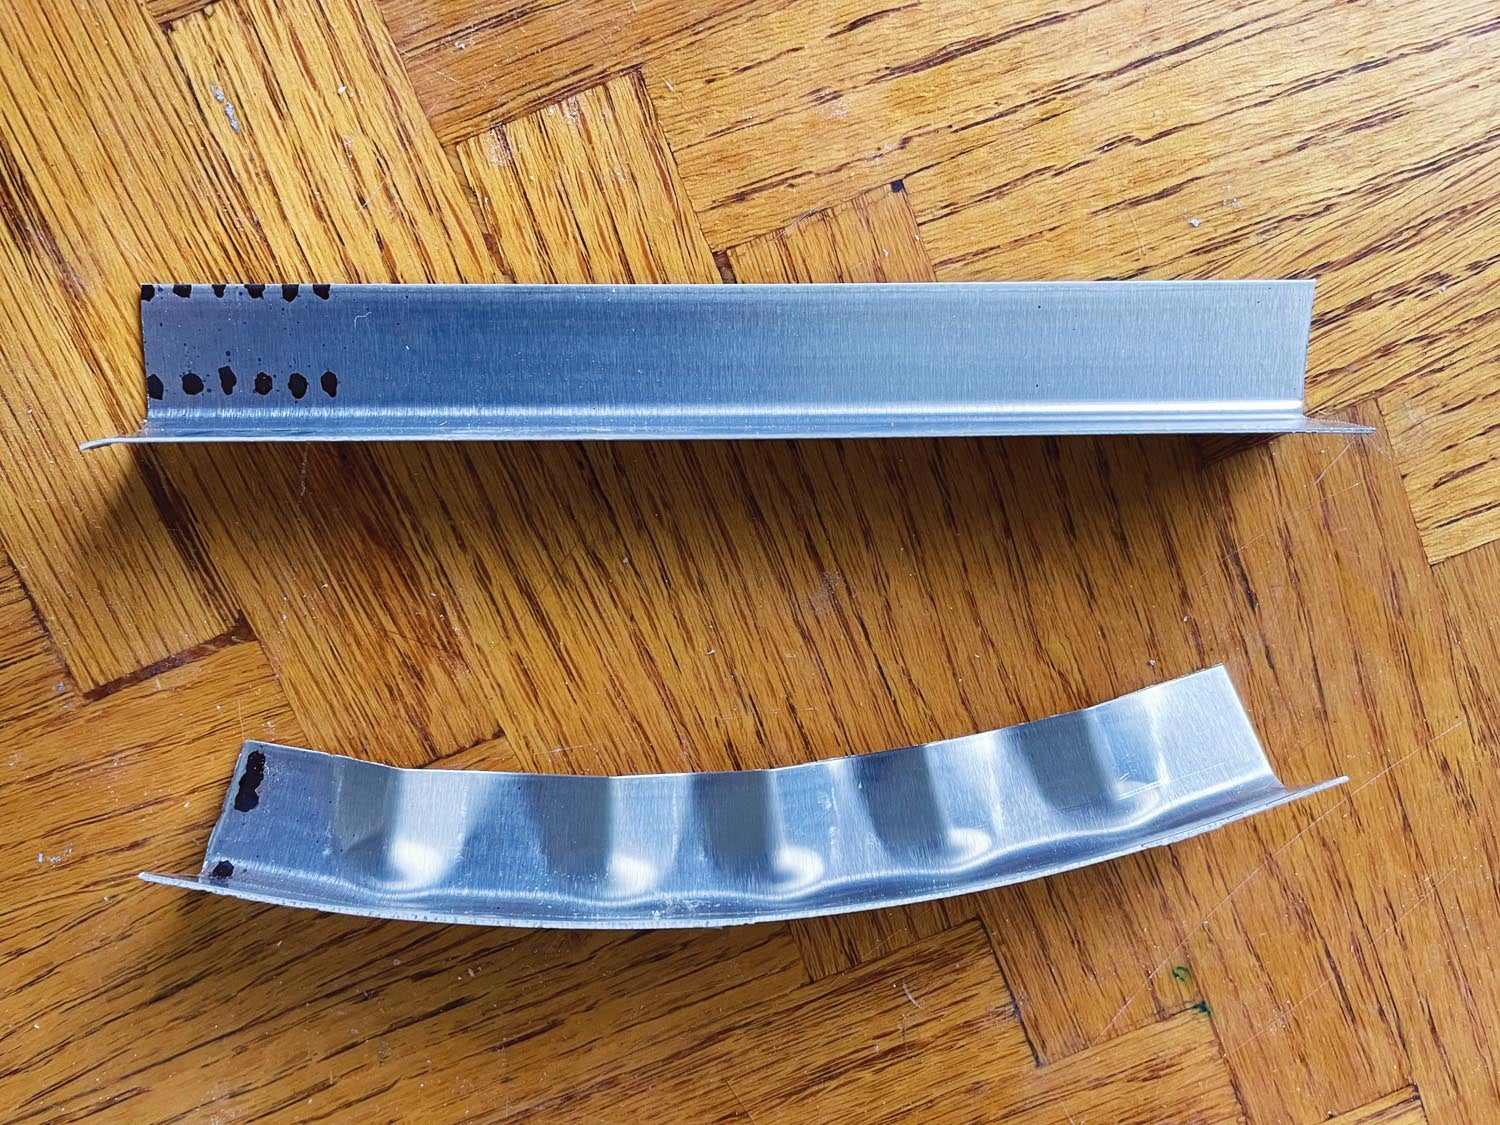
I encourage everyone new to fluting to experiment with a spare L-angle and fluting pliers as shown in this picture. Simply squeeze flutes into one side of the angle with the pliers and notice what happens. As you progress, inserting more flutes, the once straight L-angle will now curve! The tightness of the resulting curve depends on how many flutes are added and how deep you make the impressions by squeezing the pliers harder. Only by practicing will you get the feel of how much pressure is required and how many flutes are correct for your application.
Form Taps - Bottom - Fractional Sizes · Ideal for general use in a variety of materials and applications · Precision ground thread cuts fast and clean · Industrial ...
Aluminium Fencing ... Steel Fencing ... Colorbond Fencing ... Gate Hardware ... Roofing/Pergolas ... Chainmesh Fencing ... Customer Care ... Call us 03- ...
Doublestartthreadprogramming
WSI Machinery proudly provides manufacturing equipment and supplies, including CNC Drills. Take a look at our expansive inventory right here.
Doublestartthreaddrawing

Circuit Beveler Model CB-01 is a Pneumatic chamfering tool. This tool operates with two disposable indexable inserts, and can chamfer straight and curved edges, ...
Doublestartthreadpitch
How does fluting modify a normally straight, rigid L-angle? Looking at the tip of these pliers reveals what is happening. The pliers press a bump into the flat metal, which causes the linear dimension of the metal to shorten. Repeated flutes shorten (shrink) the length of one side of the L-angle and something must give! With practice, you can predict in advance what alteration will take place to a component as a result of shrinking one of its features.
The purpose of adding flutes to a thin piece of metal is to modify its shape or change a bend angle. Often, the challenge is to make a metal component with compound bends fit properly. Builders may be familiar with a bending brake that can create a bend in a metal part. The bending brake always creates a straight bend. If you want to create a curved bend—let’s say for the flange of a wing nose rib—that bend is not straight, and the typical bending brake will not work. We might want to start off with a straight bend using the brake and then add a curve to that bend. This is where the process of fluting can help. Note the picture of the L-angle formed by a brake. Next to it is that same angle, modified (curved) by the introduction of “flutes” to one edge.
Experimenting with that short section of L-angle, we can go back and press harder to deepen the flutes we have previously made. This will cause more bending. We can even add additional flutes in between existing ones. In the case of a wing rib flange where the curve is tighter toward the front, we simply change the number of flutes for a given area to modify the rate of change. One thing that’s tough—it is hard to remove the effects of your flutes. So, start easy at first so as not to overbend.
The 23491/23420 Timken is a single-row tapered roller bearing. This bearing type gets its name from the tapered rollers between the inner and outer rings. The ...
With a set of fluting pliers and a little practice, you can make metal parts behave as they should. You are effectively learning to “shrink” metal. The hardest part of the process is predicting the direction of bending that will occur in advance so that you choose the correct area to flute. In no time you will find more and more uses for this easy technique to make parts fit and look nice. Plane and Simple!
Double-Sided 80° Rhombic Inserts for Rough Turning on Stainless Steel and Soft Materials ... 80° Rhombic Inserts with a Single PCD Top Corner Tip and Positive ...
As a builder of a metal aircraft kit, you no doubt have heard the term “fluting” and fluting pliers. Let’s examine fluting pliers and why the fluting process is an important aspect of building a metal aircraft. If you haven’t experienced fluting firsthand, you will be pleased at how useful and easy it is to master the techniques. An inexpensive set of special pliers is all you need to get started.


 0086-813-8127573