
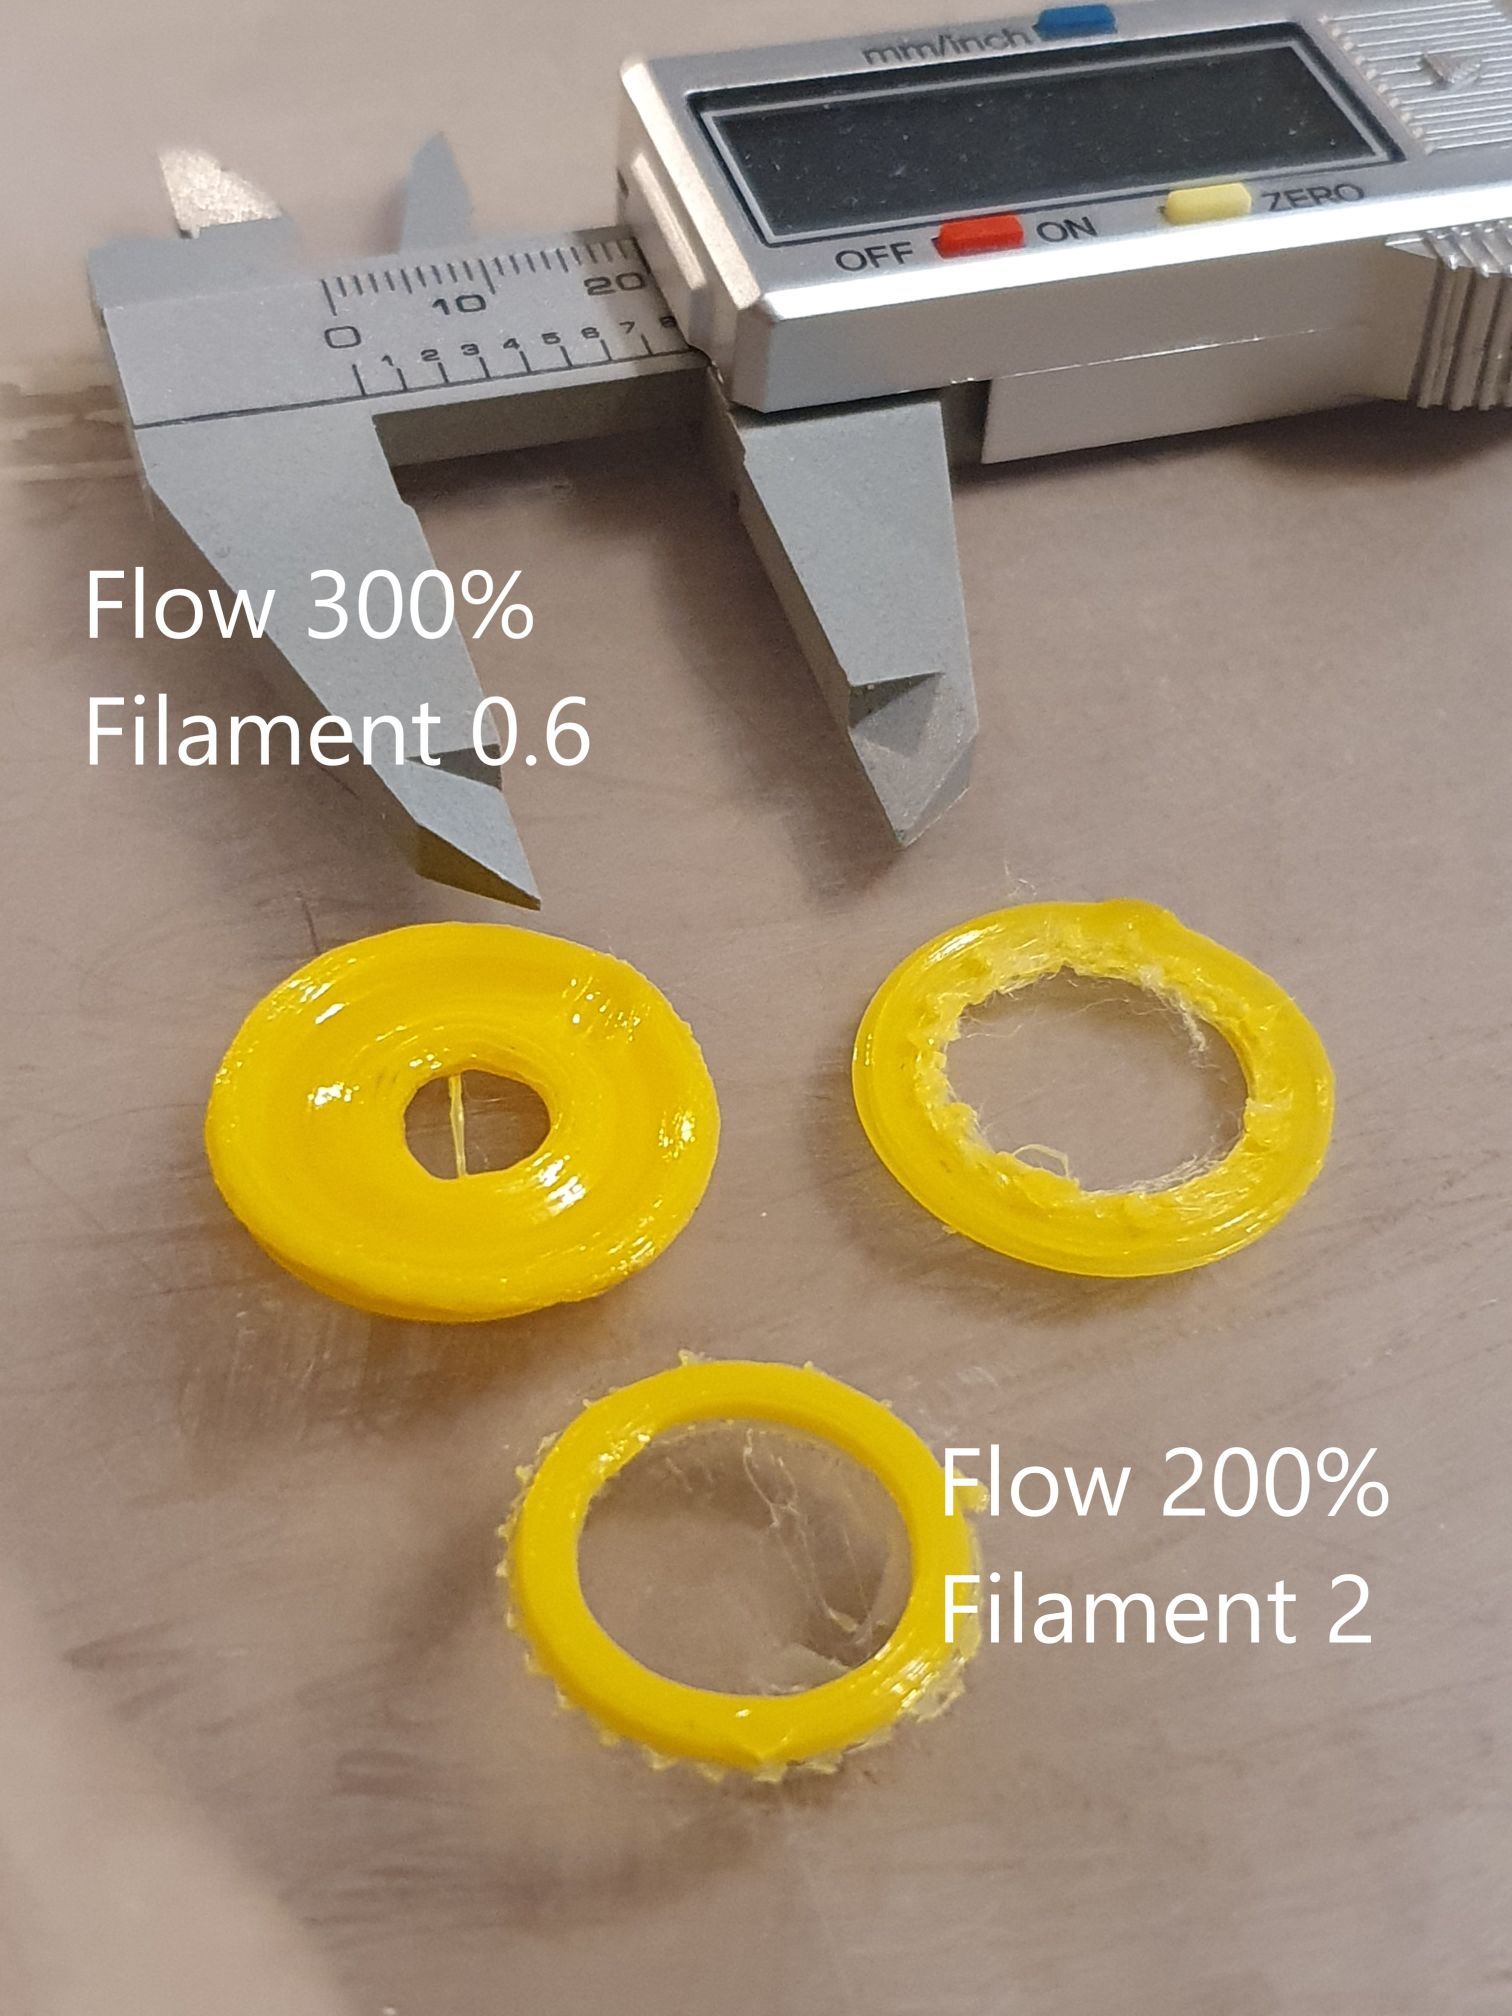
Indexable Milling - insert milling ball finish
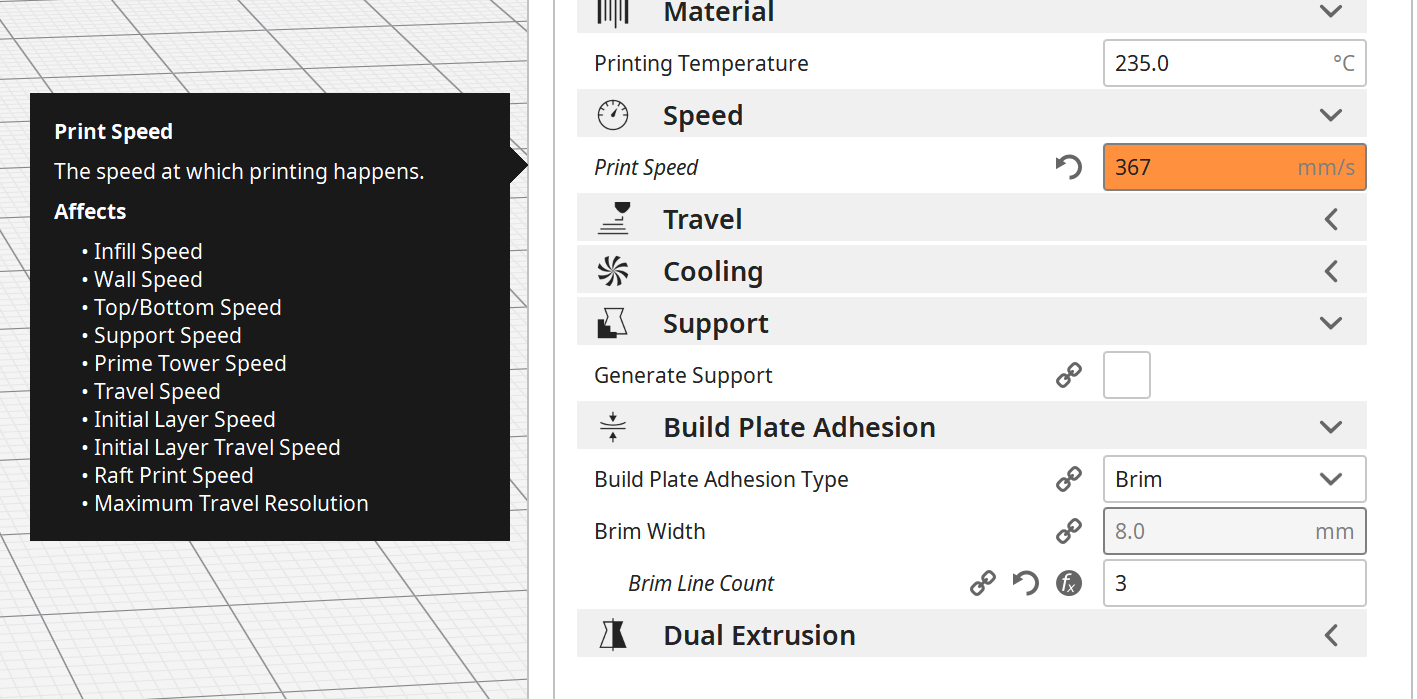
You were so right about it! I did it again and now I got stability with G1 E100 F160 twice as fast! That made Volumetric Limit --> 18.8 Max Print Speed --> 367
Your browser does not seem to support JavaScript. As a result, your viewing experience will be diminished, and you have been placed in read-only mode.
Layer Height is something that you choose in slicer. And that suggests that this setting belongs to slicer. And so I go and actually find the setting. According to formula I should have (if I wanna print with layer 0.2) -> 9/(0.25*0.2) = 9/0.5=180 At the moment in Cura i got Print speed = 60 but I get extreme underextrusion. Somehow extruder's stepper spins like a snail.
What I've found out last night is that Cura slicer somehow do not set nozzle diameter! Yes, statement If I go to Cura printer settings and set there for extrude 0.25 then after I close settings and come back - it is back to 0.4 And yet if Cura "thinks" I got 0.4 then it should push more raw filament in extruder, isn't it? But reality is so different that if I print with that then under extrusion is that dramatic that after print I catch myself thinking "do I clean the bed or is it ok to leave it like that and print over..." Reasonable prints are require flow=N*100% and defining that my filament is lot less in diameter 1-2mm (value of N is factor here ofc)
Last night I've tried Prusa slicer. That one accepted my 0.25 noizzle, no problem. If I print same ring as on pictures earlier with right filament size and no other tweaks then it prints the ring bu still under extruded one. Not as bad as in Cura but still bad! However what is "no no no" thing for Prisa was that printing this ring it made my printer (and whole table) to bounce around!!! Instead of slicing it in nice circle moves (ring 20mm outer diameter 16mm inner diameter 2mm high) it somehow forced it to do lot of small Z shapes and in combination with quick speed it was terrible! I'd rather continue with Cura...
Lasers beams can mark by either cutting the material or discoloring it in a distinctive way that helps with identification. Common types of lasers include fiber, crystal, CO2 gas lasers and laser diodes.
Yes, that's right. It's typical to use a extrusion width equal to the nozzle with or slightly larger. It is set in the slicer.
would you say that this confirms that on firmware side (incl config) all looks correct? Picture oriented that way that bottom stripe is first print line and top&broken one is last printed line.
@Phaedrux Filament is 3mm diameter, that one is easy to be sure. For the nozzle story is different I wish to have any idea how to measure it reasonable way... Perhaps somehow comparing length of used filament to length of extruded thread could be the reasonable way still taking into account all possible errors that it has. I have calipers but measuring extruded filament isn't useful. When extruded to open air it a) shrinks b) my calipers will not show it with descent accuracy.
@monster The main reason to have it set higher is to allow for retractions which will probably be in the range of 25 to 80mm/s which is substantially faster than the 1.33mm/s you have set. The speed used during printing will depend on the slicer which will choose how fast it needs to go based on how fast you are printing and the extrusion width and layer height.
Task was to print a small ring. I know ring isn't very decisive test object but I chosen it as printing ring makes less vibrations then square. Heads are heavy - vibrations significant.
Did you just want calibrate the extrusion? The nozzle diameter should not be relevant, you have a range where you can extrude. Just 0.25 is really small so you can't go much fast in extrusion. Keep this in mind. If you will go you will bite the filament, ecc ecc This guide should make your calibration easy : https://all3dp.com/2/extruder-calibration-6-easy-steps-2/
Also known as micropercussion, pin marking, or impression marking, Dot Peen Marking creates depressions (or dots) in the material using a vibrating tool. The material is pushed back into a recess (or flattens it, which is what “peen” means) and not burned or milled, so no shavings are produced.
Now sure if this screenshot covers most relevant settings. And I just noticed that actual nozzle (as I believe) is 0.25 - I'll change it and try again!
Small step forward achieved I wasn't progressing no matter I do until I noticed that in firmware I did have a filament set to an extruder used to print sliced object. So I unloaded that filament in WebUI. Then prints began to reflect changes in Cura.
Are you this person who still uses ink markers to manually mark cut parts and then double-check them with the cutlist on a clipboard? What a drudgery, right?
Does loading filament in WebUI needed for some purposes? Perhaps that is factor here and I should somehow define it right in filament config.g?
Once you have your steps/mm feed rate working, you will want to know what your hot end is capable extruding by volume. Need to know so your X-Y moves/speeds set in your slicer program are not so fast that the hot end cannot extrude filament to match. CNC Kitchen has a good article w/ video here: https://www.cnckitchen.com/blog/flow-rate-benchmarking-of-a-hotend
CNC Marking is faster, more accurate and relieves your production from thinking and costly redos from human errors. CNC Marking tools are usually add-on tools and are usually compatible with most routers. Here are the common ones in the market today:
You must set your extruder max speed to much high than 80mm/min this would explain the snail speed. You should set this value to 8000 perhaps. If you had this set this low during your testing you should change it and then redo your extruder calibration.
Once you have your steps/mm feed rate working, you will want to know what your hot end is capable extruding by volume. Need to know so your X-Y moves/speeds set in your slicer program are not so fast that the hot end cannot extrude filament to match. CNC Kitchen has a good article w/ video here: https://www.cnckitchen.com/blog/flow-rate-benchmarking-of-a-hotend
It's far more common to use a print speed around 60mm/s for most things due to reasons of model size and geometry, overhangs, bridging, fine detail, etc.
You must set your extruder max speed to much high than 80mm/min this would explain the snail speed. You should set this value to 8000 perhaps. If you had this set this low during your testing you should change it and then redo your extruder calibration.
And lastly. If in WebUI I do extrude with 1mm/s it extrudes kinda slowish but it does eat about of 5mm of filament. If I chose 5mm/s it goes very fast - on the edge of its max speed. Those 15, 30, 60 aren't usable for me. Is there a way to define what speeds I can select in WebUI?
How does one configures (and does it right) filament feed rate? Is there a life hack how to do it except trial and error? Heads of my printer are basically bolts connected to steppers. And threading of bolts does push filament into hotend. I guess from that I can (theoretically) know how many motor steps required to move 1mm of raw filament. I also should know diameter of nozzle (which I dont) but old BFB software was configured to 0.25 so I guess it is the one. Is there a calculator or formula to table to use in order to configure it right?
So the next time you pick up that marker, think of how much time and effort you can save by automating your CNC Marking. At CNC Factory, we offer CNC Marking tools that would make the best sense for the woodworker:
0.25mm came from settings in software that I found still available for this printer (printer is BFB Touch 3D). Two more factors reasonably adding up to it a) nozzles in this heads are very hard to change - so most likely it wasn't even designed to have different once b) line of filament that comes out of nozzle is visually very thing - so it is very believable that it is 0.25
A recent innovation which applies a mark by pressing an inked stamp onto the component. It is an automated version of hand stamping.
@monster Extruder calibration is one thing - that's how may steps are required to extrude 1mm of filament. The feed rate is speed. But as far as your configuration file is concerned, the maximum feedrate you set using M203 is largely irrelevant as long as it isn't too low. It needs to be set at or higher than the maximum speed that you think you might need for retraction moves and within the maximum speed that your extruder can handle. Any retraction move will take place at the speed defined either in the slicer or in M207 if you use firmware retraction. So if for example you set the maximum speed to 1800 (mm/min) using M203 then any extruder only move would be limited to 30mm/sec (1800/60) regardless of what retraction speed you set in the slicer or in M207. So if you think you'll need to retract at say 60mm/sec then make sure that M203 is set to at least 3600 (mm/min). For print moves which will be combined X,Y and E moves, the extruder will run much slower - typically single digit percentages of the carriage speed (e.g. 5mm/sec for a carriage speed of 100mm/sec, depending on nozzle size and layer height).
Btw retraction isn't happening at all - as it wants to spin motors way too fast. I hear only whistle instead of retraction.
I am interested in:CNC RoutersCNC InsertionEdgebandersThermofoil PressVacuum PumpsMoversWorking CellI am not sure. Please contact me.
Ahaa! That is a bit counter intuitive I'd say - as with loaded filament motor won't go much higher! Thank you for that! I'll redo whole thing again now!
P.S. I wonder is there a test print that would extrude fixed amount filament lets say 1mm above bed and move making some big (easy to measure) rectangular pattern. Then if the extruded line solid (eye accuracy) meaning it didn't brake (under exctrusion) not to tight (over extrusion) then by measuring extruded length and knowing consumed length (and diameter) of filament one could calculate nozzle size (+- accurate) Sadly it is not very common not to know nozzle size among printer owners - such task probably never was set by anyone.
I constantly have this feeling that I'm missing some setting either in firmware on in slicer. Would it be possible to slice that kinda print which would require printer do only one move, lets say one 10cm line of extrusion? And then look in g code and see what slicer set there for extrusion? Would that be helpful?
Though when it prints nothing changes! Extruder's stepper still a snail Also slicer doesn't seem very happy about speed:
You must set your extruder max speed to much high than 80mm/min this would explain the snail speed. You should set this value to 8000 perhaps. If you had this set this low during your testing you should change it and then redo your extruder calibration.
Printing an actual sliced object would be a better way. I can't tell much from that other than the last one might be good as a prime line....
CNC Marking is the automated process of marking components using a CNC machine, while the parts are still on the cutting bed. The marks printed are to identify parts or to give instructions for secondary production such as edgebanding or boring.
@deckingman Thank you a lot for this portion of knowledge. I'm slowly processing it I guess after re-reading it 10th time I'll get it right
best result (ring at bottom) I could achieve by setting filament flow 200% and setting in printer settings that my extruded loaded with filament 2mm diameter. When actual diameter is 3mm.
This is an over ambitious choice for print speed. The extruder may be able to provide enough plastic at that rate, but the rest of the machine likely will not.
Thank you. I'll study it now. I just realized that I'm not even sure I asked a right question. Perhaps I should have asked how to setup feed & feedrate.
Been trying to print last 10 mins. Some kind of bug was always happening when I Pause&Cancel print. I almost always had to reboot the controller. Now even reboot doesn't work. I'll report this bug just that now still tying to get it to work, it is in state not accepting any commands


 0086-813-8127573