
Machinery - Milling Machines - mill drill milling machine
Alternative 1: Make the appropriate selections on this window, then press the OK button at the bottom of the window to regenerate the material.
Alternative: Invoke Chamfer Edge using the Find Tool by searching the command name and clicking the Chamfer Edge icon, which is pictured above. Proceed to step 3.
1. In the view in which you want to remove the material operation, display in solid form all members that you want to edit.
7. Chamfer Edge shows the material edge as chamfered. The status line prompts, "Verify chamfer." Yes - No mouse bindings become active.
- Counterbore the back of existing holes without a second set up · - Rigid single piece tool body ...
Based on these principals, Harvey Industries has succeeded in supplying woodworking machinery and accessories to over 100 countries. ... tools to showcase!
2. Preselect a material to enable the Materials contextual page and click the Chamfer Edge icon found in the Operations section. Skip step 3.
Locations and key contacts for Sid Harvey Industries, Inc.
Multifunction metal working machines-tools: Function of lathe, milling and drilling machine: Available different models with different power and speed to ...
Alternative 1: Run the Show Material Operations tool if they are not shown. Once the material operation is shown you can select it.
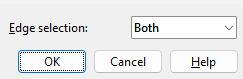
4. (if HSS) If the material you selected is an HSS rectangular (tube) or HSS round (pipe), a window opens that lets you set whether you want to be allowed to select the Outside or Inside or Both edges in step 5.
5a: Left-click (Locate) each of the edges you want to chamfer. As you hover an edge, it changes from the Selectable edge color setting to the Selectable edge highlighting color. Once selected, edges change to the Primary selection surface selection color.
3a: Chamfer Edge gives you Select One Item mouse bindings and prompts you to Select material. This prompting also occurs if a member, bolt or weld (rather than material) was selected before invoking the command.
The fence with 3/4" profile (19.05 mm), the movement free adjustable ... Delivery & shipping costs · This is how you can pay · Contact form · Returns form
5. The color of the material edges changes to the Selectable edge color found in User and Site Options. Locate - Pan - Menu mouse bindings become active. The status line prompts, "Locate edge(s)."
30° / 45° / 60° / 90° engraving tool with indexable carbide insert ... + Limited design, simply for thin or light engraving, used on engraving machine.
Flute definition: A tall narrow wineglass, often used for champagne.
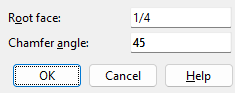
Root face: The length (in the primary dimension Units or other units) of the material edge(s) that you do not want to chamfer.
Apr 28, 2023 — Reaming is an essential manufacturing process used by machinists to achieve precise sizing and finishing of drilled or bored holes. By using ...
Drill Bits. View all · Morse Taper Shank · Masonry SDS Plus · Masonry SDS Max · Spot Weld · Spotting · Jobber · Centre · Panel & Rivet · Stub · Reduced ...
Note: If other pieces with the same submaterial piecemark exist in the 3D model and you selected the appropriate Options, then other materials are also regenerated as specified on the edit window.
Mar 3, 2018 — To cut a concave radius you simply move the tooling to the opposite side (tailstock end) and use the tail stock locked to the bed as a positive stop.
Copyright © TN Lawrence. All Rights ReservedTN Lawrence is a trading name of Jackson's Art Supplies Limited, 1 Farleigh Place, London, N16 7SXCompany Registration Number 03913002 VAT No. 752176824
JavaScript seems to be disabled in your browser. For the best experience on our site, be sure to turn on Javascript in your browser.
4. The material is regenerated per the settings on its edit window. In other words, the material operation with the delete check box checked disappears.
2a: Check the Delete check box next to the operation you wish to delete. If you want to delete multiple, you can select more than one. If you wish to remove all operations, select the Delete All check box.
5b: Press the Enter key or right-click (Menu) and choose OK on the context menu to signal to Chamfer Edge that you are done selecting edges.


 0086-813-8127573