
Machining with Ceramic Inserts - ceramic inserts
For me, the Acra-mill would be a waste of money and, to be honest, I've wasted plenty of money on things I've wound up not using. Of course, a Sherline mill is much, much more expensive. The rotary table alone costs more than the basic Acra-mill! But the Sherline mill definitely does not fall into the wasted money category for me. I keep finding more and more uses for it and this thread has been really interesting to see how others use theirs.
I've often thought about trying to buy a mill, either new or used, but have put those thoughts in the same bin as my thoughts about dating Kate Upton.
A couple years ago there was a thread dealing with this subject and I like to revamp that:http://modelshipworld.com/index.php/topic/4320-milling-work-and-miniature-jig-making/page-2?hl=+milling%20+machine.
Being able to move the table in and out is very useful when you need a hole located in the center of a narrow piece of wood, for example.
Completed: Skipjack Kathryn; Dunbrody Sectional Model; Paragon (modified Mayflower) Scratch Build; Planning a Sectional Model of Dunbrody
Current build Cross Section USS Constitution http://modelshipworld.com/index.php/topic/10120-cross-section-forward-area-of-the-uss-constitution/
Current build Cross Section USS Constitution http://modelshipworld.com/index.php/topic/10120-cross-section-forward-area-of-the-uss-constitution/
Surface feet per minutetable
I recently used my Rotary Table and the Tilting Angle table to produce the mast tops for my Paragon (modified Mayflower).
That's true John. for most mills. However, I have the "old" MM Micro-Mill. If it were the "Mini" which is similar to the Sherline and others, it wouldn't be problem. There is nothing standard about this mill.
I have a four inch vise that is very accurate. Using the parallels underneath this piece of pear, I was able to machine this log of gun carriages. After the milling I cut slabs that were only 0.050 inch thick.
Chuck Seiler San Diego Ship Modelers Guild Nautical Research Guild Current Build:: Colonial Schooner SULTANA (scratch from Model Expo Plans), Hanseatic Cog Wutender Hund, Pinas Cross Section Completed: Missouri Riverboat FAR WEST (1876) Scratch, 1776 Gunboat PHILADELPHIA (Scratch), John Smith Shallop
Completed: Skipjack Kathryn; Dunbrody Sectional Model; Paragon (modified Mayflower) Scratch Build; Planning a Sectional Model of Dunbrody
Current build Cross Section USS Constitution http://modelshipworld.com/index.php/topic/10120-cross-section-forward-area-of-the-uss-constitution/
I understand that cranking the z direction feed can be a pain. I did not realize that some mills don't have the feature I have on mine. That is, with a simple push of a button I can change the z feed from cranking to a lever action such as used on a drill press. In other words I can readily change my mill to a drill press.
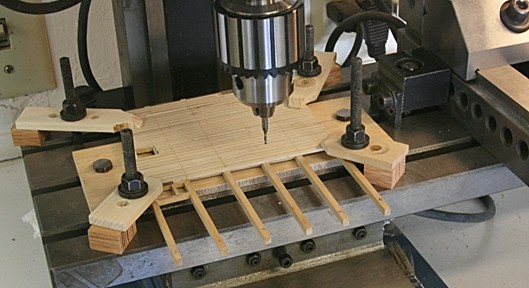
When I decided to make my own gratings, I had to make a decision about square or round holes. After some experimenting I gave up making square holes. Now I find it hard to tell if the grating has square or round holes (when viewed a few inches or more away). My point here is that I placed the grating material on a piece of plywood that was clamped to the table and used the mill’s x-y table movements to accurately drill the holes.
I actually use my mill a lot. For fine drilling I use the Sensitive Drilling Attachment, and for regular drilling I use the z-axis hand wheel. I stopped using my mini drill press, so I sold it.
On my current build(AL Mayflower) there is seven different pin rails to be made, with the mill I was finally able to drill all holes exactly centered and spaced. This job is virtually impossible on a drill press, and with the proper bit(which didn't have) it would have been possible to cut each one to the exact length. I mounted a piece of stock in the vice and drilled out all the pin rails at once then cut them to length later on my table saw.
The only real drawback to it is the need to mount it for drilling, but that's not a big deal. To me it's the best way to use the very small drills for machine drilling, and it works great with the carbide drills.
Since then I don’t use the metal clamps that you see in the picture above. I made a number of wooden clamps and blocks that do a better and safer job.
Mark, you can get universal digital readouts from several places. I know Micro-Mark carries them. They are pretty easy to install.
The second one is bit harder... Get a nail, heat it and let it cool. Pound end flat. Try to work from both sides. Grind a profile into flattened area and then heat treat. The nail now becomes a router bit for doing trim pieces, railing with a profile or whatever you cut into the flat spot as a profile. I don't use a high speed on the mill since it's not balanced but it does the job.
Surface feet per minutefor steel
I seldom use mine for drilling holes unless I need accuracy, such as making wheels. (The drill press is faster and easier to use for holes.)
I have a lot of experience with wood working power tools, but have never used a mill, much less seen one in operation, add to that to the fact that I'm at least a couple of builds away from my first scratch build, makes buying a mill less than practipble, But looking at some of the work being done by the Masters on this site (Danny V, EdT, Remco, Gaetan and others) and my general level of "tool lust" keeps a mill on my wish list.
I recently used my Rotary Table and the Tilting Angle table to produce the mast tops for my Paragon (modified Mayflower).
I'd say the one drawback to a mill is that setup can take quite a long time. You can easily spend more time getting set up to mill something than it actually takes to mill the piece. But I love the thing and I am very happy that I bought it! I also got the DRO with mine and I'm glad I did although I don't use/need it for every operation.
My daughter is 25 and a dead ringer for Natalie Portman. I keep telling her that when she's ready to get serious, I'm going to interview her beau in my den while cleaning a shotgun.
I might add one comment. My experience with building the full scale Constitution was not too good by mounting the pin rails directly against the bulwark with some glue. In other words they were butt joined and hard to keep aligned. Next time I want to make the rails wider and extend them into the bulwark and frames (if necessary). This could mean cutting tendons, something easily done on a mill.
First off - let me say that I've never used or owned the Vanda-Lay mill although I do own a Proxxon mill. So I'll offer my two cents for what it's worth. I think the utility of the Vanda-Lay and Proxxon mills is limited. You can only use 1/8"-shank tools to begin with. I'm not sure Dremels are really the best choice for milling operations - although they may be just fine for some operations. The bigger limitation is lack of accessories. As I mentioned in my original post, I didn't really use my Proxxon all that much, but since getting the Sherline with the angle table and rotary table, I have used it much, much more. Plus, the larger size of the Sherline mill is very helpful. There were some things that just wouldn't fit in the Proxxon mill. Holding work to the table could be problematic - they mention using double-sided tape.
Mark, I will have to try your idea about the broken drill bit. When I used my broken bit, it did a so, so job. But to add a bit of gump at the end would work better.
I picked up two tricks from the late Roma on MSW 1.0... I'm very much a novice at milling anything except slots and few bits and pieces.
Current build Cross Section USS Constitution http://modelshipworld.com/index.php/topic/10120-cross-section-forward-area-of-the-uss-constitution/
Current build Cross Section USS Constitution http://modelshipworld.com/index.php/topic/10120-cross-section-forward-area-of-the-uss-constitution/
Thanks for offer but I'm one of the happily married guys (40 yrs). And besides, it doesn't sound like your granddaughter will be in want of suitors.
Thanks Jay and Mark. I'm a relative novice with my Sherline Mill, and am very happy you started this thread. Hopefully there's more to come!
I would not have been able to do this in a regular drill press because of the accuracy I wanted in indexing the hole locations.
CH-53 Sikorsky - 1:48 - Revell - Completed Licorne - 1755 from Hahn Plans (Scratch) Version 2.0 (Abandoned)
Good points on the read-out, Jay. I never did order them for my mill but I do have them on the lathe. Too late, the mill is out of production now.
The Nautical Research Guild has published our world-renowned quarterly magazine, The Nautical Research Journal, since 1955. The pages of the Journal are full of articles by accomplished ship modelers who show you how they create those exquisite details on their models, and by maritime historians who show you the correct details to build. The Journal is available in both print and digital editions. Go to the NRG web site (www.thenrg.org) to download a complimentary digital copy of the Journal. The NRG also publishes plan sets, books and compilations of back issues of the Journal and the former Ships in Scale and Model Ship Builder magazines.
Here is an example how I mount a tiny piece in the vise. It is outboard, but firmly in place. I can carefully machine a groove, whereas if I mount it in the center of the vise, I have no room to clamp (or run the bit into the vise).
Mark "The shipwright is slow, but the wood is patient." - me Current Build: Past Builds: La Belle Poule 1765 - French Frigate from ANCRE plans - ON HOLD Triton Cross-Section
Surface feet per minuteto inchesper minute
The situation I find myself in is that when I had more $$$ than experience, I purchased the Acra Plus mill along with the drill press option. Never used it. It has a wheel each for X and Y axis but a little crank knob for Z. This can be upgraded for a few dozen bucks. Now I am in a position where milling some joints and other things I cannot seem to do well with my other tools is looking like a viable option. Nothing fancy/nothing large.
As far as I am concerned, I agree with John that a Vanda-Lay mill seems like a waste of time and money when you consider its very limited capabilities.
Surfacespeed formula
Chuck Seiler San Diego Ship Modelers Guild Nautical Research Guild Current Build:: Colonial Schooner SULTANA (scratch from Model Expo Plans), Hanseatic Cog Wutender Hund, Pinas Cross Section Completed: Missouri Riverboat FAR WEST (1876) Scratch, 1776 Gunboat PHILADELPHIA (Scratch), John Smith Shallop
Frank, when I got mine, I made it a point to learn as much as I could about how to use it. That is easy to say and a bit hard to explain.The upshot is that a mill is not like your computer. If you do something wrong with a mill it may cause more than 'headaches' . So be sure to know what you are trying to do before turning on the dials. Yet, once you are sure, don't be afraid and follow your plan. Go for it.
I really hope this topic catches on. I see it has the potential to be another great tutorial for model ship builders in general.
Current build Cross Section USS Constitution http://modelshipworld.com/index.php/topic/10120-cross-section-forward-area-of-the-uss-constitution/
The other accessory I bought was the rotary table. Boy, do I love that thing! I'm working on making the anchor windlass for my current model and I needed a couple of gears for it. Now, I don't have a gear cutter so I didn't want to tackle making them from scratch but I found a plastic gear for an RC car that was the right diameter and had about the right number of teeth. Problem was, the center was nothing like what I needed. So I mounted the gear on the rotary table and milled out the center in no time. Here's a before and after pic:
Current build Cross Section USS Constitution http://modelshipworld.com/index.php/topic/10120-cross-section-forward-area-of-the-uss-constitution/
CH-53 Sikorsky - 1:48 - Revell - Completed Licorne - 1755 from Hahn Plans (Scratch) Version 2.0 (Abandoned)
Finally I want to share a little trick. It is the result of a failure to start with. I broke one of my 0.5 mm drills, but saved the broken piece. Later, when making the sheaves in the riding bits shown below, I drilled the holes through with a new bit, but used the broken one to score the grove that connects the holes. This was done by clamping the riding bits in the mill’s vise and slowly feeding the broken bit (at 5000 rpm) across. The picture is not very clear, but it worked.
If you enjoy building ship models that are historically accurate as well as beautiful, then The Nautical Research Guild (NRG) is just right for you.
For a few years, I owned a Proxxon mill, but didn't wind up using it all that much. I didn't have many accessories for it. But a couple months ago, I bought a Sherline mill and there are three accessories that have proven to be very useful indeed. One is the rotating base for the mill vise. Very useful if you need to mill a slot or edge at an angle. The second is the right-angle plate. It can be adjusted from 0-90 degrees and will hold the vise or the rotary table. Here's an instance where I needed to mill a specific angle on the edge of a piece of wood. My Preac table saw won't cut at an angle and it would have been too small anyway. If I'd started with longer, wider stock, I probably could have done it on the 10" table saw or even on the band saw. But the mill did such a nice job of it and it didn't even need to be sanded when I was done and setup was pretty quick for this one.
Mark "The shipwright is slow, but the wood is patient." - me Current Build: Past Builds: La Belle Poule 1765 - French Frigate from ANCRE plans - ON HOLD Triton Cross-Section
surface feet per minuteto m/min
A mill is very handy for all of the tips above plus many others. For example, you can mount your work between centers and mill it round or hex or octogonal. A dividing head is useful here but you can divide the work by mounting various gears.
Current build Cross Section USS Constitution http://modelshipworld.com/index.php/topic/10120-cross-section-forward-area-of-the-uss-constitution/
©2006-2023, Nautical Research Guild. 'Model Ship World' and emblem are Registered Trademarks ®. Powered by Invision Community
http://modelshipworld.com/index.php/topic/5783-a-review-of-a-mini-mill-from-little-machine-shop/?hl=%2Blittle+%2Bmachine+%2Bshop
In addition, I can mount a dremmel like tool on the head and use it for drills down to the #80 size while indexing the x and y according to my needs. Like most other operations with tiny bits, I just have to be more careful with the feed rate and not move the table while drilling. One example that comes to mind is drilling hundreds of small holes for tree nailing deck planking.
I also made a mounting bracket so I could attach my old rotary tool (a Monkey Wards left over, that works great). Speeds now are from zero up to 10000 rpm (never measured that, I don't care, it works fine).
On my current build(AL Mayflower) there is seven different pin rails to be made, with the mill I was finally able to drill all holes exactly centered and spaced. This job is virtually impossible on a drill press, and with the proper bit(which didn't have) it would have been possible to cut each one to the exact length. I mounted a piece of stock in the vice and drilled out all the pin rails at once then cut them to length later on my table saw.
By the way - there are some great examples of using a mill on this gentleman's build log - http://modelshipworld.com/index.php/topic/196-hms-bellona-by-sjsoane-scale-164-1760-english-74-gun-as-designed/
Current build Cross Section USS Constitution http://modelshipworld.com/index.php/topic/10120-cross-section-forward-area-of-the-uss-constitution/
Does anybody have knowledge of or experience with the Vanda-Lay Dremel Mill? (I think he calls it the Acru Mill, but it uses a Dremel for power.)
Mark "The shipwright is slow, but the wood is patient." - me Current Build: Past Builds: La Belle Poule 1765 - French Frigate from ANCRE plans - ON HOLD Triton Cross-Section
Does anybody have knowledge of or experience with the Vanda-Lay Dremel Mill? (I think he calls it the Acru Mill, but it uses a Dremel for power.)
I'm not real sure how I would have done it without the mill. There is also a smaller gear and I found one made of steel that was the right diameter and pitch but it was too wide. Once again, the mill came to the rescue and I was able to mill off half of it to make it the right thickness. I don't honestly think I could have done that with a hacksaw.
I'd be interested in knowing a bit more about how you do this. I'd love to be able to mill the 8- and 16-sided sections on a bowsprit but there a couple of problems I've not been able to get around. First, I tend to work at larger scales (1:48 & 1:32) so something like a bowsprit or mast is typically going to be longer than the travel available in the Y direction (5 inches on my mill if I recall correctly). Of course, you could mill part then maybe move the stock to mill the rest but that brings into play the other problem, which is that masts and spars are typically tapered, so you can't just mount the stock flat on the table. Maybe some sort of jig would work that would allow you to clamp the stock in the jig at an angle and then move the whole jig? I can see that if you were just milling the 8-sided section in the center of a yard, it wouldn't be so difficult. I've you've come up with a workable jig, I'd like to see how you do it.
Surface feet per minuteto RPM
This is a 0.020 inch wide groove/slot/carving, you name it.I went back and forth as well as at an angle and the bit at that same depth held steady at 5000 rpm.
surface feet per minuteto mm/min
My current setup is as shown next. I have the vise accurately mounted and try to keep it that way. I use it with bits that take the collets. For flat parts, that can be mounted on the plywood panel, I use the Jacob’s chuck. It is quite accurate and takes drill bits down to around #75.The plywood panels are easy to make and I have a couple for different edge machining.
Completed: Skipjack Kathryn; Dunbrody Sectional Model; Paragon (modified Mayflower) Scratch Build; Planning a Sectional Model of Dunbrody
Surface feet per minutecalculator
The Guild is a non-profit educational organization whose mission is to “Advance Ship Modeling Through Research”. We provide support to our members in their efforts to raise the quality of their model ships.
I have used a couple of them and they work ok, not as good as a sharp bit, but at least there are several shapes to choose from. I am referring to the cone and cylindrical shapes. Don't bother with the straight bits.
I actually use my mill a lot. For fine drilling I use the Sensitive Drilling Attachment, and for regular drilling I use the z-axis hand wheel. I stopped using my mini drill press, so I sold it.
Chuck Seiler San Diego Ship Modelers Guild Nautical Research Guild Current Build:: Colonial Schooner SULTANA (scratch from Model Expo Plans), Hanseatic Cog Wutender Hund, Pinas Cross Section Completed: Missouri Riverboat FAR WEST (1876) Scratch, 1776 Gunboat PHILADELPHIA (Scratch), John Smith Shallop
I also used the rotary table and a Dremel bit to cut the pawl plates for the drums on the windlass. And I'll be using the rotary table when I get around to making the steering wheel.
A couple of these I inherited from my father-in-law who had a die-casting shop and made his own dies.So, now I have straight bits that go from 1/2 inch diameter down to .020 inches.
I have just recently purchased(two weeks ago) a Sherline mill and lathe. They are both great machines and I would advise anyone thinking of buying a mill or lathe to buy a Sherline, they are a quality "made in America" product. Unlike other products on the market Sherline has an extensive line of accessories available that make the possibilities of what can be achieved on your mill endless.
I realize that not too many modelers have a milling machine, but for those lucky enough to have one, I would venture to say that it is a very versatile and useful tool for scratch builders as well as those who want a bit more accuracy in cutting material.I am constantly learning to use mine with new ideas for fixtures and techniques. Perhaps we can share some ideas on this thread.
Let me show you a few things I have done to and with my machine.When I first got it, I wanted to learn the basics and made this aluminum slitting fixture. It can be used to make slots or even cut planks. Now I don’t use it too much anymore, because it takes a while to set up and takes away space on the table.
The mill, although I am a novice on it, with the proper accessories can be thought of as a drill press, router, scroll saw, lathe and even a table saw to some extent.
Going thru some of the old posts, I saw some comments from JPett. I was just curious if anyone else has experience with it.
Current build Cross Section USS Constitution http://modelshipworld.com/index.php/topic/10120-cross-section-forward-area-of-the-uss-constitution/
As someone who has been toying with the idea of buying a milling machine for quite a while, but being unsure if I would have enough use for it or not, I will be following this thread avidly. Keep the ideas coming.
I mentioned my broken drill bit. It is 0.5 mm diameter and has a nice thick shaft. I cut a groove (three passes, so it would not break it again) and here is the result.Not bad for a failure.
I should add that to ship one of those heavy machines to Austalia is not cheap. There you might consider a smaller version such as offered by Proxston.
Current build Cross Section USS Constitution http://modelshipworld.com/index.php/topic/10120-cross-section-forward-area-of-the-uss-constitution/
CH-53 Sikorsky - 1:48 - Revell - Completed Licorne - 1755 from Hahn Plans (Scratch) Version 2.0 (Abandoned)
One thing I would like to add is a digital read-out system. Counting those turns of the crank can become a pain after a while.
Unlike some, I rarely use my mill for drilling because I just find it too slow to crank up and down (and I don't have a sensitive drilling attachment). I much prefer the small drill press I own for drilling holes. The exception would be if I needed a series of holes spaced a specific distance apart, but I can't recall a time when I've ever needed that. Note, on the Acra-mill, that there is no handwheel for the Y direction or the Z direction, so that also limits its usefulness or at least its accuracy. Apparently you can add a drill press handle to it - otherwise I can't tell how you're supposed to move it in the Z direction. It looks like you have to slide it up and down and then lock it in place. Seems the same with the Y direction. I see that they sell a separate Y table as well as a separate Z adjuster but then you've added another $100+ to the cost. And in the end, you're still left with a small machine that uses a Dremel.
The last thing I would like to mention if anyone is thinking of buying one from Sherline check out the "packages" they come with enough accessories that you can start milling right away.
The first one, using a broken drill bit, grind it lengthwise such that when looking from the end, it's only a half-round. Don't do the whole bit, just the end that needs to stick out of the chuck or collet. You want the rest round to fit into the chuck or collet. Using that, you cut tiny slots (depending on the bit size). The flat area does the cutting and also lets the swarf drop out.


 0086-813-8127573