
Magnaflow 16917 Street Series Cat-back Stainless ... - 16917
LinkedIn and 3rd parties use essential and non-essential cookies to provide, secure, analyze and improve our Services, and to show you relevant ads (including professional and job ads) on and off LinkedIn. Learn more in our Cookie Policy.
2. With a square, mark straight lines on the face of the pin boards down to the baseline. This is a source of confusion for many woodworkers, because whereas you use a square on the ends of the tail boards, you use it on the faces of the pin boards. Checking with a complete set of dovetails will remind you which face and which end have straight lines on them.
Select Accept to consent or Reject to decline non-essential cookies for this use. You can update your choices at any time in your settings.
5. Across the ends of both tail boards, use a square to draw the lines that describe the tails. Then set your T-bevel for the angles of the tails and mark the angles on the face of one board. The right angle for dovetails is simple to get. I’ve never found recommended degrees and such useful. I set my T-bevel off another set of dovetails in my shop or by eye. But if you don’t have a sample joint or layout jig and are uncomfortable doing it by eye, try the technique in “Paper Angles.”
Titans ofCNCowner
In the dovetailing courses I’ve taught, most students have found a sample set to pore over very useful. Of course, you need to make that first set to have it to study (it’s a chicken and egg thing).
6. Pare clean the surfaces you’ve just chopped with a chisel. If you leave them rough, they’ll prevent the joint from coming together fully. Never cut shallower than the baseline at the edges, but inside where you don’t see it’s fine to undercut a bit. F
Get instant access to over 100 digital plans available only to UNLIMITED members. Start your 14-day FREE trial - and get building!
This Tool Holder's Coolant Placement is Genius Göltenbodt technology GmbH Tornos Group #titansofcnc #cnc #cncmachining #machining #3dprinting #engineering
Become an UNLIMITED member and get it all: searchable online archive of every issue, how-to videos, Complete Illustrated Guide to Woodworking digital series, print magazine, e-newsletter, and more.
Titans ofCNCNet worth
Measure 1 in. from a corner along the short side of a sheet of paper and make a mark. Measure 6 in. from the same corner but along the long side. Draw a straight line between the two marks and cut along it. You’ve just made an adequate dovetail jig.
Stunning Clear Finish with See Thru MCD Tool Horn USA, Inc. DN Solutions America DN Solutions Global #titansofcnc #cnc #cncmachining #machining #3dprinting #engineering
TITANS ofCNClocation
Satisfying Cut on Monster Part Heller Machine Tools Kennametal Mastercam #titansofcnc #cnc #cncmachining #machining #3dprinting #engineering
3. Mark the waste between the pins. This is a key orienting technique. Without those marks it can be very easy to cut out the wrong parts, or simply on the wrong side of your line.
Fine Woodworking receives a commission for items purchased through links on this site, including Amazon Associates and other affiliate advertising programs.
Titans ofCNCWikipedia
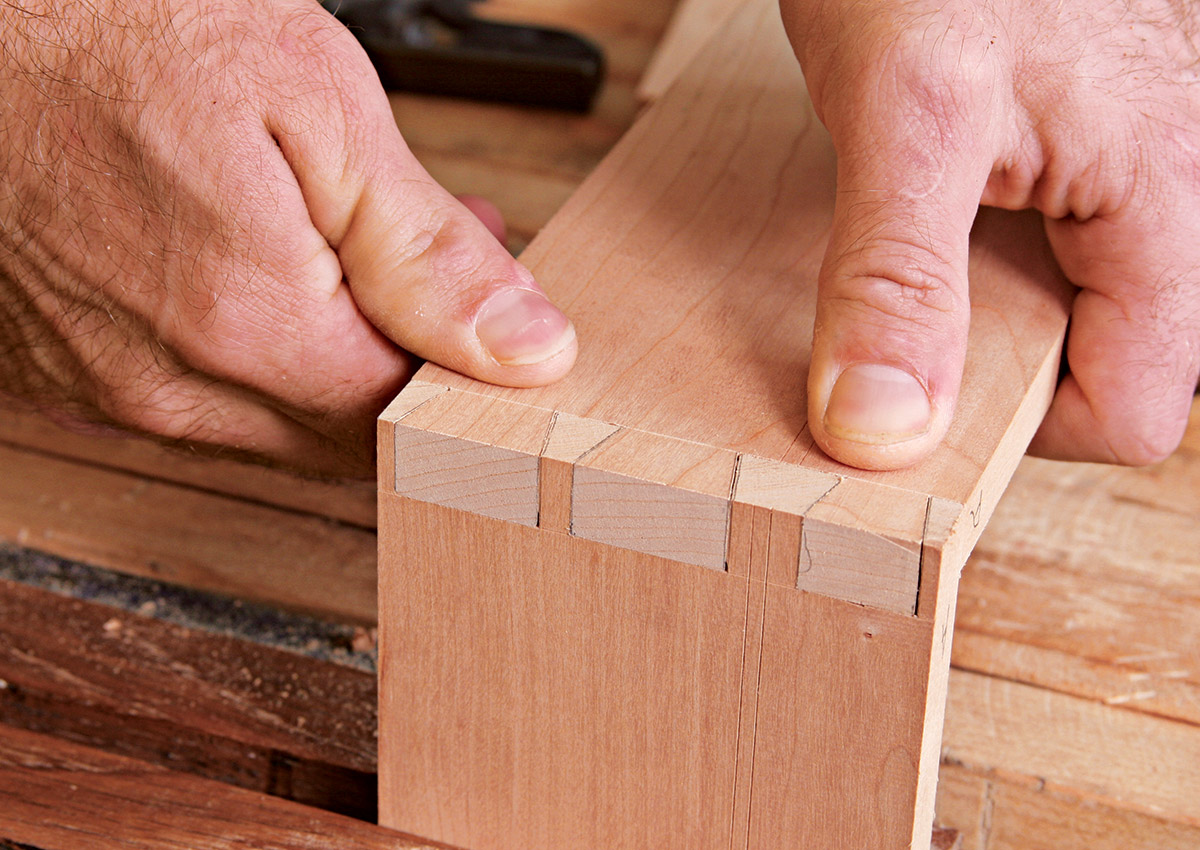
8. In softer woods such as cherry, I chop out the waste between the tails. Your first cut should be well off the baseline, as the chisel will move toward it during the cut. If you start at the baseline, the chisel will dig in past the baseline. Chop from both sides and knock out the chips. A coping saw with a thin blade is another good tool to use for removing the waste between the tails, as is a bandsaw or scrollsaw.
TITANS ofCNCyoutube
To use it, fold the remaining piece of paper at 90 degrees across its width, then drape it over your workpiece. Mark out your tails as necessary. It’s that easy.
This is the second of three articles on making a simple dovetailed box. The first article explained how to mill the cherry stock for the box. Here, we show how to lay out and cut the dovetails. In the next article you’ll learn how to assemble the box and add the hinges.
Though they’re helpful, you don’t need a T-bevel, angle guide, or protractor to lay out good dovetail angles. You can make do with a piece of paper, a pencil, and a ruler.
TITANS of CNC, Inc. stands at the forefront of the global manufacturing industry, redefining standards through innovation, education, and community empowerment. As a premier leader in CNC machining and advanced manufacturing, the team at TITANS of CNC has revolutionized the way machining is taught and understood, setting new benchmarks for excellence and accessibility. Founded by Global Manufacturing Leader Titan Gilroy, TITANS of CNC has transformed from a modest machine shop into an international phenomenon, recognized for its pioneering CNC Academies. Offering free, world-class education, the TITANS of CNC Academy has become the go-to resource for students, educators, and industry professionals across 190+ countries, delivering comprehensive training that bridges the gap between theory and hands-on application. Our commitment to pushing the boundaries of what's possible in manufacturing is matched only by our dedication to empowering the next generation of machinists. Through our state-of-the-art curriculum, real-world projects, and a vast library of engaging content, we equip individuals and companies with the skills and knowledge needed to excel in an ever-evolving industry. As a Power House on social media, TITANS of CNC reaches millions of followers, sharing innovative techniques, inspirational stories, and industry insights. Our dynamic content not only educates but has also fostered the largest global community of makers, driving a renaissance in manufacturing. Recognized with numerous awards and industry accolades, TITANS of CNC continues to lead the charge in modern manufacturing education. Our mission is clear: to elevate the standards of CNC machining, champion the resurgence of American manufacturing, and inspire a worldwide movement of innovation and excellence. Join us as we shape the future of manufacturing, one groundbreaking project at a time.
TITANS ofCNCphone number
Start with the two 1/8-in.-wide half pin lines at either end, then divide the remaining space evenly, taking into consideration the kerf you’ll lose later. As for errors, the less evenly spaced dovetails are, the more they say “handmade.” So give yourself a break if you’re not precise.
3. If the joint is almost together and you need just a slightly bigger push than your hands can muster, it’s OK to reach for a hammer. But don’t tell anyone. If the tail board splits, I warned you. C
1. Set your marking gauge to the thickness of your boards. Scratch your baseline on both faces of each end of all four side pieces.
3. With a marking gauge scratch two parallel lines, 1/8 in. apart, along the faces of all four boards, 1-1/16 in. from the top edge. This marks the kerf where you will saw the box in two after assembly. It’s important to mark these lines before you lay out the dovetails because they show the boundary between the top and bottom of the box.
Insane Swiss Machining Compilation Tornos Group Kennametal #titansofcnc #cnc #cncmachining #machining #3dprinting #engineering
Grinding with 2 Wheels at Once UNITED GRINDING North America Tyrolit Group #titansofcnc #cnc #cncmachining #machining #3dprinting #engineering
TITANS ofCNCSYIL
4. Saw just inside of the lines you marked (on the waste side). It’s best to leave the pins large. Don’t saw directly on your guidelines.
? Revolutionizing Manufacturing Worldwide ? Introducing CNCEXPERT.com – the app that will transform how you work, connect, and grow in the manufacturing industry. Need your CNC machine repaired? Book a service tech instantly for a fraction of the cost – just like calling an Uber. But that’s just the beginning… This all-in-one platform is your gateway to: • ? The Largest Online Community for Industry Pros • ? Finding Customers, Vendors, and Skilled Workers • ?️ Showcasing Your Work with a Stunning Gallery • ?️ Getting CAD, CAM, & CNC Certified • ? Building Your Influence and Becoming a Leader in the Field I’m already using it—and it’s amazing. Join today at CNCEXPERT.com and be part of the global movement reshaping manufacturing. ? The app launches soon, and early access is yours if you sign up now. This isn’t just an app; it’s the future of our industry. #CNCEXPERT #ManufacturingRevolution #Innovation
TITANS ofCNCjobs
The TERRIFYING Process Of Machining Vespel https://lnkd.in/gmCvTKSr #titansofcnc #cnc #cncmachining #cncmachinist #machining #innovation #technology

How I Charge $40 for a $370 Part https://lnkd.in/gTVeiV-P #titansofcnc #cnc #cncmachining #cncmachinist #machining #innovation #technology
4. On each end of the tail boards, mark lines 1/8 in. from each end. Then space the tops of the tails evenly, as shown in the drawing below. It’s important to space the tails around the kerf farther apart. When you cut the box apart, the resulting half-pins should look like a proper-size whole one.
6. With a fine-toothed saw, cut your marked lines down to the base line. The toughest part is sawing exactly to your line, so keep your eyes open and pay lots of attention to the way you hold the saw. Sawing two boards at once helps ensure accuracy.
1. Do not reach for the hammer. Test fit the joint with hand pressure only (and using the palm of your hand like a hammer will hurt). If the joint doesn’t start to go together by hand with some effort, then it’s too tight. If the joint goes together the first time perfectly, call the local newspaper, as you’ve just performed a miracle.
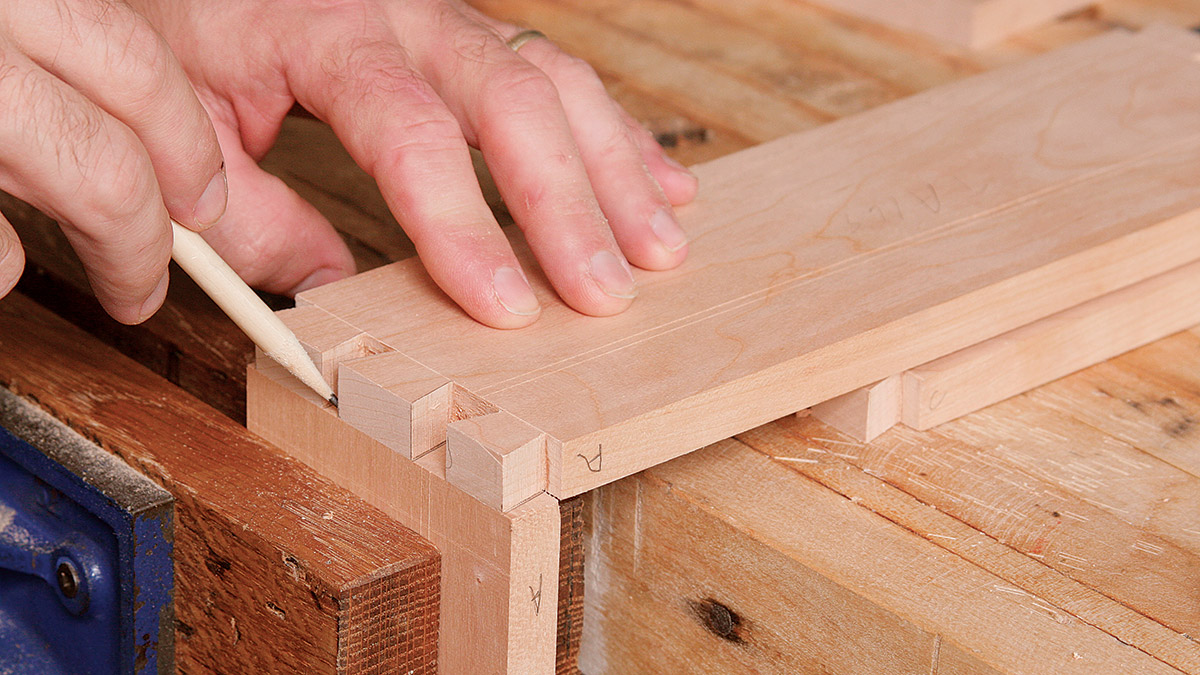
1. Unlike the tails, you lay out the pins individually using the matched set of tails as a template. This ensures that each joint fits perfectly. So place the “A” tail board over the end of the “A” pin board and trace the tails onto the ends of the pin board with a pencil.
2. Align the front, back, and sides as you want them in the finished box. Label the joints on the top edge (I use “A-B-C-D” for the four joints). I mark the outside faces with “Tails,” and on the sides I write “Pins,” to keep track of which way is out and which part of the joint goes on which board. Believe me, all this writing helps avoid disasters.
My dovetailing strategies have become habit over the years, both good and bad. I’ll show you the whole process, though I admit taking shortcuts sometimes. It’s traditional to cut half pins, not half tails. I’ve also made one tail wider to accommodate the kerf of material lost when the box is sawn in two.


 0086-813-8127573