
STHT0-74367 STANLEY - Pliers | universal; CONTROL-GRIP - 74367
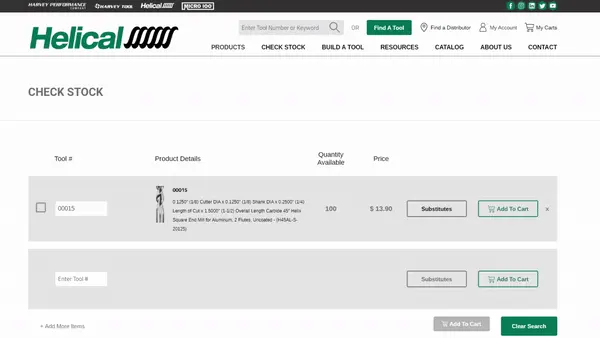
If you know the EDP number you need and want to check stock levels, use our Check Stock feature to check quantities on hand, and then add the tools to your “shopping cart” right from the Check Stock page.
The Cut Optimizer is easy to use, and it lets you optimize one of the two variables (Depth of Cut or Cut Width) while you hold the other one constant. For example, suppose you need to machine a slot that is 1″ deep with a cutter that is the diameter of the slot. You will be holding Cut Width constant–it’s the diameter of the cutter. But Depth of Cut is the variable to be optimized. What the Cut Optimizer does is to calculate the deepest cut that can be taken without creating excessive tool deflection.
Depth of cut and stepover (width of cut) are crucial variables when milling pockets, profiling, facing, and any other machining operation where you’ll be cutting with the flutes on the side of a cutting tool. Other important variables are the machine’s capabilities, the material to be cut, and a description of the tool to be used. The rest can be determined from those variables.

The astute reader will see that a lot of what’s been said above is great for 2 1/2D machine, but may not apply to 3D Toolpaths. It’s true, and that’s a whole new area. We’ve got a great article on selecting the best stepovers for 3D profiling that talks through the theory. But check it out:
Depth of cutin drilling
In exchange, we back off the Stepover a bit. Using such deep depth of cut means we could have chip clearance and heat problems. Backing off the Stepover is how we avoid that. It turns out the resultant cutting parameters work great for High Speed Machining tool paths, which bring even more performance to HEM.
Using more flute length means spreading the wear over a longer length. That means your cutter lasts longer, or it can also mean you can drive it a bit harder.
Since this tool is offered uncoated and Zplus coated, we need to select which option we would like from the drop down menu. For this example, we will select the Zplus coated tool. Now, we simply need to update our quantity to “5”, and click “Add To Cart.” That tool will now appear in your “shopping cart” in the quantity selected.
Depth of Cut is the length of the side of the flutes that are actually cutting. So, if you’re doing a pocket in several steps or layers, it is the thickness of the current layer you’re cutting and not the total depth of the pocket. Depth of Cut is also referred to as Axial Depth of Cut.
Bob is responsible for the development and implementation of the popular G-Wizard CNC Software. Bob is also the founder of CNCCookbook, the largest CNC-related blog on the Internet.
Let’s start by defining the terms “Depth of Cut” and “Cut Width” (also called “Stepover”). Since a picture is worth a thousand words:
Optimizing the Depth of Cut or Stepover to keep Tool Deflection under control is super easy. Just click the title of the one you want to optimize and it’s done:
Join 100,000+ CNC'ers! Get our latest blog posts delivered straight to your email inbox once a week for free. Plus, we’ll give you access to some great CNC reference materials including:
With the launch of the new Helical Solutions website, Harvey Performance Company is proud to introduce a new way to order Helical cutting tools. Now, users of our new website are able to send a “shopping cart” of Helical tools they’re interested in directly to their distributor to place an order, or share it with a colleague. Let’s dive into the details about this functionality and learn how you can take advantage of the time savings associated with sending a “shopping cart” to your distributor for simplified ordering.
To get started with this exciting new way to shop for Helical cutting tools, click here to begin creating an account on HelicalTool.com! print
That’s all bad, but it gets worse. At some point, if you’re producing chips fast enough, and your cutter is down in a hole or slot with walls blocking chips in, you will create so many chips that they jam in the teeth of the cutter and you shortly have a broken cutter.
Or take an opposite example. You’re profiling a wall and you’d like to do it in a single pass instead of having to step down for multiple passes. You want to do this because the wall finish will look prettier without having the steps visible and because it spreads the wear over a longer flute length, which means your tool will last longer. In that case, Depth of Cut is the constant and the Cut Width is what you’d like to optimize.
On the right side of the My Cart screen, you will see an option to “Send to Distributor.” Click on the text to expand the drop down. If you have previously added a preferred distributor from your account page and they are participating in our Shopping Cart Program, you will see their information in this area.
There are actually many more such factors, and they’re all inter-related. Strategies like High Speed Machining make those inter-relationships even more complex and unpredictable. Choosing the best Cut Width and Depth of Cut are a function of optimizing a lot of trade offs!
Depth of cutformula for turning
When CADCAM Wizards are considering the various combinations of Depth of Cut and Stepover, it prefers a greater Depth of Cut over a more shallow one, all other things being equal.
We introduced the Cut Optimizer some time ago and it has been an extremely popular part of G-Wizard. To this day, only G-Wizard has a Cut Optimizer.
G-Wizard Calculator has a CADCAM Wizard that can optimize stepover for 3D profiling toolpaths using all those same principles.
The machining time spent roughing your workpiece is mostly determined by Material Removal Rate. If you can get a higher Material Removal Rate, you can shorten the machining time. For a commercial machine shop, optimizing MRR can make a huge difference to your business.
One can do systematic experiments given time, but there are so many variables involved that any combination of machine, material to be cut, and tool requires a completely new set of experiments to be done. A big matrix of Depths of Cut and Cut Widths must be assembled and Feed Rate and Cutting Speed together with MRR’s computed. Very few have time to do all that, so they fall back on what’s worked in the past, which may not be even close to optimal in the present.
That is, unless you have our G-Wizard Calculator Software. GW Calculator has not one but two tools for optimizing Depth of Cut and Cut Width. In fact, since it can calculate Scallop Heights for 3D profiling with ball nosed end mills, it actually has three tools, but we want to focus on the two.
That’s exactly what CADCAM Wizards do. It’s easier to watch them in action than to try to explain further, so check out another new G-Wizard University video for the details:
A cutting tool has to be able to clear chips that it cuts. If they’re not cleared, they will be cut again and again. In that sense, they compete with the end mill’s ability to cut new material.
Let’s be specific about what we’re optimizing. When roughing we want to optimize Material Removal Rate. After all, the purpose of roughing is raw Material Removal. We want to do it as quickly as we can without compromising Tool Life so much that it isn’t worth it.
You can create more clearance for chips to get out and coolant to get in by reducing Depth of Cut or Stepover. Increasing Depth of Cut or Stepover may require you to do a better job chip clearing. That can mean such things as:
Before you can generate the g-code for any given feature, CAM software needs to know those things. Most CNC’ers calculate Cutting Speed and Feed Rate using science. Unfortunately, most CNC’ers have no scientific way to choose Depth of Cut and Stepover. Your choice of Depth of Cut and Stepover will limit Cutting Speed and Feed Rate. That means we can unlock a lot of potential by adopting a more scientific approach to Depth of Cut and Stepover.
Within 1 business day, the distributor will follow up with you to confirm the order, process payment, and get the tools shipped out and on the way to your shop. No more phone calls or emails – just a single click, and your order is in the hands of our distributor partners.
If you have not yet selected a preferred distributor, select “Update My Distributor.” This will bring you to a new page where you can select your state and see all participating distributors in your area. Select one distributor as your preferred distributor, and then head back to the My Cart page.
Depth of cutCalculator
Sign up to receive a monthly recap of: – The latest machining solutions – Machining tips and tricks – A recap of our most popular posts
For roughing, deflection is roughly equivalent to runout as far as tool life is concerned. Even a little (as a % of max chip load), can really shorten tool life. Thinking of your cutting tool as the paperclip that got bent too many times, and with deflection it is getting bent at whatever your spindle rpm is as times per minute. Worse, deflection excites chatter like crazy.
Despite the importance of Depth of Cut and Stepover, most machinists do not have analytical tools that help them to optimize their values. Instead, they rely on guesswork, rules of thumb, and what has worked well in the past.
If you need more information on a tool, you can click on an EDP number to be brought to the tool details page, where you can also add that EDP to your collection.
While it sounds like it could be something extremely advanced and hard to understand, the principle behind High Efficiency Milling is actually pretty simple. If you bury your cutter in the work, you’re going to wind up making multiple passes to get down to the full depth of a pocket in many cases. With HEM, the idea is to use as much of the flute length as possible on your cutter. You may be able to cut that pocket in a single layer instead of several.
Depth of cutformula
This is a complex topic, and I’ll refer you to a dedicated article for more information. Suffice it to say we allow more for roughing than finishing because too much deflection is bad when you want a good surface finish or need to hold tight tolerances. Therefore, finish passes can tolerate less.
Depth of cutformula for milling
Once you have completed adding tools to your Helical “shopping cart,” navigate back to the My Carts page to review it. From here, you can update quantities, see list pricing, and access valuable resources.
For the sake of completeness, Cutting Speed is defined as your spindle speed (in rpm) in the cut. Feed Rate is defined as how fast the cutter is moving through the cut.
First, you must create an account on HelicalTool.com. Having an account on the Helical website allows you to save and edit “shopping carts,” which can be sent to a distributor to place an order; choose a preferred distributor; auto-fill your information in any important forms; and to manage your shipping information.
Now that you have a distributor selected, you can do a final review of the “shopping cart,” and then simply click “Send Cart.” This will send an email order directly to your distributor with all of your shipping information, your list of tools and requested quantities, and your contact information. You will also receive a copy of this email for your records.
Both of these tools are unique to G-Wizard, so if you’re looking to make Depth of Cut and Cut Width a little more scientific (and you know you really ought to), you’ve found the right place. Put them to work for you, they’re quick and easy, and before you know it you’ll find your cycle times are shorter and your tools last longer. It’s almost as good as sliced bread. Well, not quite, but close. If you’ve never tried G-Wizard, be sure to check out our free 30-day trial.
Depth of cut definitionlathe machine
G-Wizard’s default deflection limits are pretty conservative, and are aimed at minimizing chatter. But, you can set them to whatever you’d like.
Cutting speeddefinition
Rules of thumb can be useful memory aids when they’re used to refer to simple phenomena that are easily explained. But, with Depth of Cut and Cut Width, there are so many complex phenomena that interact with each other that rules of thumb are useless. Worse, they can conflict.
Moreover, you want the recipe to address both roughing and finishing without you having to tell your assistant anything additional. Lastly, you want this assistant to ask you as few questions as possible. After all, your time is valuable. Let the assistant worry about the details.
Once complete, you can name your “shopping cart” anything you would like. One example might be creating a collection of tools for each of your jobs, or for different machines in the shop. In this case, we will name it “Aluminum Roughing Job.” You can create as many different “shopping carts” as you would like; they’ll never be removed from your account unless you choose to delete them, allowing you to go back to past tooling orders whenever you’d like.
Cut Width, also called Stepover, is the total thickness of the cut when viewing the cutting tool from above. It can be no more than 100% of the cutter’s diameter. Stepover is also referred to as Radial Depth of Cut.
www.harveytool.com www.helicaltool.com www.micro100.com www.titancuttingtools.com www.corehog.com www.valorholemaking.com
CADCAM Wizards really put some amazing power at your fingertips. Like I said in the video, when was the last time you got a chance to run 1100 different scenarios to find the best combination of parameters for a job? I will never have enough time to do that even once. Yet as a customer said to me, G-Wizard makes it possible to optimize every cut. It even makes it easy to do so.
Depth of cut definitionlathe
Cut Optimizer was a great advancement–finally a tool that made determining the best Depth of Cut or Cut Width a science. But the CADCAM Wizards are even more powerful and strangely enough, simpler to use. CADCAM Wizards are a feature included with every copy of G-Wizard Calculator. They’re accessed by clicking the CADCAM tab. Imagine having an assistant who was really good at figuring out “Cut Recipes.” A Cut Recipe is everything you need to know in order to tell the CAM software how to generate a toolpath to cut a particular feature:
To begin creating a new shopping cart, simply click on the “My Carts” text in the top right menu. This will take you to the management portal, where you can add a new “shopping cart” by selecting “Create New Shopping Cart.”
There are multiple ways to add tooling to your “shopping cart,” but the easiest method is by heading to a product table. In this example, we will be adding tooling from our 3 Flute, Corner Radius – 35° Helix product line. We want to add a quantity of 5 of EDP #59033 to our “shopping cart.” To do this, simply click on the “Add To Cart” icon located in the table row next to pricing and tool descriptions. This will open up a small window where we can manage our selection. The first step will be to choose which “shopping cart” we want to add this tool to, so we will select our “Aluminum Roughing Job” collection.


 0086-813-8127573