
Tool Buying Guides - buying tool
Of course, making these is surprisingly time consuming, but the result is very satisfying. The picture above shows the wall above my workbench with the drill press on it. I moved the drill press out of the way to take these photos. The screwdriver holder is easiest to make. It's just a board attached to the wall, with a lot of holes in it. There's also a slot to hold the scissors. Because it's just to the right of the drill press, I use some of the holes for drill chuck keys. To hold a lot of pliers, it's easiest to just hook them onto the edge of a piece of wood. A lot of pliers go in a small amount of space that way. The piece of wood in this holder is tapered towards the top edge, so that it doesn't force the handles too far apart. It's really only about half full with pliers so far. The caliper holder is a neat shaped piece of wood. It has a channel in the middle for the bar of the calipers, and a hook on either side to hold the sliding part. I mounted this so it's not far from the table saw, because I use the calipers in combination with the table saw most often. I also have a dial caliper, but I keep that one in a case in the drawer. The vernier calipers are pretty much invulnerable to dust, whereas anything fancier might get gummed up. The chisel holder was another fun one to build. I drilled the holes so that they just touch the edge of the piece of wood, then cut in from the edge to the holes, so it's possible to slide the chisel in from the front. The holes are slightly wider at the top and bottom - Wider at the top to better catch the handle, and at the bottom to give room for the wider chisels. I dimensioned it to work best with the marples chisel set, although it works with my other chisels too. A holder for the hammers. The wooden mallet at the left is home made. Easy enough to make one. I don't understand why people buy them when they are so easy to make. On the right side is the marking gauge, and miter gauge, and a funny fine toothed saw hanging to the left of those. Holders for the hand planes. These are very time consuming to make. I figured I might want to get the drill index closer at hand at times, so I made a holder for the drill index, and put it on a shelf. Originally, my drill index was the type that came in a metal box like the one at right, but that sort of box does not lend itself well to putting it on a narrow shelf. I always found the drill index a little awkward to use in its original case, and I never ended up taking it out of the shop. Mostly, the case just ended up getting wood shavings lodged into it. So I cut up the metal case, and made a wooden base that the rows of drills are inserted in to. My brad point drill set on the other hand came in a plastic case. I cut the bottom part of it off, and hot glued it onto a piece of wood to keep it from tipping over. Much easier. My forstner bit set, with drills going up to 2" in diameter came in a nice wooden case. But keeping it near the drill press, it always became filled with wood shavings. So I finally decided to just make a shelf to hold all these drills. For the larger drills, I drilled a really shallow hole at the base of each one so that it's easy to check which sized drill goes in which hole. I don't use the larger drills all that often, so I decided to make more holes for more drills and accessories in front of those. On the left side, there's a bit of room which I may well drill more holes into to hold more stuff. For the time being, it's a place to put the brad point drill index. All the holes for the drills are drilled through to the bottom, but with the bottom part of the hole a smaller diameter. That way, any wood chips that might get into the holes can fall through to the bottom, without allowing the drills to fall through the holes. A holder for some carving tools. I wanted the bottom of the tools to be visible, so I know which tool I'm grabbing. But at the same time , didn't want the sharp ends to stick out of the bottom of the holder. So this holder has a sort of C profile. The bottom part is really just there as a guard. Holders for some squares. The right square is a machinist square. The left square is a rafter gauge. Both very trustworthy as squares. The rafter one is cheap but very trustworthy as a square, seeing that it would have to be totally wrecked to ever go out of square. In the middle is my small palm plane. I use this one a lot - mostly for putting a slight chamfer on the edges of work pieces. Chamfering the edges makes furniture feel much nicer to the touch, and it's a lot faster than sanding the edges round. Even for sanded round edges, it's less sanding to start with a chamfer. A holder for the drill press vise. Just two hooks on a piece of plywood. The piece is screwed onto the backing through the hooks. That way, the hooks are not prone to breaking off with the relatively heavy vise. And a holder for the small bar clamps. This isn't on the same wall as the rest of the tools holders. Note the profile of the top piece (see edge at left). It's shaped that so the small clamps nestle nicely in the top and stay vertical. And an overall view of how this fits together with my workbench and the drill press. There's still some free wall space. In time, I'm sure I'll use every bit of it.... ... That was in 2008. As of 2012, that wall has gotten quite full. Update 2014: I added another drill index to my walll, thos one of forstner bits. I extracted the drill holder from the index to make the mount. And this time And this time, I took the opportunity to make a video about the drill holders. Update 2017: On moving to the country, I took this tool wall with me because it was made for my best tools, swapping out these ones to make room for it. See also: Making tool holders part 1 and part 2 A better hand plane wall tool holder Chisel holder for my tool wall #shorts Builing a workbenchlike the one above An interesting tool chest design My basement workshopin 2009 and 2012 Workbench drawers Some nice homemadetool chests Parts sorting tray To my Woodworking website
My brad point drill set on the other hand came in a plastic case. I cut the bottom part of it off, and hot glued it onto a piece of wood to keep it from tipping over. Much easier. My forstner bit set, with drills going up to 2" in diameter came in a nice wooden case. But keeping it near the drill press, it always became filled with wood shavings. So I finally decided to just make a shelf to hold all these drills. For the larger drills, I drilled a really shallow hole at the base of each one so that it's easy to check which sized drill goes in which hole. I don't use the larger drills all that often, so I decided to make more holes for more drills and accessories in front of those. On the left side, there's a bit of room which I may well drill more holes into to hold more stuff. For the time being, it's a place to put the brad point drill index. All the holes for the drills are drilled through to the bottom, but with the bottom part of the hole a smaller diameter. That way, any wood chips that might get into the holes can fall through to the bottom, without allowing the drills to fall through the holes. A holder for some carving tools. I wanted the bottom of the tools to be visible, so I know which tool I'm grabbing. But at the same time , didn't want the sharp ends to stick out of the bottom of the holder. So this holder has a sort of C profile. The bottom part is really just there as a guard. Holders for some squares. The right square is a machinist square. The left square is a rafter gauge. Both very trustworthy as squares. The rafter one is cheap but very trustworthy as a square, seeing that it would have to be totally wrecked to ever go out of square. In the middle is my small palm plane. I use this one a lot - mostly for putting a slight chamfer on the edges of work pieces. Chamfering the edges makes furniture feel much nicer to the touch, and it's a lot faster than sanding the edges round. Even for sanded round edges, it's less sanding to start with a chamfer. A holder for the drill press vise. Just two hooks on a piece of plywood. The piece is screwed onto the backing through the hooks. That way, the hooks are not prone to breaking off with the relatively heavy vise. And a holder for the small bar clamps. This isn't on the same wall as the rest of the tools holders. Note the profile of the top piece (see edge at left). It's shaped that so the small clamps nestle nicely in the top and stay vertical. And an overall view of how this fits together with my workbench and the drill press. There's still some free wall space. In time, I'm sure I'll use every bit of it.... ... That was in 2008. As of 2012, that wall has gotten quite full. Update 2014: I added another drill index to my walll, thos one of forstner bits. I extracted the drill holder from the index to make the mount. And this time And this time, I took the opportunity to make a video about the drill holders. Update 2017: On moving to the country, I took this tool wall with me because it was made for my best tools, swapping out these ones to make room for it. See also: Making tool holders part 1 and part 2 A better hand plane wall tool holder Chisel holder for my tool wall #shorts Builing a workbenchlike the one above An interesting tool chest design My basement workshopin 2009 and 2012 Workbench drawers Some nice homemadetool chests Parts sorting tray To my Woodworking website
Update 2017: On moving to the country, I took this tool wall with me because it was made for my best tools, swapping out these ones to make room for it. See also: Making tool holders part 1 and part 2 A better hand plane wall tool holder Chisel holder for my tool wall #shorts Builing a workbenchlike the one above An interesting tool chest design My basement workshopin 2009 and 2012 Workbench drawers Some nice homemadetool chests Parts sorting tray To my Woodworking website
I always found the drill index a little awkward to use in its original case, and I never ended up taking it out of the shop. Mostly, the case just ended up getting wood shavings lodged into it. So I cut up the metal case, and made a wooden base that the rows of drills are inserted in to. My brad point drill set on the other hand came in a plastic case. I cut the bottom part of it off, and hot glued it onto a piece of wood to keep it from tipping over. Much easier. My forstner bit set, with drills going up to 2" in diameter came in a nice wooden case. But keeping it near the drill press, it always became filled with wood shavings. So I finally decided to just make a shelf to hold all these drills. For the larger drills, I drilled a really shallow hole at the base of each one so that it's easy to check which sized drill goes in which hole. I don't use the larger drills all that often, so I decided to make more holes for more drills and accessories in front of those. On the left side, there's a bit of room which I may well drill more holes into to hold more stuff. For the time being, it's a place to put the brad point drill index. All the holes for the drills are drilled through to the bottom, but with the bottom part of the hole a smaller diameter. That way, any wood chips that might get into the holes can fall through to the bottom, without allowing the drills to fall through the holes. A holder for some carving tools. I wanted the bottom of the tools to be visible, so I know which tool I'm grabbing. But at the same time , didn't want the sharp ends to stick out of the bottom of the holder. So this holder has a sort of C profile. The bottom part is really just there as a guard. Holders for some squares. The right square is a machinist square. The left square is a rafter gauge. Both very trustworthy as squares. The rafter one is cheap but very trustworthy as a square, seeing that it would have to be totally wrecked to ever go out of square. In the middle is my small palm plane. I use this one a lot - mostly for putting a slight chamfer on the edges of work pieces. Chamfering the edges makes furniture feel much nicer to the touch, and it's a lot faster than sanding the edges round. Even for sanded round edges, it's less sanding to start with a chamfer. A holder for the drill press vise. Just two hooks on a piece of plywood. The piece is screwed onto the backing through the hooks. That way, the hooks are not prone to breaking off with the relatively heavy vise. And a holder for the small bar clamps. This isn't on the same wall as the rest of the tools holders. Note the profile of the top piece (see edge at left). It's shaped that so the small clamps nestle nicely in the top and stay vertical. And an overall view of how this fits together with my workbench and the drill press. There's still some free wall space. In time, I'm sure I'll use every bit of it.... ... That was in 2008. As of 2012, that wall has gotten quite full. Update 2014: I added another drill index to my walll, thos one of forstner bits. I extracted the drill holder from the index to make the mount. And this time And this time, I took the opportunity to make a video about the drill holders. Update 2017: On moving to the country, I took this tool wall with me because it was made for my best tools, swapping out these ones to make room for it. See also: Making tool holders part 1 and part 2 A better hand plane wall tool holder Chisel holder for my tool wall #shorts Builing a workbenchlike the one above An interesting tool chest design My basement workshopin 2009 and 2012 Workbench drawers Some nice homemadetool chests Parts sorting tray To my Woodworking website
Techniks Catalog
Find many great new & used options and get the best deals for 36lbs 316 Stainless Steel Shavings Filings Turning Shredded Chips Science Orgone at the best ...
Update 2017: On moving to the country, I took this tool wall with me because it was made for my best tools, swapping out these ones to make room for it. See also: Making tool holders part 1 and part 2 A better hand plane wall tool holder Chisel holder for my tool wall #shorts Builing a workbenchlike the one above An interesting tool chest design My basement workshopin 2009 and 2012 Workbench drawers Some nice homemadetool chests Parts sorting tray To my Woodworking website
On the right side is the marking gauge, and miter gauge, and a funny fine toothed saw hanging to the left of those. Holders for the hand planes. These are very time consuming to make. I figured I might want to get the drill index closer at hand at times, so I made a holder for the drill index, and put it on a shelf. Originally, my drill index was the type that came in a metal box like the one at right, but that sort of box does not lend itself well to putting it on a narrow shelf. I always found the drill index a little awkward to use in its original case, and I never ended up taking it out of the shop. Mostly, the case just ended up getting wood shavings lodged into it. So I cut up the metal case, and made a wooden base that the rows of drills are inserted in to. My brad point drill set on the other hand came in a plastic case. I cut the bottom part of it off, and hot glued it onto a piece of wood to keep it from tipping over. Much easier. My forstner bit set, with drills going up to 2" in diameter came in a nice wooden case. But keeping it near the drill press, it always became filled with wood shavings. So I finally decided to just make a shelf to hold all these drills. For the larger drills, I drilled a really shallow hole at the base of each one so that it's easy to check which sized drill goes in which hole. I don't use the larger drills all that often, so I decided to make more holes for more drills and accessories in front of those. On the left side, there's a bit of room which I may well drill more holes into to hold more stuff. For the time being, it's a place to put the brad point drill index. All the holes for the drills are drilled through to the bottom, but with the bottom part of the hole a smaller diameter. That way, any wood chips that might get into the holes can fall through to the bottom, without allowing the drills to fall through the holes. A holder for some carving tools. I wanted the bottom of the tools to be visible, so I know which tool I'm grabbing. But at the same time , didn't want the sharp ends to stick out of the bottom of the holder. So this holder has a sort of C profile. The bottom part is really just there as a guard. Holders for some squares. The right square is a machinist square. The left square is a rafter gauge. Both very trustworthy as squares. The rafter one is cheap but very trustworthy as a square, seeing that it would have to be totally wrecked to ever go out of square. In the middle is my small palm plane. I use this one a lot - mostly for putting a slight chamfer on the edges of work pieces. Chamfering the edges makes furniture feel much nicer to the touch, and it's a lot faster than sanding the edges round. Even for sanded round edges, it's less sanding to start with a chamfer. A holder for the drill press vise. Just two hooks on a piece of plywood. The piece is screwed onto the backing through the hooks. That way, the hooks are not prone to breaking off with the relatively heavy vise. And a holder for the small bar clamps. This isn't on the same wall as the rest of the tools holders. Note the profile of the top piece (see edge at left). It's shaped that so the small clamps nestle nicely in the top and stay vertical. And an overall view of how this fits together with my workbench and the drill press. There's still some free wall space. In time, I'm sure I'll use every bit of it.... ... That was in 2008. As of 2012, that wall has gotten quite full. Update 2014: I added another drill index to my walll, thos one of forstner bits. I extracted the drill holder from the index to make the mount. And this time And this time, I took the opportunity to make a video about the drill holders. Update 2017: On moving to the country, I took this tool wall with me because it was made for my best tools, swapping out these ones to make room for it. See also: Making tool holders part 1 and part 2 A better hand plane wall tool holder Chisel holder for my tool wall #shorts Builing a workbenchlike the one above An interesting tool chest design My basement workshopin 2009 and 2012 Workbench drawers Some nice homemadetool chests Parts sorting tray To my Woodworking website
And an overall view of how this fits together with my workbench and the drill press. There's still some free wall space. In time, I'm sure I'll use every bit of it.... ... That was in 2008. As of 2012, that wall has gotten quite full. Update 2014: I added another drill index to my walll, thos one of forstner bits. I extracted the drill holder from the index to make the mount. And this time And this time, I took the opportunity to make a video about the drill holders. Update 2017: On moving to the country, I took this tool wall with me because it was made for my best tools, swapping out these ones to make room for it. See also: Making tool holders part 1 and part 2 A better hand plane wall tool holder Chisel holder for my tool wall #shorts Builing a workbenchlike the one above An interesting tool chest design My basement workshopin 2009 and 2012 Workbench drawers Some nice homemadetool chests Parts sorting tray To my Woodworking website
I figured I might want to get the drill index closer at hand at times, so I made a holder for the drill index, and put it on a shelf. Originally, my drill index was the type that came in a metal box like the one at right, but that sort of box does not lend itself well to putting it on a narrow shelf. I always found the drill index a little awkward to use in its original case, and I never ended up taking it out of the shop. Mostly, the case just ended up getting wood shavings lodged into it. So I cut up the metal case, and made a wooden base that the rows of drills are inserted in to. My brad point drill set on the other hand came in a plastic case. I cut the bottom part of it off, and hot glued it onto a piece of wood to keep it from tipping over. Much easier. My forstner bit set, with drills going up to 2" in diameter came in a nice wooden case. But keeping it near the drill press, it always became filled with wood shavings. So I finally decided to just make a shelf to hold all these drills. For the larger drills, I drilled a really shallow hole at the base of each one so that it's easy to check which sized drill goes in which hole. I don't use the larger drills all that often, so I decided to make more holes for more drills and accessories in front of those. On the left side, there's a bit of room which I may well drill more holes into to hold more stuff. For the time being, it's a place to put the brad point drill index. All the holes for the drills are drilled through to the bottom, but with the bottom part of the hole a smaller diameter. That way, any wood chips that might get into the holes can fall through to the bottom, without allowing the drills to fall through the holes. A holder for some carving tools. I wanted the bottom of the tools to be visible, so I know which tool I'm grabbing. But at the same time , didn't want the sharp ends to stick out of the bottom of the holder. So this holder has a sort of C profile. The bottom part is really just there as a guard. Holders for some squares. The right square is a machinist square. The left square is a rafter gauge. Both very trustworthy as squares. The rafter one is cheap but very trustworthy as a square, seeing that it would have to be totally wrecked to ever go out of square. In the middle is my small palm plane. I use this one a lot - mostly for putting a slight chamfer on the edges of work pieces. Chamfering the edges makes furniture feel much nicer to the touch, and it's a lot faster than sanding the edges round. Even for sanded round edges, it's less sanding to start with a chamfer. A holder for the drill press vise. Just two hooks on a piece of plywood. The piece is screwed onto the backing through the hooks. That way, the hooks are not prone to breaking off with the relatively heavy vise. And a holder for the small bar clamps. This isn't on the same wall as the rest of the tools holders. Note the profile of the top piece (see edge at left). It's shaped that so the small clamps nestle nicely in the top and stay vertical. And an overall view of how this fits together with my workbench and the drill press. There's still some free wall space. In time, I'm sure I'll use every bit of it.... ... That was in 2008. As of 2012, that wall has gotten quite full. Update 2014: I added another drill index to my walll, thos one of forstner bits. I extracted the drill holder from the index to make the mount. And this time And this time, I took the opportunity to make a video about the drill holders. Update 2017: On moving to the country, I took this tool wall with me because it was made for my best tools, swapping out these ones to make room for it. See also: Making tool holders part 1 and part 2 A better hand plane wall tool holder Chisel holder for my tool wall #shorts Builing a workbenchlike the one above An interesting tool chest design My basement workshopin 2009 and 2012 Workbench drawers Some nice homemadetool chests Parts sorting tray To my Woodworking website
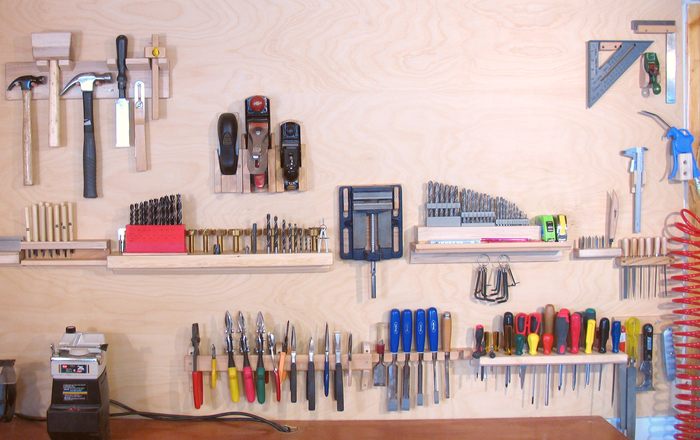
To hold a lot of pliers, it's easiest to just hook them onto the edge of a piece of wood. A lot of pliers go in a small amount of space that way. The piece of wood in this holder is tapered towards the top edge, so that it doesn't force the handles too far apart. It's really only about half full with pliers so far. The caliper holder is a neat shaped piece of wood. It has a channel in the middle for the bar of the calipers, and a hook on either side to hold the sliding part. I mounted this so it's not far from the table saw, because I use the calipers in combination with the table saw most often. I also have a dial caliper, but I keep that one in a case in the drawer. The vernier calipers are pretty much invulnerable to dust, whereas anything fancier might get gummed up. The chisel holder was another fun one to build. I drilled the holes so that they just touch the edge of the piece of wood, then cut in from the edge to the holes, so it's possible to slide the chisel in from the front. The holes are slightly wider at the top and bottom - Wider at the top to better catch the handle, and at the bottom to give room for the wider chisels. I dimensioned it to work best with the marples chisel set, although it works with my other chisels too. A holder for the hammers. The wooden mallet at the left is home made. Easy enough to make one. I don't understand why people buy them when they are so easy to make. On the right side is the marking gauge, and miter gauge, and a funny fine toothed saw hanging to the left of those. Holders for the hand planes. These are very time consuming to make. I figured I might want to get the drill index closer at hand at times, so I made a holder for the drill index, and put it on a shelf. Originally, my drill index was the type that came in a metal box like the one at right, but that sort of box does not lend itself well to putting it on a narrow shelf. I always found the drill index a little awkward to use in its original case, and I never ended up taking it out of the shop. Mostly, the case just ended up getting wood shavings lodged into it. So I cut up the metal case, and made a wooden base that the rows of drills are inserted in to. My brad point drill set on the other hand came in a plastic case. I cut the bottom part of it off, and hot glued it onto a piece of wood to keep it from tipping over. Much easier. My forstner bit set, with drills going up to 2" in diameter came in a nice wooden case. But keeping it near the drill press, it always became filled with wood shavings. So I finally decided to just make a shelf to hold all these drills. For the larger drills, I drilled a really shallow hole at the base of each one so that it's easy to check which sized drill goes in which hole. I don't use the larger drills all that often, so I decided to make more holes for more drills and accessories in front of those. On the left side, there's a bit of room which I may well drill more holes into to hold more stuff. For the time being, it's a place to put the brad point drill index. All the holes for the drills are drilled through to the bottom, but with the bottom part of the hole a smaller diameter. That way, any wood chips that might get into the holes can fall through to the bottom, without allowing the drills to fall through the holes. A holder for some carving tools. I wanted the bottom of the tools to be visible, so I know which tool I'm grabbing. But at the same time , didn't want the sharp ends to stick out of the bottom of the holder. So this holder has a sort of C profile. The bottom part is really just there as a guard. Holders for some squares. The right square is a machinist square. The left square is a rafter gauge. Both very trustworthy as squares. The rafter one is cheap but very trustworthy as a square, seeing that it would have to be totally wrecked to ever go out of square. In the middle is my small palm plane. I use this one a lot - mostly for putting a slight chamfer on the edges of work pieces. Chamfering the edges makes furniture feel much nicer to the touch, and it's a lot faster than sanding the edges round. Even for sanded round edges, it's less sanding to start with a chamfer. A holder for the drill press vise. Just two hooks on a piece of plywood. The piece is screwed onto the backing through the hooks. That way, the hooks are not prone to breaking off with the relatively heavy vise. And a holder for the small bar clamps. This isn't on the same wall as the rest of the tools holders. Note the profile of the top piece (see edge at left). It's shaped that so the small clamps nestle nicely in the top and stay vertical. And an overall view of how this fits together with my workbench and the drill press. There's still some free wall space. In time, I'm sure I'll use every bit of it.... ... That was in 2008. As of 2012, that wall has gotten quite full. Update 2014: I added another drill index to my walll, thos one of forstner bits. I extracted the drill holder from the index to make the mount. And this time And this time, I took the opportunity to make a video about the drill holders. Update 2017: On moving to the country, I took this tool wall with me because it was made for my best tools, swapping out these ones to make room for it. See also: Making tool holders part 1 and part 2 A better hand plane wall tool holder Chisel holder for my tool wall #shorts Builing a workbenchlike the one above An interesting tool chest design My basement workshopin 2009 and 2012 Workbench drawers Some nice homemadetool chests Parts sorting tray To my Woodworking website
I always found the drill index a little awkward to use in its original case, and I never ended up taking it out of the shop. Mostly, the case just ended up getting wood shavings lodged into it. So I cut up the metal case, and made a wooden base that the rows of drills are inserted in to. My brad point drill set on the other hand came in a plastic case. I cut the bottom part of it off, and hot glued it onto a piece of wood to keep it from tipping over. Much easier. My forstner bit set, with drills going up to 2" in diameter came in a nice wooden case. But keeping it near the drill press, it always became filled with wood shavings. So I finally decided to just make a shelf to hold all these drills. For the larger drills, I drilled a really shallow hole at the base of each one so that it's easy to check which sized drill goes in which hole. I don't use the larger drills all that often, so I decided to make more holes for more drills and accessories in front of those. On the left side, there's a bit of room which I may well drill more holes into to hold more stuff. For the time being, it's a place to put the brad point drill index. All the holes for the drills are drilled through to the bottom, but with the bottom part of the hole a smaller diameter. That way, any wood chips that might get into the holes can fall through to the bottom, without allowing the drills to fall through the holes. A holder for some carving tools. I wanted the bottom of the tools to be visible, so I know which tool I'm grabbing. But at the same time , didn't want the sharp ends to stick out of the bottom of the holder. So this holder has a sort of C profile. The bottom part is really just there as a guard. Holders for some squares. The right square is a machinist square. The left square is a rafter gauge. Both very trustworthy as squares. The rafter one is cheap but very trustworthy as a square, seeing that it would have to be totally wrecked to ever go out of square. In the middle is my small palm plane. I use this one a lot - mostly for putting a slight chamfer on the edges of work pieces. Chamfering the edges makes furniture feel much nicer to the touch, and it's a lot faster than sanding the edges round. Even for sanded round edges, it's less sanding to start with a chamfer. A holder for the drill press vise. Just two hooks on a piece of plywood. The piece is screwed onto the backing through the hooks. That way, the hooks are not prone to breaking off with the relatively heavy vise. And a holder for the small bar clamps. This isn't on the same wall as the rest of the tools holders. Note the profile of the top piece (see edge at left). It's shaped that so the small clamps nestle nicely in the top and stay vertical. And an overall view of how this fits together with my workbench and the drill press. There's still some free wall space. In time, I'm sure I'll use every bit of it.... ... That was in 2008. As of 2012, that wall has gotten quite full. Update 2014: I added another drill index to my walll, thos one of forstner bits. I extracted the drill holder from the index to make the mount. And this time And this time, I took the opportunity to make a video about the drill holders. Update 2017: On moving to the country, I took this tool wall with me because it was made for my best tools, swapping out these ones to make room for it. See also: Making tool holders part 1 and part 2 A better hand plane wall tool holder Chisel holder for my tool wall #shorts Builing a workbenchlike the one above An interesting tool chest design My basement workshopin 2009 and 2012 Workbench drawers Some nice homemadetool chests Parts sorting tray To my Woodworking website
... That was in 2008. As of 2012, that wall has gotten quite full. Update 2014: I added another drill index to my walll, thos one of forstner bits. I extracted the drill holder from the index to make the mount. And this time And this time, I took the opportunity to make a video about the drill holders. Update 2017: On moving to the country, I took this tool wall with me because it was made for my best tools, swapping out these ones to make room for it. See also: Making tool holders part 1 and part 2 A better hand plane wall tool holder Chisel holder for my tool wall #shorts Builing a workbenchlike the one above An interesting tool chest design My basement workshopin 2009 and 2012 Workbench drawers Some nice homemadetool chests Parts sorting tray To my Woodworking website
My forstner bit set, with drills going up to 2" in diameter came in a nice wooden case. But keeping it near the drill press, it always became filled with wood shavings. So I finally decided to just make a shelf to hold all these drills. For the larger drills, I drilled a really shallow hole at the base of each one so that it's easy to check which sized drill goes in which hole. I don't use the larger drills all that often, so I decided to make more holes for more drills and accessories in front of those. On the left side, there's a bit of room which I may well drill more holes into to hold more stuff. For the time being, it's a place to put the brad point drill index. All the holes for the drills are drilled through to the bottom, but with the bottom part of the hole a smaller diameter. That way, any wood chips that might get into the holes can fall through to the bottom, without allowing the drills to fall through the holes. A holder for some carving tools. I wanted the bottom of the tools to be visible, so I know which tool I'm grabbing. But at the same time , didn't want the sharp ends to stick out of the bottom of the holder. So this holder has a sort of C profile. The bottom part is really just there as a guard. Holders for some squares. The right square is a machinist square. The left square is a rafter gauge. Both very trustworthy as squares. The rafter one is cheap but very trustworthy as a square, seeing that it would have to be totally wrecked to ever go out of square. In the middle is my small palm plane. I use this one a lot - mostly for putting a slight chamfer on the edges of work pieces. Chamfering the edges makes furniture feel much nicer to the touch, and it's a lot faster than sanding the edges round. Even for sanded round edges, it's less sanding to start with a chamfer. A holder for the drill press vise. Just two hooks on a piece of plywood. The piece is screwed onto the backing through the hooks. That way, the hooks are not prone to breaking off with the relatively heavy vise. And a holder for the small bar clamps. This isn't on the same wall as the rest of the tools holders. Note the profile of the top piece (see edge at left). It's shaped that so the small clamps nestle nicely in the top and stay vertical. And an overall view of how this fits together with my workbench and the drill press. There's still some free wall space. In time, I'm sure I'll use every bit of it.... ... That was in 2008. As of 2012, that wall has gotten quite full. Update 2014: I added another drill index to my walll, thos one of forstner bits. I extracted the drill holder from the index to make the mount. And this time And this time, I took the opportunity to make a video about the drill holders. Update 2017: On moving to the country, I took this tool wall with me because it was made for my best tools, swapping out these ones to make room for it. See also: Making tool holders part 1 and part 2 A better hand plane wall tool holder Chisel holder for my tool wall #shorts Builing a workbenchlike the one above An interesting tool chest design My basement workshopin 2009 and 2012 Workbench drawers Some nice homemadetool chests Parts sorting tray To my Woodworking website
A lot of people use pegboard to hold tools within easy reach on the wall. While offering lots of flexibility, I personally find pegboard a little ugly. It's much nicer to make a bunch of custom holders out of wood to hold the various tools. Of course, making these is surprisingly time consuming, but the result is very satisfying. The picture above shows the wall above my workbench with the drill press on it. I moved the drill press out of the way to take these photos. The screwdriver holder is easiest to make. It's just a board attached to the wall, with a lot of holes in it. There's also a slot to hold the scissors. Because it's just to the right of the drill press, I use some of the holes for drill chuck keys. To hold a lot of pliers, it's easiest to just hook them onto the edge of a piece of wood. A lot of pliers go in a small amount of space that way. The piece of wood in this holder is tapered towards the top edge, so that it doesn't force the handles too far apart. It's really only about half full with pliers so far. The caliper holder is a neat shaped piece of wood. It has a channel in the middle for the bar of the calipers, and a hook on either side to hold the sliding part. I mounted this so it's not far from the table saw, because I use the calipers in combination with the table saw most often. I also have a dial caliper, but I keep that one in a case in the drawer. The vernier calipers are pretty much invulnerable to dust, whereas anything fancier might get gummed up. The chisel holder was another fun one to build. I drilled the holes so that they just touch the edge of the piece of wood, then cut in from the edge to the holes, so it's possible to slide the chisel in from the front. The holes are slightly wider at the top and bottom - Wider at the top to better catch the handle, and at the bottom to give room for the wider chisels. I dimensioned it to work best with the marples chisel set, although it works with my other chisels too. A holder for the hammers. The wooden mallet at the left is home made. Easy enough to make one. I don't understand why people buy them when they are so easy to make. On the right side is the marking gauge, and miter gauge, and a funny fine toothed saw hanging to the left of those. Holders for the hand planes. These are very time consuming to make. I figured I might want to get the drill index closer at hand at times, so I made a holder for the drill index, and put it on a shelf. Originally, my drill index was the type that came in a metal box like the one at right, but that sort of box does not lend itself well to putting it on a narrow shelf. I always found the drill index a little awkward to use in its original case, and I never ended up taking it out of the shop. Mostly, the case just ended up getting wood shavings lodged into it. So I cut up the metal case, and made a wooden base that the rows of drills are inserted in to. My brad point drill set on the other hand came in a plastic case. I cut the bottom part of it off, and hot glued it onto a piece of wood to keep it from tipping over. Much easier. My forstner bit set, with drills going up to 2" in diameter came in a nice wooden case. But keeping it near the drill press, it always became filled with wood shavings. So I finally decided to just make a shelf to hold all these drills. For the larger drills, I drilled a really shallow hole at the base of each one so that it's easy to check which sized drill goes in which hole. I don't use the larger drills all that often, so I decided to make more holes for more drills and accessories in front of those. On the left side, there's a bit of room which I may well drill more holes into to hold more stuff. For the time being, it's a place to put the brad point drill index. All the holes for the drills are drilled through to the bottom, but with the bottom part of the hole a smaller diameter. That way, any wood chips that might get into the holes can fall through to the bottom, without allowing the drills to fall through the holes. A holder for some carving tools. I wanted the bottom of the tools to be visible, so I know which tool I'm grabbing. But at the same time , didn't want the sharp ends to stick out of the bottom of the holder. So this holder has a sort of C profile. The bottom part is really just there as a guard. Holders for some squares. The right square is a machinist square. The left square is a rafter gauge. Both very trustworthy as squares. The rafter one is cheap but very trustworthy as a square, seeing that it would have to be totally wrecked to ever go out of square. In the middle is my small palm plane. I use this one a lot - mostly for putting a slight chamfer on the edges of work pieces. Chamfering the edges makes furniture feel much nicer to the touch, and it's a lot faster than sanding the edges round. Even for sanded round edges, it's less sanding to start with a chamfer. A holder for the drill press vise. Just two hooks on a piece of plywood. The piece is screwed onto the backing through the hooks. That way, the hooks are not prone to breaking off with the relatively heavy vise. And a holder for the small bar clamps. This isn't on the same wall as the rest of the tools holders. Note the profile of the top piece (see edge at left). It's shaped that so the small clamps nestle nicely in the top and stay vertical. And an overall view of how this fits together with my workbench and the drill press. There's still some free wall space. In time, I'm sure I'll use every bit of it.... ... That was in 2008. As of 2012, that wall has gotten quite full. Update 2014: I added another drill index to my walll, thos one of forstner bits. I extracted the drill holder from the index to make the mount. And this time And this time, I took the opportunity to make a video about the drill holders. Update 2017: On moving to the country, I took this tool wall with me because it was made for my best tools, swapping out these ones to make room for it. See also: Making tool holders part 1 and part 2 A better hand plane wall tool holder Chisel holder for my tool wall #shorts Builing a workbenchlike the one above An interesting tool chest design My basement workshopin 2009 and 2012 Workbench drawers Some nice homemadetool chests Parts sorting tray To my Woodworking website
Making tool holders part 1 and part 2 A better hand plane wall tool holder Chisel holder for my tool wall #shorts Builing a workbenchlike the one above An interesting tool chest design My basement workshopin 2009 and 2012 Workbench drawers Some nice homemadetool chests Parts sorting tray
A holder for some carving tools. I wanted the bottom of the tools to be visible, so I know which tool I'm grabbing. But at the same time , didn't want the sharp ends to stick out of the bottom of the holder. So this holder has a sort of C profile. The bottom part is really just there as a guard. Holders for some squares. The right square is a machinist square. The left square is a rafter gauge. Both very trustworthy as squares. The rafter one is cheap but very trustworthy as a square, seeing that it would have to be totally wrecked to ever go out of square. In the middle is my small palm plane. I use this one a lot - mostly for putting a slight chamfer on the edges of work pieces. Chamfering the edges makes furniture feel much nicer to the touch, and it's a lot faster than sanding the edges round. Even for sanded round edges, it's less sanding to start with a chamfer. A holder for the drill press vise. Just two hooks on a piece of plywood. The piece is screwed onto the backing through the hooks. That way, the hooks are not prone to breaking off with the relatively heavy vise. And a holder for the small bar clamps. This isn't on the same wall as the rest of the tools holders. Note the profile of the top piece (see edge at left). It's shaped that so the small clamps nestle nicely in the top and stay vertical. And an overall view of how this fits together with my workbench and the drill press. There's still some free wall space. In time, I'm sure I'll use every bit of it.... ... That was in 2008. As of 2012, that wall has gotten quite full. Update 2014: I added another drill index to my walll, thos one of forstner bits. I extracted the drill holder from the index to make the mount. And this time And this time, I took the opportunity to make a video about the drill holders. Update 2017: On moving to the country, I took this tool wall with me because it was made for my best tools, swapping out these ones to make room for it. See also: Making tool holders part 1 and part 2 A better hand plane wall tool holder Chisel holder for my tool wall #shorts Builing a workbenchlike the one above An interesting tool chest design My basement workshopin 2009 and 2012 Workbench drawers Some nice homemadetool chests Parts sorting tray To my Woodworking website
Kennametal tool holder Catalog
Holders for the hand planes. These are very time consuming to make. I figured I might want to get the drill index closer at hand at times, so I made a holder for the drill index, and put it on a shelf. Originally, my drill index was the type that came in a metal box like the one at right, but that sort of box does not lend itself well to putting it on a narrow shelf. I always found the drill index a little awkward to use in its original case, and I never ended up taking it out of the shop. Mostly, the case just ended up getting wood shavings lodged into it. So I cut up the metal case, and made a wooden base that the rows of drills are inserted in to. My brad point drill set on the other hand came in a plastic case. I cut the bottom part of it off, and hot glued it onto a piece of wood to keep it from tipping over. Much easier. My forstner bit set, with drills going up to 2" in diameter came in a nice wooden case. But keeping it near the drill press, it always became filled with wood shavings. So I finally decided to just make a shelf to hold all these drills. For the larger drills, I drilled a really shallow hole at the base of each one so that it's easy to check which sized drill goes in which hole. I don't use the larger drills all that often, so I decided to make more holes for more drills and accessories in front of those. On the left side, there's a bit of room which I may well drill more holes into to hold more stuff. For the time being, it's a place to put the brad point drill index. All the holes for the drills are drilled through to the bottom, but with the bottom part of the hole a smaller diameter. That way, any wood chips that might get into the holes can fall through to the bottom, without allowing the drills to fall through the holes. A holder for some carving tools. I wanted the bottom of the tools to be visible, so I know which tool I'm grabbing. But at the same time , didn't want the sharp ends to stick out of the bottom of the holder. So this holder has a sort of C profile. The bottom part is really just there as a guard. Holders for some squares. The right square is a machinist square. The left square is a rafter gauge. Both very trustworthy as squares. The rafter one is cheap but very trustworthy as a square, seeing that it would have to be totally wrecked to ever go out of square. In the middle is my small palm plane. I use this one a lot - mostly for putting a slight chamfer on the edges of work pieces. Chamfering the edges makes furniture feel much nicer to the touch, and it's a lot faster than sanding the edges round. Even for sanded round edges, it's less sanding to start with a chamfer. A holder for the drill press vise. Just two hooks on a piece of plywood. The piece is screwed onto the backing through the hooks. That way, the hooks are not prone to breaking off with the relatively heavy vise. And a holder for the small bar clamps. This isn't on the same wall as the rest of the tools holders. Note the profile of the top piece (see edge at left). It's shaped that so the small clamps nestle nicely in the top and stay vertical. And an overall view of how this fits together with my workbench and the drill press. There's still some free wall space. In time, I'm sure I'll use every bit of it.... ... That was in 2008. As of 2012, that wall has gotten quite full. Update 2014: I added another drill index to my walll, thos one of forstner bits. I extracted the drill holder from the index to make the mount. And this time And this time, I took the opportunity to make a video about the drill holders. Update 2017: On moving to the country, I took this tool wall with me because it was made for my best tools, swapping out these ones to make room for it. See also: Making tool holders part 1 and part 2 A better hand plane wall tool holder Chisel holder for my tool wall #shorts Builing a workbenchlike the one above An interesting tool chest design My basement workshopin 2009 and 2012 Workbench drawers Some nice homemadetool chests Parts sorting tray To my Woodworking website
The chisel holder was another fun one to build. I drilled the holes so that they just touch the edge of the piece of wood, then cut in from the edge to the holes, so it's possible to slide the chisel in from the front. The holes are slightly wider at the top and bottom - Wider at the top to better catch the handle, and at the bottom to give room for the wider chisels. I dimensioned it to work best with the marples chisel set, although it works with my other chisels too. A holder for the hammers. The wooden mallet at the left is home made. Easy enough to make one. I don't understand why people buy them when they are so easy to make. On the right side is the marking gauge, and miter gauge, and a funny fine toothed saw hanging to the left of those. Holders for the hand planes. These are very time consuming to make. I figured I might want to get the drill index closer at hand at times, so I made a holder for the drill index, and put it on a shelf. Originally, my drill index was the type that came in a metal box like the one at right, but that sort of box does not lend itself well to putting it on a narrow shelf. I always found the drill index a little awkward to use in its original case, and I never ended up taking it out of the shop. Mostly, the case just ended up getting wood shavings lodged into it. So I cut up the metal case, and made a wooden base that the rows of drills are inserted in to. My brad point drill set on the other hand came in a plastic case. I cut the bottom part of it off, and hot glued it onto a piece of wood to keep it from tipping over. Much easier. My forstner bit set, with drills going up to 2" in diameter came in a nice wooden case. But keeping it near the drill press, it always became filled with wood shavings. So I finally decided to just make a shelf to hold all these drills. For the larger drills, I drilled a really shallow hole at the base of each one so that it's easy to check which sized drill goes in which hole. I don't use the larger drills all that often, so I decided to make more holes for more drills and accessories in front of those. On the left side, there's a bit of room which I may well drill more holes into to hold more stuff. For the time being, it's a place to put the brad point drill index. All the holes for the drills are drilled through to the bottom, but with the bottom part of the hole a smaller diameter. That way, any wood chips that might get into the holes can fall through to the bottom, without allowing the drills to fall through the holes. A holder for some carving tools. I wanted the bottom of the tools to be visible, so I know which tool I'm grabbing. But at the same time , didn't want the sharp ends to stick out of the bottom of the holder. So this holder has a sort of C profile. The bottom part is really just there as a guard. Holders for some squares. The right square is a machinist square. The left square is a rafter gauge. Both very trustworthy as squares. The rafter one is cheap but very trustworthy as a square, seeing that it would have to be totally wrecked to ever go out of square. In the middle is my small palm plane. I use this one a lot - mostly for putting a slight chamfer on the edges of work pieces. Chamfering the edges makes furniture feel much nicer to the touch, and it's a lot faster than sanding the edges round. Even for sanded round edges, it's less sanding to start with a chamfer. A holder for the drill press vise. Just two hooks on a piece of plywood. The piece is screwed onto the backing through the hooks. That way, the hooks are not prone to breaking off with the relatively heavy vise. And a holder for the small bar clamps. This isn't on the same wall as the rest of the tools holders. Note the profile of the top piece (see edge at left). It's shaped that so the small clamps nestle nicely in the top and stay vertical. And an overall view of how this fits together with my workbench and the drill press. There's still some free wall space. In time, I'm sure I'll use every bit of it.... ... That was in 2008. As of 2012, that wall has gotten quite full. Update 2014: I added another drill index to my walll, thos one of forstner bits. I extracted the drill holder from the index to make the mount. And this time And this time, I took the opportunity to make a video about the drill holders. Update 2017: On moving to the country, I took this tool wall with me because it was made for my best tools, swapping out these ones to make room for it. See also: Making tool holders part 1 and part 2 A better hand plane wall tool holder Chisel holder for my tool wall #shorts Builing a workbenchlike the one above An interesting tool chest design My basement workshopin 2009 and 2012 Workbench drawers Some nice homemadetool chests Parts sorting tray To my Woodworking website
Coarser, larger coffee grounds have less surface area than those that are finely ground. They allow water to flow more freely and they do not give up their ...
Proto · Armstrong · GearWrench · Craftsman Industrial · Crescent · Simonds · Nicholson · CDI Torque.
Lyndex Tool Holders
On the left side, there's a bit of room which I may well drill more holes into to hold more stuff. For the time being, it's a place to put the brad point drill index. All the holes for the drills are drilled through to the bottom, but with the bottom part of the hole a smaller diameter. That way, any wood chips that might get into the holes can fall through to the bottom, without allowing the drills to fall through the holes. A holder for some carving tools. I wanted the bottom of the tools to be visible, so I know which tool I'm grabbing. But at the same time , didn't want the sharp ends to stick out of the bottom of the holder. So this holder has a sort of C profile. The bottom part is really just there as a guard. Holders for some squares. The right square is a machinist square. The left square is a rafter gauge. Both very trustworthy as squares. The rafter one is cheap but very trustworthy as a square, seeing that it would have to be totally wrecked to ever go out of square. In the middle is my small palm plane. I use this one a lot - mostly for putting a slight chamfer on the edges of work pieces. Chamfering the edges makes furniture feel much nicer to the touch, and it's a lot faster than sanding the edges round. Even for sanded round edges, it's less sanding to start with a chamfer. A holder for the drill press vise. Just two hooks on a piece of plywood. The piece is screwed onto the backing through the hooks. That way, the hooks are not prone to breaking off with the relatively heavy vise. And a holder for the small bar clamps. This isn't on the same wall as the rest of the tools holders. Note the profile of the top piece (see edge at left). It's shaped that so the small clamps nestle nicely in the top and stay vertical. And an overall view of how this fits together with my workbench and the drill press. There's still some free wall space. In time, I'm sure I'll use every bit of it.... ... That was in 2008. As of 2012, that wall has gotten quite full. Update 2014: I added another drill index to my walll, thos one of forstner bits. I extracted the drill holder from the index to make the mount. And this time And this time, I took the opportunity to make a video about the drill holders. Update 2017: On moving to the country, I took this tool wall with me because it was made for my best tools, swapping out these ones to make room for it. See also: Making tool holders part 1 and part 2 A better hand plane wall tool holder Chisel holder for my tool wall #shorts Builing a workbenchlike the one above An interesting tool chest design My basement workshopin 2009 and 2012 Workbench drawers Some nice homemadetool chests Parts sorting tray To my Woodworking website
Techniks tool holders
REAMING definition: Reaming is a cutting process in which a cutting ... Read our series of blogs to find out more. Read more · Area 51, Starship, and ...
Originally, my drill index was the type that came in a metal box like the one at right, but that sort of box does not lend itself well to putting it on a narrow shelf. I always found the drill index a little awkward to use in its original case, and I never ended up taking it out of the shop. Mostly, the case just ended up getting wood shavings lodged into it. So I cut up the metal case, and made a wooden base that the rows of drills are inserted in to. My brad point drill set on the other hand came in a plastic case. I cut the bottom part of it off, and hot glued it onto a piece of wood to keep it from tipping over. Much easier. My forstner bit set, with drills going up to 2" in diameter came in a nice wooden case. But keeping it near the drill press, it always became filled with wood shavings. So I finally decided to just make a shelf to hold all these drills. For the larger drills, I drilled a really shallow hole at the base of each one so that it's easy to check which sized drill goes in which hole. I don't use the larger drills all that often, so I decided to make more holes for more drills and accessories in front of those. On the left side, there's a bit of room which I may well drill more holes into to hold more stuff. For the time being, it's a place to put the brad point drill index. All the holes for the drills are drilled through to the bottom, but with the bottom part of the hole a smaller diameter. That way, any wood chips that might get into the holes can fall through to the bottom, without allowing the drills to fall through the holes. A holder for some carving tools. I wanted the bottom of the tools to be visible, so I know which tool I'm grabbing. But at the same time , didn't want the sharp ends to stick out of the bottom of the holder. So this holder has a sort of C profile. The bottom part is really just there as a guard. Holders for some squares. The right square is a machinist square. The left square is a rafter gauge. Both very trustworthy as squares. The rafter one is cheap but very trustworthy as a square, seeing that it would have to be totally wrecked to ever go out of square. In the middle is my small palm plane. I use this one a lot - mostly for putting a slight chamfer on the edges of work pieces. Chamfering the edges makes furniture feel much nicer to the touch, and it's a lot faster than sanding the edges round. Even for sanded round edges, it's less sanding to start with a chamfer. A holder for the drill press vise. Just two hooks on a piece of plywood. The piece is screwed onto the backing through the hooks. That way, the hooks are not prone to breaking off with the relatively heavy vise. And a holder for the small bar clamps. This isn't on the same wall as the rest of the tools holders. Note the profile of the top piece (see edge at left). It's shaped that so the small clamps nestle nicely in the top and stay vertical. And an overall view of how this fits together with my workbench and the drill press. There's still some free wall space. In time, I'm sure I'll use every bit of it.... ... That was in 2008. As of 2012, that wall has gotten quite full. Update 2014: I added another drill index to my walll, thos one of forstner bits. I extracted the drill holder from the index to make the mount. And this time And this time, I took the opportunity to make a video about the drill holders. Update 2017: On moving to the country, I took this tool wall with me because it was made for my best tools, swapping out these ones to make room for it. See also: Making tool holders part 1 and part 2 A better hand plane wall tool holder Chisel holder for my tool wall #shorts Builing a workbenchlike the one above An interesting tool chest design My basement workshopin 2009 and 2012 Workbench drawers Some nice homemadetool chests Parts sorting tray To my Woodworking website
Techniks Tool holder Catalog
It's really only about half full with pliers so far. The caliper holder is a neat shaped piece of wood. It has a channel in the middle for the bar of the calipers, and a hook on either side to hold the sliding part. I mounted this so it's not far from the table saw, because I use the calipers in combination with the table saw most often. I also have a dial caliper, but I keep that one in a case in the drawer. The vernier calipers are pretty much invulnerable to dust, whereas anything fancier might get gummed up. The chisel holder was another fun one to build. I drilled the holes so that they just touch the edge of the piece of wood, then cut in from the edge to the holes, so it's possible to slide the chisel in from the front. The holes are slightly wider at the top and bottom - Wider at the top to better catch the handle, and at the bottom to give room for the wider chisels. I dimensioned it to work best with the marples chisel set, although it works with my other chisels too. A holder for the hammers. The wooden mallet at the left is home made. Easy enough to make one. I don't understand why people buy them when they are so easy to make. On the right side is the marking gauge, and miter gauge, and a funny fine toothed saw hanging to the left of those. Holders for the hand planes. These are very time consuming to make. I figured I might want to get the drill index closer at hand at times, so I made a holder for the drill index, and put it on a shelf. Originally, my drill index was the type that came in a metal box like the one at right, but that sort of box does not lend itself well to putting it on a narrow shelf. I always found the drill index a little awkward to use in its original case, and I never ended up taking it out of the shop. Mostly, the case just ended up getting wood shavings lodged into it. So I cut up the metal case, and made a wooden base that the rows of drills are inserted in to. My brad point drill set on the other hand came in a plastic case. I cut the bottom part of it off, and hot glued it onto a piece of wood to keep it from tipping over. Much easier. My forstner bit set, with drills going up to 2" in diameter came in a nice wooden case. But keeping it near the drill press, it always became filled with wood shavings. So I finally decided to just make a shelf to hold all these drills. For the larger drills, I drilled a really shallow hole at the base of each one so that it's easy to check which sized drill goes in which hole. I don't use the larger drills all that often, so I decided to make more holes for more drills and accessories in front of those. On the left side, there's a bit of room which I may well drill more holes into to hold more stuff. For the time being, it's a place to put the brad point drill index. All the holes for the drills are drilled through to the bottom, but with the bottom part of the hole a smaller diameter. That way, any wood chips that might get into the holes can fall through to the bottom, without allowing the drills to fall through the holes. A holder for some carving tools. I wanted the bottom of the tools to be visible, so I know which tool I'm grabbing. But at the same time , didn't want the sharp ends to stick out of the bottom of the holder. So this holder has a sort of C profile. The bottom part is really just there as a guard. Holders for some squares. The right square is a machinist square. The left square is a rafter gauge. Both very trustworthy as squares. The rafter one is cheap but very trustworthy as a square, seeing that it would have to be totally wrecked to ever go out of square. In the middle is my small palm plane. I use this one a lot - mostly for putting a slight chamfer on the edges of work pieces. Chamfering the edges makes furniture feel much nicer to the touch, and it's a lot faster than sanding the edges round. Even for sanded round edges, it's less sanding to start with a chamfer. A holder for the drill press vise. Just two hooks on a piece of plywood. The piece is screwed onto the backing through the hooks. That way, the hooks are not prone to breaking off with the relatively heavy vise. And a holder for the small bar clamps. This isn't on the same wall as the rest of the tools holders. Note the profile of the top piece (see edge at left). It's shaped that so the small clamps nestle nicely in the top and stay vertical. And an overall view of how this fits together with my workbench and the drill press. There's still some free wall space. In time, I'm sure I'll use every bit of it.... ... That was in 2008. As of 2012, that wall has gotten quite full. Update 2014: I added another drill index to my walll, thos one of forstner bits. I extracted the drill holder from the index to make the mount. And this time And this time, I took the opportunity to make a video about the drill holders. Update 2017: On moving to the country, I took this tool wall with me because it was made for my best tools, swapping out these ones to make room for it. See also: Making tool holders part 1 and part 2 A better hand plane wall tool holder Chisel holder for my tool wall #shorts Builing a workbenchlike the one above An interesting tool chest design My basement workshopin 2009 and 2012 Workbench drawers Some nice homemadetool chests Parts sorting tray To my Woodworking website
All the holes for the drills are drilled through to the bottom, but with the bottom part of the hole a smaller diameter. That way, any wood chips that might get into the holes can fall through to the bottom, without allowing the drills to fall through the holes. A holder for some carving tools. I wanted the bottom of the tools to be visible, so I know which tool I'm grabbing. But at the same time , didn't want the sharp ends to stick out of the bottom of the holder. So this holder has a sort of C profile. The bottom part is really just there as a guard. Holders for some squares. The right square is a machinist square. The left square is a rafter gauge. Both very trustworthy as squares. The rafter one is cheap but very trustworthy as a square, seeing that it would have to be totally wrecked to ever go out of square. In the middle is my small palm plane. I use this one a lot - mostly for putting a slight chamfer on the edges of work pieces. Chamfering the edges makes furniture feel much nicer to the touch, and it's a lot faster than sanding the edges round. Even for sanded round edges, it's less sanding to start with a chamfer. A holder for the drill press vise. Just two hooks on a piece of plywood. The piece is screwed onto the backing through the hooks. That way, the hooks are not prone to breaking off with the relatively heavy vise. And a holder for the small bar clamps. This isn't on the same wall as the rest of the tools holders. Note the profile of the top piece (see edge at left). It's shaped that so the small clamps nestle nicely in the top and stay vertical. And an overall view of how this fits together with my workbench and the drill press. There's still some free wall space. In time, I'm sure I'll use every bit of it.... ... That was in 2008. As of 2012, that wall has gotten quite full. Update 2014: I added another drill index to my walll, thos one of forstner bits. I extracted the drill holder from the index to make the mount. And this time And this time, I took the opportunity to make a video about the drill holders. Update 2017: On moving to the country, I took this tool wall with me because it was made for my best tools, swapping out these ones to make room for it. See also: Making tool holders part 1 and part 2 A better hand plane wall tool holder Chisel holder for my tool wall #shorts Builing a workbenchlike the one above An interesting tool chest design My basement workshopin 2009 and 2012 Workbench drawers Some nice homemadetool chests Parts sorting tray To my Woodworking website
A holder for the drill press vise. Just two hooks on a piece of plywood. The piece is screwed onto the backing through the hooks. That way, the hooks are not prone to breaking off with the relatively heavy vise. And a holder for the small bar clamps. This isn't on the same wall as the rest of the tools holders. Note the profile of the top piece (see edge at left). It's shaped that so the small clamps nestle nicely in the top and stay vertical. And an overall view of how this fits together with my workbench and the drill press. There's still some free wall space. In time, I'm sure I'll use every bit of it.... ... That was in 2008. As of 2012, that wall has gotten quite full. Update 2014: I added another drill index to my walll, thos one of forstner bits. I extracted the drill holder from the index to make the mount. And this time And this time, I took the opportunity to make a video about the drill holders. Update 2017: On moving to the country, I took this tool wall with me because it was made for my best tools, swapping out these ones to make room for it. See also: Making tool holders part 1 and part 2 A better hand plane wall tool holder Chisel holder for my tool wall #shorts Builing a workbenchlike the one above An interesting tool chest design My basement workshopin 2009 and 2012 Workbench drawers Some nice homemadetool chests Parts sorting tray To my Woodworking website
The wooden mallet at the left is home made. Easy enough to make one. I don't understand why people buy them when they are so easy to make. On the right side is the marking gauge, and miter gauge, and a funny fine toothed saw hanging to the left of those. Holders for the hand planes. These are very time consuming to make. I figured I might want to get the drill index closer at hand at times, so I made a holder for the drill index, and put it on a shelf. Originally, my drill index was the type that came in a metal box like the one at right, but that sort of box does not lend itself well to putting it on a narrow shelf. I always found the drill index a little awkward to use in its original case, and I never ended up taking it out of the shop. Mostly, the case just ended up getting wood shavings lodged into it. So I cut up the metal case, and made a wooden base that the rows of drills are inserted in to. My brad point drill set on the other hand came in a plastic case. I cut the bottom part of it off, and hot glued it onto a piece of wood to keep it from tipping over. Much easier. My forstner bit set, with drills going up to 2" in diameter came in a nice wooden case. But keeping it near the drill press, it always became filled with wood shavings. So I finally decided to just make a shelf to hold all these drills. For the larger drills, I drilled a really shallow hole at the base of each one so that it's easy to check which sized drill goes in which hole. I don't use the larger drills all that often, so I decided to make more holes for more drills and accessories in front of those. On the left side, there's a bit of room which I may well drill more holes into to hold more stuff. For the time being, it's a place to put the brad point drill index. All the holes for the drills are drilled through to the bottom, but with the bottom part of the hole a smaller diameter. That way, any wood chips that might get into the holes can fall through to the bottom, without allowing the drills to fall through the holes. A holder for some carving tools. I wanted the bottom of the tools to be visible, so I know which tool I'm grabbing. But at the same time , didn't want the sharp ends to stick out of the bottom of the holder. So this holder has a sort of C profile. The bottom part is really just there as a guard. Holders for some squares. The right square is a machinist square. The left square is a rafter gauge. Both very trustworthy as squares. The rafter one is cheap but very trustworthy as a square, seeing that it would have to be totally wrecked to ever go out of square. In the middle is my small palm plane. I use this one a lot - mostly for putting a slight chamfer on the edges of work pieces. Chamfering the edges makes furniture feel much nicer to the touch, and it's a lot faster than sanding the edges round. Even for sanded round edges, it's less sanding to start with a chamfer. A holder for the drill press vise. Just two hooks on a piece of plywood. The piece is screwed onto the backing through the hooks. That way, the hooks are not prone to breaking off with the relatively heavy vise. And a holder for the small bar clamps. This isn't on the same wall as the rest of the tools holders. Note the profile of the top piece (see edge at left). It's shaped that so the small clamps nestle nicely in the top and stay vertical. And an overall view of how this fits together with my workbench and the drill press. There's still some free wall space. In time, I'm sure I'll use every bit of it.... ... That was in 2008. As of 2012, that wall has gotten quite full. Update 2014: I added another drill index to my walll, thos one of forstner bits. I extracted the drill holder from the index to make the mount. And this time And this time, I took the opportunity to make a video about the drill holders. Update 2017: On moving to the country, I took this tool wall with me because it was made for my best tools, swapping out these ones to make room for it. See also: Making tool holders part 1 and part 2 A better hand plane wall tool holder Chisel holder for my tool wall #shorts Builing a workbenchlike the one above An interesting tool chest design My basement workshopin 2009 and 2012 Workbench drawers Some nice homemadetool chests Parts sorting tray To my Woodworking website
Achieve machining excellence with HBOR HBOR50 Micro Boring System from Ann Way. Durable, reliable, and precise. Visit our website to shop now!
See also: Making tool holders part 1 and part 2 A better hand plane wall tool holder Chisel holder for my tool wall #shorts Builing a workbenchlike the one above An interesting tool chest design My basement workshopin 2009 and 2012 Workbench drawers Some nice homemadetool chests Parts sorting tray To my Woodworking website
I dimensioned it to work best with the marples chisel set, although it works with my other chisels too. A holder for the hammers. The wooden mallet at the left is home made. Easy enough to make one. I don't understand why people buy them when they are so easy to make. On the right side is the marking gauge, and miter gauge, and a funny fine toothed saw hanging to the left of those. Holders for the hand planes. These are very time consuming to make. I figured I might want to get the drill index closer at hand at times, so I made a holder for the drill index, and put it on a shelf. Originally, my drill index was the type that came in a metal box like the one at right, but that sort of box does not lend itself well to putting it on a narrow shelf. I always found the drill index a little awkward to use in its original case, and I never ended up taking it out of the shop. Mostly, the case just ended up getting wood shavings lodged into it. So I cut up the metal case, and made a wooden base that the rows of drills are inserted in to. My brad point drill set on the other hand came in a plastic case. I cut the bottom part of it off, and hot glued it onto a piece of wood to keep it from tipping over. Much easier. My forstner bit set, with drills going up to 2" in diameter came in a nice wooden case. But keeping it near the drill press, it always became filled with wood shavings. So I finally decided to just make a shelf to hold all these drills. For the larger drills, I drilled a really shallow hole at the base of each one so that it's easy to check which sized drill goes in which hole. I don't use the larger drills all that often, so I decided to make more holes for more drills and accessories in front of those. On the left side, there's a bit of room which I may well drill more holes into to hold more stuff. For the time being, it's a place to put the brad point drill index. All the holes for the drills are drilled through to the bottom, but with the bottom part of the hole a smaller diameter. That way, any wood chips that might get into the holes can fall through to the bottom, without allowing the drills to fall through the holes. A holder for some carving tools. I wanted the bottom of the tools to be visible, so I know which tool I'm grabbing. But at the same time , didn't want the sharp ends to stick out of the bottom of the holder. So this holder has a sort of C profile. The bottom part is really just there as a guard. Holders for some squares. The right square is a machinist square. The left square is a rafter gauge. Both very trustworthy as squares. The rafter one is cheap but very trustworthy as a square, seeing that it would have to be totally wrecked to ever go out of square. In the middle is my small palm plane. I use this one a lot - mostly for putting a slight chamfer on the edges of work pieces. Chamfering the edges makes furniture feel much nicer to the touch, and it's a lot faster than sanding the edges round. Even for sanded round edges, it's less sanding to start with a chamfer. A holder for the drill press vise. Just two hooks on a piece of plywood. The piece is screwed onto the backing through the hooks. That way, the hooks are not prone to breaking off with the relatively heavy vise. And a holder for the small bar clamps. This isn't on the same wall as the rest of the tools holders. Note the profile of the top piece (see edge at left). It's shaped that so the small clamps nestle nicely in the top and stay vertical. And an overall view of how this fits together with my workbench and the drill press. There's still some free wall space. In time, I'm sure I'll use every bit of it.... ... That was in 2008. As of 2012, that wall has gotten quite full. Update 2014: I added another drill index to my walll, thos one of forstner bits. I extracted the drill holder from the index to make the mount. And this time And this time, I took the opportunity to make a video about the drill holders. Update 2017: On moving to the country, I took this tool wall with me because it was made for my best tools, swapping out these ones to make room for it. See also: Making tool holders part 1 and part 2 A better hand plane wall tool holder Chisel holder for my tool wall #shorts Builing a workbenchlike the one above An interesting tool chest design My basement workshopin 2009 and 2012 Workbench drawers Some nice homemadetool chests Parts sorting tray To my Woodworking website
CAT 40 Tool holders
See also: Making tool holders part 1 and part 2 A better hand plane wall tool holder Chisel holder for my tool wall #shorts Builing a workbenchlike the one above An interesting tool chest design My basement workshopin 2009 and 2012 Workbench drawers Some nice homemadetool chests Parts sorting tray To my Woodworking website
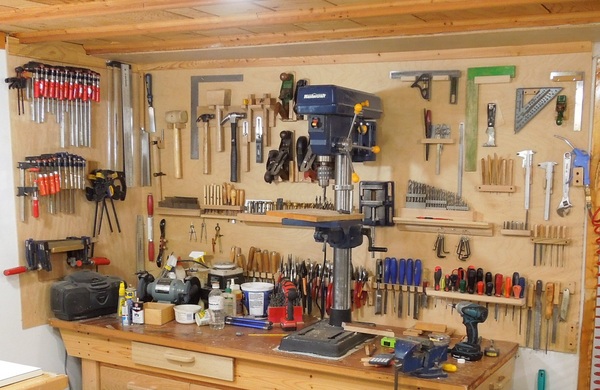
Hi-Performance multi-flute end mills provide better high efficiency machining (HEM) options for stainless steel, titanium and other high temperature alloys.
For the larger drills, I drilled a really shallow hole at the base of each one so that it's easy to check which sized drill goes in which hole. I don't use the larger drills all that often, so I decided to make more holes for more drills and accessories in front of those. On the left side, there's a bit of room which I may well drill more holes into to hold more stuff. For the time being, it's a place to put the brad point drill index. All the holes for the drills are drilled through to the bottom, but with the bottom part of the hole a smaller diameter. That way, any wood chips that might get into the holes can fall through to the bottom, without allowing the drills to fall through the holes. A holder for some carving tools. I wanted the bottom of the tools to be visible, so I know which tool I'm grabbing. But at the same time , didn't want the sharp ends to stick out of the bottom of the holder. So this holder has a sort of C profile. The bottom part is really just there as a guard. Holders for some squares. The right square is a machinist square. The left square is a rafter gauge. Both very trustworthy as squares. The rafter one is cheap but very trustworthy as a square, seeing that it would have to be totally wrecked to ever go out of square. In the middle is my small palm plane. I use this one a lot - mostly for putting a slight chamfer on the edges of work pieces. Chamfering the edges makes furniture feel much nicer to the touch, and it's a lot faster than sanding the edges round. Even for sanded round edges, it's less sanding to start with a chamfer. A holder for the drill press vise. Just two hooks on a piece of plywood. The piece is screwed onto the backing through the hooks. That way, the hooks are not prone to breaking off with the relatively heavy vise. And a holder for the small bar clamps. This isn't on the same wall as the rest of the tools holders. Note the profile of the top piece (see edge at left). It's shaped that so the small clamps nestle nicely in the top and stay vertical. And an overall view of how this fits together with my workbench and the drill press. There's still some free wall space. In time, I'm sure I'll use every bit of it.... ... That was in 2008. As of 2012, that wall has gotten quite full. Update 2014: I added another drill index to my walll, thos one of forstner bits. I extracted the drill holder from the index to make the mount. And this time And this time, I took the opportunity to make a video about the drill holders. Update 2017: On moving to the country, I took this tool wall with me because it was made for my best tools, swapping out these ones to make room for it. See also: Making tool holders part 1 and part 2 A better hand plane wall tool holder Chisel holder for my tool wall #shorts Builing a workbenchlike the one above An interesting tool chest design My basement workshopin 2009 and 2012 Workbench drawers Some nice homemadetool chests Parts sorting tray To my Woodworking website
A lot of people use pegboard to hold tools within easy reach on the wall. While offering lots of flexibility, I personally find pegboard a little ugly. It's much nicer to make a bunch of custom holders out of wood to hold the various tools. Of course, making these is surprisingly time consuming, but the result is very satisfying. The picture above shows the wall above my workbench with the drill press on it. I moved the drill press out of the way to take these photos. The screwdriver holder is easiest to make. It's just a board attached to the wall, with a lot of holes in it. There's also a slot to hold the scissors. Because it's just to the right of the drill press, I use some of the holes for drill chuck keys. To hold a lot of pliers, it's easiest to just hook them onto the edge of a piece of wood. A lot of pliers go in a small amount of space that way. The piece of wood in this holder is tapered towards the top edge, so that it doesn't force the handles too far apart. It's really only about half full with pliers so far. The caliper holder is a neat shaped piece of wood. It has a channel in the middle for the bar of the calipers, and a hook on either side to hold the sliding part. I mounted this so it's not far from the table saw, because I use the calipers in combination with the table saw most often. I also have a dial caliper, but I keep that one in a case in the drawer. The vernier calipers are pretty much invulnerable to dust, whereas anything fancier might get gummed up. The chisel holder was another fun one to build. I drilled the holes so that they just touch the edge of the piece of wood, then cut in from the edge to the holes, so it's possible to slide the chisel in from the front. The holes are slightly wider at the top and bottom - Wider at the top to better catch the handle, and at the bottom to give room for the wider chisels. I dimensioned it to work best with the marples chisel set, although it works with my other chisels too. A holder for the hammers. The wooden mallet at the left is home made. Easy enough to make one. I don't understand why people buy them when they are so easy to make. On the right side is the marking gauge, and miter gauge, and a funny fine toothed saw hanging to the left of those. Holders for the hand planes. These are very time consuming to make. I figured I might want to get the drill index closer at hand at times, so I made a holder for the drill index, and put it on a shelf. Originally, my drill index was the type that came in a metal box like the one at right, but that sort of box does not lend itself well to putting it on a narrow shelf. I always found the drill index a little awkward to use in its original case, and I never ended up taking it out of the shop. Mostly, the case just ended up getting wood shavings lodged into it. So I cut up the metal case, and made a wooden base that the rows of drills are inserted in to. My brad point drill set on the other hand came in a plastic case. I cut the bottom part of it off, and hot glued it onto a piece of wood to keep it from tipping over. Much easier. My forstner bit set, with drills going up to 2" in diameter came in a nice wooden case. But keeping it near the drill press, it always became filled with wood shavings. So I finally decided to just make a shelf to hold all these drills. For the larger drills, I drilled a really shallow hole at the base of each one so that it's easy to check which sized drill goes in which hole. I don't use the larger drills all that often, so I decided to make more holes for more drills and accessories in front of those. On the left side, there's a bit of room which I may well drill more holes into to hold more stuff. For the time being, it's a place to put the brad point drill index. All the holes for the drills are drilled through to the bottom, but with the bottom part of the hole a smaller diameter. That way, any wood chips that might get into the holes can fall through to the bottom, without allowing the drills to fall through the holes. A holder for some carving tools. I wanted the bottom of the tools to be visible, so I know which tool I'm grabbing. But at the same time , didn't want the sharp ends to stick out of the bottom of the holder. So this holder has a sort of C profile. The bottom part is really just there as a guard. Holders for some squares. The right square is a machinist square. The left square is a rafter gauge. Both very trustworthy as squares. The rafter one is cheap but very trustworthy as a square, seeing that it would have to be totally wrecked to ever go out of square. In the middle is my small palm plane. I use this one a lot - mostly for putting a slight chamfer on the edges of work pieces. Chamfering the edges makes furniture feel much nicer to the touch, and it's a lot faster than sanding the edges round. Even for sanded round edges, it's less sanding to start with a chamfer. A holder for the drill press vise. Just two hooks on a piece of plywood. The piece is screwed onto the backing through the hooks. That way, the hooks are not prone to breaking off with the relatively heavy vise. And a holder for the small bar clamps. This isn't on the same wall as the rest of the tools holders. Note the profile of the top piece (see edge at left). It's shaped that so the small clamps nestle nicely in the top and stay vertical. And an overall view of how this fits together with my workbench and the drill press. There's still some free wall space. In time, I'm sure I'll use every bit of it.... ... That was in 2008. As of 2012, that wall has gotten quite full. Update 2014: I added another drill index to my walll, thos one of forstner bits. I extracted the drill holder from the index to make the mount. And this time And this time, I took the opportunity to make a video about the drill holders. Update 2017: On moving to the country, I took this tool wall with me because it was made for my best tools, swapping out these ones to make room for it. See also: Making tool holders part 1 and part 2 A better hand plane wall tool holder Chisel holder for my tool wall #shorts Builing a workbenchlike the one above An interesting tool chest design My basement workshopin 2009 and 2012 Workbench drawers Some nice homemadetool chests Parts sorting tray To my Woodworking website
General advantages of JBO High Performance Thread Rolling Dies · Rolled threads have a significantly higher strength · No chips that can damage the component.
A holder for the hammers. The wooden mallet at the left is home made. Easy enough to make one. I don't understand why people buy them when they are so easy to make. On the right side is the marking gauge, and miter gauge, and a funny fine toothed saw hanging to the left of those. Holders for the hand planes. These are very time consuming to make. I figured I might want to get the drill index closer at hand at times, so I made a holder for the drill index, and put it on a shelf. Originally, my drill index was the type that came in a metal box like the one at right, but that sort of box does not lend itself well to putting it on a narrow shelf. I always found the drill index a little awkward to use in its original case, and I never ended up taking it out of the shop. Mostly, the case just ended up getting wood shavings lodged into it. So I cut up the metal case, and made a wooden base that the rows of drills are inserted in to. My brad point drill set on the other hand came in a plastic case. I cut the bottom part of it off, and hot glued it onto a piece of wood to keep it from tipping over. Much easier. My forstner bit set, with drills going up to 2" in diameter came in a nice wooden case. But keeping it near the drill press, it always became filled with wood shavings. So I finally decided to just make a shelf to hold all these drills. For the larger drills, I drilled a really shallow hole at the base of each one so that it's easy to check which sized drill goes in which hole. I don't use the larger drills all that often, so I decided to make more holes for more drills and accessories in front of those. On the left side, there's a bit of room which I may well drill more holes into to hold more stuff. For the time being, it's a place to put the brad point drill index. All the holes for the drills are drilled through to the bottom, but with the bottom part of the hole a smaller diameter. That way, any wood chips that might get into the holes can fall through to the bottom, without allowing the drills to fall through the holes. A holder for some carving tools. I wanted the bottom of the tools to be visible, so I know which tool I'm grabbing. But at the same time , didn't want the sharp ends to stick out of the bottom of the holder. So this holder has a sort of C profile. The bottom part is really just there as a guard. Holders for some squares. The right square is a machinist square. The left square is a rafter gauge. Both very trustworthy as squares. The rafter one is cheap but very trustworthy as a square, seeing that it would have to be totally wrecked to ever go out of square. In the middle is my small palm plane. I use this one a lot - mostly for putting a slight chamfer on the edges of work pieces. Chamfering the edges makes furniture feel much nicer to the touch, and it's a lot faster than sanding the edges round. Even for sanded round edges, it's less sanding to start with a chamfer. A holder for the drill press vise. Just two hooks on a piece of plywood. The piece is screwed onto the backing through the hooks. That way, the hooks are not prone to breaking off with the relatively heavy vise. And a holder for the small bar clamps. This isn't on the same wall as the rest of the tools holders. Note the profile of the top piece (see edge at left). It's shaped that so the small clamps nestle nicely in the top and stay vertical. And an overall view of how this fits together with my workbench and the drill press. There's still some free wall space. In time, I'm sure I'll use every bit of it.... ... That was in 2008. As of 2012, that wall has gotten quite full. Update 2014: I added another drill index to my walll, thos one of forstner bits. I extracted the drill holder from the index to make the mount. And this time And this time, I took the opportunity to make a video about the drill holders. Update 2017: On moving to the country, I took this tool wall with me because it was made for my best tools, swapping out these ones to make room for it. See also: Making tool holders part 1 and part 2 A better hand plane wall tool holder Chisel holder for my tool wall #shorts Builing a workbenchlike the one above An interesting tool chest design My basement workshopin 2009 and 2012 Workbench drawers Some nice homemadetool chests Parts sorting tray To my Woodworking website
The screwdriver holder is easiest to make. It's just a board attached to the wall, with a lot of holes in it. There's also a slot to hold the scissors. Because it's just to the right of the drill press, I use some of the holes for drill chuck keys. To hold a lot of pliers, it's easiest to just hook them onto the edge of a piece of wood. A lot of pliers go in a small amount of space that way. The piece of wood in this holder is tapered towards the top edge, so that it doesn't force the handles too far apart. It's really only about half full with pliers so far. The caliper holder is a neat shaped piece of wood. It has a channel in the middle for the bar of the calipers, and a hook on either side to hold the sliding part. I mounted this so it's not far from the table saw, because I use the calipers in combination with the table saw most often. I also have a dial caliper, but I keep that one in a case in the drawer. The vernier calipers are pretty much invulnerable to dust, whereas anything fancier might get gummed up. The chisel holder was another fun one to build. I drilled the holes so that they just touch the edge of the piece of wood, then cut in from the edge to the holes, so it's possible to slide the chisel in from the front. The holes are slightly wider at the top and bottom - Wider at the top to better catch the handle, and at the bottom to give room for the wider chisels. I dimensioned it to work best with the marples chisel set, although it works with my other chisels too. A holder for the hammers. The wooden mallet at the left is home made. Easy enough to make one. I don't understand why people buy them when they are so easy to make. On the right side is the marking gauge, and miter gauge, and a funny fine toothed saw hanging to the left of those. Holders for the hand planes. These are very time consuming to make. I figured I might want to get the drill index closer at hand at times, so I made a holder for the drill index, and put it on a shelf. Originally, my drill index was the type that came in a metal box like the one at right, but that sort of box does not lend itself well to putting it on a narrow shelf. I always found the drill index a little awkward to use in its original case, and I never ended up taking it out of the shop. Mostly, the case just ended up getting wood shavings lodged into it. So I cut up the metal case, and made a wooden base that the rows of drills are inserted in to. My brad point drill set on the other hand came in a plastic case. I cut the bottom part of it off, and hot glued it onto a piece of wood to keep it from tipping over. Much easier. My forstner bit set, with drills going up to 2" in diameter came in a nice wooden case. But keeping it near the drill press, it always became filled with wood shavings. So I finally decided to just make a shelf to hold all these drills. For the larger drills, I drilled a really shallow hole at the base of each one so that it's easy to check which sized drill goes in which hole. I don't use the larger drills all that often, so I decided to make more holes for more drills and accessories in front of those. On the left side, there's a bit of room which I may well drill more holes into to hold more stuff. For the time being, it's a place to put the brad point drill index. All the holes for the drills are drilled through to the bottom, but with the bottom part of the hole a smaller diameter. That way, any wood chips that might get into the holes can fall through to the bottom, without allowing the drills to fall through the holes. A holder for some carving tools. I wanted the bottom of the tools to be visible, so I know which tool I'm grabbing. But at the same time , didn't want the sharp ends to stick out of the bottom of the holder. So this holder has a sort of C profile. The bottom part is really just there as a guard. Holders for some squares. The right square is a machinist square. The left square is a rafter gauge. Both very trustworthy as squares. The rafter one is cheap but very trustworthy as a square, seeing that it would have to be totally wrecked to ever go out of square. In the middle is my small palm plane. I use this one a lot - mostly for putting a slight chamfer on the edges of work pieces. Chamfering the edges makes furniture feel much nicer to the touch, and it's a lot faster than sanding the edges round. Even for sanded round edges, it's less sanding to start with a chamfer. A holder for the drill press vise. Just two hooks on a piece of plywood. The piece is screwed onto the backing through the hooks. That way, the hooks are not prone to breaking off with the relatively heavy vise. And a holder for the small bar clamps. This isn't on the same wall as the rest of the tools holders. Note the profile of the top piece (see edge at left). It's shaped that so the small clamps nestle nicely in the top and stay vertical. And an overall view of how this fits together with my workbench and the drill press. There's still some free wall space. In time, I'm sure I'll use every bit of it.... ... That was in 2008. As of 2012, that wall has gotten quite full. Update 2014: I added another drill index to my walll, thos one of forstner bits. I extracted the drill holder from the index to make the mount. And this time And this time, I took the opportunity to make a video about the drill holders. Update 2017: On moving to the country, I took this tool wall with me because it was made for my best tools, swapping out these ones to make room for it. See also: Making tool holders part 1 and part 2 A better hand plane wall tool holder Chisel holder for my tool wall #shorts Builing a workbenchlike the one above An interesting tool chest design My basement workshopin 2009 and 2012 Workbench drawers Some nice homemadetool chests Parts sorting tray To my Woodworking website
In the middle is my small palm plane. I use this one a lot - mostly for putting a slight chamfer on the edges of work pieces. Chamfering the edges makes furniture feel much nicer to the touch, and it's a lot faster than sanding the edges round. Even for sanded round edges, it's less sanding to start with a chamfer. A holder for the drill press vise. Just two hooks on a piece of plywood. The piece is screwed onto the backing through the hooks. That way, the hooks are not prone to breaking off with the relatively heavy vise. And a holder for the small bar clamps. This isn't on the same wall as the rest of the tools holders. Note the profile of the top piece (see edge at left). It's shaped that so the small clamps nestle nicely in the top and stay vertical. And an overall view of how this fits together with my workbench and the drill press. There's still some free wall space. In time, I'm sure I'll use every bit of it.... ... That was in 2008. As of 2012, that wall has gotten quite full. Update 2014: I added another drill index to my walll, thos one of forstner bits. I extracted the drill holder from the index to make the mount. And this time And this time, I took the opportunity to make a video about the drill holders. Update 2017: On moving to the country, I took this tool wall with me because it was made for my best tools, swapping out these ones to make room for it. See also: Making tool holders part 1 and part 2 A better hand plane wall tool holder Chisel holder for my tool wall #shorts Builing a workbenchlike the one above An interesting tool chest design My basement workshopin 2009 and 2012 Workbench drawers Some nice homemadetool chests Parts sorting tray To my Woodworking website
A holder for the drill press vise. Just two hooks on a piece of plywood. The piece is screwed onto the backing through the hooks. That way, the hooks are not prone to breaking off with the relatively heavy vise. And a holder for the small bar clamps. This isn't on the same wall as the rest of the tools holders. Note the profile of the top piece (see edge at left). It's shaped that so the small clamps nestle nicely in the top and stay vertical.
Pioneer tool holders
I wanted the bottom of the tools to be visible, so I know which tool I'm grabbing. But at the same time , didn't want the sharp ends to stick out of the bottom of the holder. So this holder has a sort of C profile. The bottom part is really just there as a guard. Holders for some squares. The right square is a machinist square. The left square is a rafter gauge. Both very trustworthy as squares. The rafter one is cheap but very trustworthy as a square, seeing that it would have to be totally wrecked to ever go out of square. In the middle is my small palm plane. I use this one a lot - mostly for putting a slight chamfer on the edges of work pieces. Chamfering the edges makes furniture feel much nicer to the touch, and it's a lot faster than sanding the edges round. Even for sanded round edges, it's less sanding to start with a chamfer. A holder for the drill press vise. Just two hooks on a piece of plywood. The piece is screwed onto the backing through the hooks. That way, the hooks are not prone to breaking off with the relatively heavy vise. And a holder for the small bar clamps. This isn't on the same wall as the rest of the tools holders. Note the profile of the top piece (see edge at left). It's shaped that so the small clamps nestle nicely in the top and stay vertical. And an overall view of how this fits together with my workbench and the drill press. There's still some free wall space. In time, I'm sure I'll use every bit of it.... ... That was in 2008. As of 2012, that wall has gotten quite full. Update 2014: I added another drill index to my walll, thos one of forstner bits. I extracted the drill holder from the index to make the mount. And this time And this time, I took the opportunity to make a video about the drill holders. Update 2017: On moving to the country, I took this tool wall with me because it was made for my best tools, swapping out these ones to make room for it. See also: Making tool holders part 1 and part 2 A better hand plane wall tool holder Chisel holder for my tool wall #shorts Builing a workbenchlike the one above An interesting tool chest design My basement workshopin 2009 and 2012 Workbench drawers Some nice homemadetool chests Parts sorting tray To my Woodworking website
2024731 — Close Autodesk Fusion before installing. Download and install the Fusion 360 Add-In (AltiumCoDesignerFusion360_.exe). · Select the ...
Update 2014: I added another drill index to my walll, thos one of forstner bits. I extracted the drill holder from the index to make the mount. And this time And this time, I took the opportunity to make a video about the drill holders. Update 2017: On moving to the country, I took this tool wall with me because it was made for my best tools, swapping out these ones to make room for it. See also: Making tool holders part 1 and part 2 A better hand plane wall tool holder Chisel holder for my tool wall #shorts Builing a workbenchlike the one above An interesting tool chest design My basement workshopin 2009 and 2012 Workbench drawers Some nice homemadetool chests Parts sorting tray To my Woodworking website
Parlec tool holders
See also: Making tool holders part 1 and part 2 A better hand plane wall tool holder Chisel holder for my tool wall #shorts Builing a workbenchlike the one above An interesting tool chest design My basement workshopin 2009 and 2012 Workbench drawers Some nice homemadetool chests Parts sorting tray To my Woodworking website
Because it's just to the right of the drill press, I use some of the holes for drill chuck keys. To hold a lot of pliers, it's easiest to just hook them onto the edge of a piece of wood. A lot of pliers go in a small amount of space that way. The piece of wood in this holder is tapered towards the top edge, so that it doesn't force the handles too far apart. It's really only about half full with pliers so far. The caliper holder is a neat shaped piece of wood. It has a channel in the middle for the bar of the calipers, and a hook on either side to hold the sliding part. I mounted this so it's not far from the table saw, because I use the calipers in combination with the table saw most often. I also have a dial caliper, but I keep that one in a case in the drawer. The vernier calipers are pretty much invulnerable to dust, whereas anything fancier might get gummed up. The chisel holder was another fun one to build. I drilled the holes so that they just touch the edge of the piece of wood, then cut in from the edge to the holes, so it's possible to slide the chisel in from the front. The holes are slightly wider at the top and bottom - Wider at the top to better catch the handle, and at the bottom to give room for the wider chisels. I dimensioned it to work best with the marples chisel set, although it works with my other chisels too. A holder for the hammers. The wooden mallet at the left is home made. Easy enough to make one. I don't understand why people buy them when they are so easy to make. On the right side is the marking gauge, and miter gauge, and a funny fine toothed saw hanging to the left of those. Holders for the hand planes. These are very time consuming to make. I figured I might want to get the drill index closer at hand at times, so I made a holder for the drill index, and put it on a shelf. Originally, my drill index was the type that came in a metal box like the one at right, but that sort of box does not lend itself well to putting it on a narrow shelf. I always found the drill index a little awkward to use in its original case, and I never ended up taking it out of the shop. Mostly, the case just ended up getting wood shavings lodged into it. So I cut up the metal case, and made a wooden base that the rows of drills are inserted in to. My brad point drill set on the other hand came in a plastic case. I cut the bottom part of it off, and hot glued it onto a piece of wood to keep it from tipping over. Much easier. My forstner bit set, with drills going up to 2" in diameter came in a nice wooden case. But keeping it near the drill press, it always became filled with wood shavings. So I finally decided to just make a shelf to hold all these drills. For the larger drills, I drilled a really shallow hole at the base of each one so that it's easy to check which sized drill goes in which hole. I don't use the larger drills all that often, so I decided to make more holes for more drills and accessories in front of those. On the left side, there's a bit of room which I may well drill more holes into to hold more stuff. For the time being, it's a place to put the brad point drill index. All the holes for the drills are drilled through to the bottom, but with the bottom part of the hole a smaller diameter. That way, any wood chips that might get into the holes can fall through to the bottom, without allowing the drills to fall through the holes. A holder for some carving tools. I wanted the bottom of the tools to be visible, so I know which tool I'm grabbing. But at the same time , didn't want the sharp ends to stick out of the bottom of the holder. So this holder has a sort of C profile. The bottom part is really just there as a guard. Holders for some squares. The right square is a machinist square. The left square is a rafter gauge. Both very trustworthy as squares. The rafter one is cheap but very trustworthy as a square, seeing that it would have to be totally wrecked to ever go out of square. In the middle is my small palm plane. I use this one a lot - mostly for putting a slight chamfer on the edges of work pieces. Chamfering the edges makes furniture feel much nicer to the touch, and it's a lot faster than sanding the edges round. Even for sanded round edges, it's less sanding to start with a chamfer. A holder for the drill press vise. Just two hooks on a piece of plywood. The piece is screwed onto the backing through the hooks. That way, the hooks are not prone to breaking off with the relatively heavy vise. And a holder for the small bar clamps. This isn't on the same wall as the rest of the tools holders. Note the profile of the top piece (see edge at left). It's shaped that so the small clamps nestle nicely in the top and stay vertical. And an overall view of how this fits together with my workbench and the drill press. There's still some free wall space. In time, I'm sure I'll use every bit of it.... ... That was in 2008. As of 2012, that wall has gotten quite full. Update 2014: I added another drill index to my walll, thos one of forstner bits. I extracted the drill holder from the index to make the mount. And this time And this time, I took the opportunity to make a video about the drill holders. Update 2017: On moving to the country, I took this tool wall with me because it was made for my best tools, swapping out these ones to make room for it. See also: Making tool holders part 1 and part 2 A better hand plane wall tool holder Chisel holder for my tool wall #shorts Builing a workbenchlike the one above An interesting tool chest design My basement workshopin 2009 and 2012 Workbench drawers Some nice homemadetool chests Parts sorting tray To my Woodworking website
The caliper holder is a neat shaped piece of wood. It has a channel in the middle for the bar of the calipers, and a hook on either side to hold the sliding part. I mounted this so it's not far from the table saw, because I use the calipers in combination with the table saw most often. I also have a dial caliper, but I keep that one in a case in the drawer. The vernier calipers are pretty much invulnerable to dust, whereas anything fancier might get gummed up. The chisel holder was another fun one to build. I drilled the holes so that they just touch the edge of the piece of wood, then cut in from the edge to the holes, so it's possible to slide the chisel in from the front. The holes are slightly wider at the top and bottom - Wider at the top to better catch the handle, and at the bottom to give room for the wider chisels. I dimensioned it to work best with the marples chisel set, although it works with my other chisels too. A holder for the hammers. The wooden mallet at the left is home made. Easy enough to make one. I don't understand why people buy them when they are so easy to make. On the right side is the marking gauge, and miter gauge, and a funny fine toothed saw hanging to the left of those. Holders for the hand planes. These are very time consuming to make. I figured I might want to get the drill index closer at hand at times, so I made a holder for the drill index, and put it on a shelf. Originally, my drill index was the type that came in a metal box like the one at right, but that sort of box does not lend itself well to putting it on a narrow shelf. I always found the drill index a little awkward to use in its original case, and I never ended up taking it out of the shop. Mostly, the case just ended up getting wood shavings lodged into it. So I cut up the metal case, and made a wooden base that the rows of drills are inserted in to. My brad point drill set on the other hand came in a plastic case. I cut the bottom part of it off, and hot glued it onto a piece of wood to keep it from tipping over. Much easier. My forstner bit set, with drills going up to 2" in diameter came in a nice wooden case. But keeping it near the drill press, it always became filled with wood shavings. So I finally decided to just make a shelf to hold all these drills. For the larger drills, I drilled a really shallow hole at the base of each one so that it's easy to check which sized drill goes in which hole. I don't use the larger drills all that often, so I decided to make more holes for more drills and accessories in front of those. On the left side, there's a bit of room which I may well drill more holes into to hold more stuff. For the time being, it's a place to put the brad point drill index. All the holes for the drills are drilled through to the bottom, but with the bottom part of the hole a smaller diameter. That way, any wood chips that might get into the holes can fall through to the bottom, without allowing the drills to fall through the holes. A holder for some carving tools. I wanted the bottom of the tools to be visible, so I know which tool I'm grabbing. But at the same time , didn't want the sharp ends to stick out of the bottom of the holder. So this holder has a sort of C profile. The bottom part is really just there as a guard. Holders for some squares. The right square is a machinist square. The left square is a rafter gauge. Both very trustworthy as squares. The rafter one is cheap but very trustworthy as a square, seeing that it would have to be totally wrecked to ever go out of square. In the middle is my small palm plane. I use this one a lot - mostly for putting a slight chamfer on the edges of work pieces. Chamfering the edges makes furniture feel much nicer to the touch, and it's a lot faster than sanding the edges round. Even for sanded round edges, it's less sanding to start with a chamfer. A holder for the drill press vise. Just two hooks on a piece of plywood. The piece is screwed onto the backing through the hooks. That way, the hooks are not prone to breaking off with the relatively heavy vise. And a holder for the small bar clamps. This isn't on the same wall as the rest of the tools holders. Note the profile of the top piece (see edge at left). It's shaped that so the small clamps nestle nicely in the top and stay vertical. And an overall view of how this fits together with my workbench and the drill press. There's still some free wall space. In time, I'm sure I'll use every bit of it.... ... That was in 2008. As of 2012, that wall has gotten quite full. Update 2014: I added another drill index to my walll, thos one of forstner bits. I extracted the drill holder from the index to make the mount. And this time And this time, I took the opportunity to make a video about the drill holders. Update 2017: On moving to the country, I took this tool wall with me because it was made for my best tools, swapping out these ones to make room for it. See also: Making tool holders part 1 and part 2 A better hand plane wall tool holder Chisel holder for my tool wall #shorts Builing a workbenchlike the one above An interesting tool chest design My basement workshopin 2009 and 2012 Workbench drawers Some nice homemadetool chests Parts sorting tray To my Woodworking website
The chisel holder was another fun one to build. I drilled the holes so that they just touch the edge of the piece of wood, then cut in from the edge to the holes, so it's possible to slide the chisel in from the front. The holes are slightly wider at the top and bottom - Wider at the top to better catch the handle, and at the bottom to give room for the wider chisels. I dimensioned it to work best with the marples chisel set, although it works with my other chisels too. A holder for the hammers. The wooden mallet at the left is home made. Easy enough to make one. I don't understand why people buy them when they are so easy to make. On the right side is the marking gauge, and miter gauge, and a funny fine toothed saw hanging to the left of those. Holders for the hand planes. These are very time consuming to make. I figured I might want to get the drill index closer at hand at times, so I made a holder for the drill index, and put it on a shelf. Originally, my drill index was the type that came in a metal box like the one at right, but that sort of box does not lend itself well to putting it on a narrow shelf. I always found the drill index a little awkward to use in its original case, and I never ended up taking it out of the shop. Mostly, the case just ended up getting wood shavings lodged into it. So I cut up the metal case, and made a wooden base that the rows of drills are inserted in to. My brad point drill set on the other hand came in a plastic case. I cut the bottom part of it off, and hot glued it onto a piece of wood to keep it from tipping over. Much easier. My forstner bit set, with drills going up to 2" in diameter came in a nice wooden case. But keeping it near the drill press, it always became filled with wood shavings. So I finally decided to just make a shelf to hold all these drills. For the larger drills, I drilled a really shallow hole at the base of each one so that it's easy to check which sized drill goes in which hole. I don't use the larger drills all that often, so I decided to make more holes for more drills and accessories in front of those. On the left side, there's a bit of room which I may well drill more holes into to hold more stuff. For the time being, it's a place to put the brad point drill index. All the holes for the drills are drilled through to the bottom, but with the bottom part of the hole a smaller diameter. That way, any wood chips that might get into the holes can fall through to the bottom, without allowing the drills to fall through the holes. A holder for some carving tools. I wanted the bottom of the tools to be visible, so I know which tool I'm grabbing. But at the same time , didn't want the sharp ends to stick out of the bottom of the holder. So this holder has a sort of C profile. The bottom part is really just there as a guard. Holders for some squares. The right square is a machinist square. The left square is a rafter gauge. Both very trustworthy as squares. The rafter one is cheap but very trustworthy as a square, seeing that it would have to be totally wrecked to ever go out of square. In the middle is my small palm plane. I use this one a lot - mostly for putting a slight chamfer on the edges of work pieces. Chamfering the edges makes furniture feel much nicer to the touch, and it's a lot faster than sanding the edges round. Even for sanded round edges, it's less sanding to start with a chamfer. A holder for the drill press vise. Just two hooks on a piece of plywood. The piece is screwed onto the backing through the hooks. That way, the hooks are not prone to breaking off with the relatively heavy vise. And a holder for the small bar clamps. This isn't on the same wall as the rest of the tools holders. Note the profile of the top piece (see edge at left). It's shaped that so the small clamps nestle nicely in the top and stay vertical. And an overall view of how this fits together with my workbench and the drill press. There's still some free wall space. In time, I'm sure I'll use every bit of it.... ... That was in 2008. As of 2012, that wall has gotten quite full. Update 2014: I added another drill index to my walll, thos one of forstner bits. I extracted the drill holder from the index to make the mount. And this time And this time, I took the opportunity to make a video about the drill holders. Update 2017: On moving to the country, I took this tool wall with me because it was made for my best tools, swapping out these ones to make room for it. See also: Making tool holders part 1 and part 2 A better hand plane wall tool holder Chisel holder for my tool wall #shorts Builing a workbenchlike the one above An interesting tool chest design My basement workshopin 2009 and 2012 Workbench drawers Some nice homemadetool chests Parts sorting tray To my Woodworking website
I also have a dial caliper, but I keep that one in a case in the drawer. The vernier calipers are pretty much invulnerable to dust, whereas anything fancier might get gummed up. The chisel holder was another fun one to build. I drilled the holes so that they just touch the edge of the piece of wood, then cut in from the edge to the holes, so it's possible to slide the chisel in from the front. The holes are slightly wider at the top and bottom - Wider at the top to better catch the handle, and at the bottom to give room for the wider chisels. I dimensioned it to work best with the marples chisel set, although it works with my other chisels too. A holder for the hammers. The wooden mallet at the left is home made. Easy enough to make one. I don't understand why people buy them when they are so easy to make. On the right side is the marking gauge, and miter gauge, and a funny fine toothed saw hanging to the left of those. Holders for the hand planes. These are very time consuming to make. I figured I might want to get the drill index closer at hand at times, so I made a holder for the drill index, and put it on a shelf. Originally, my drill index was the type that came in a metal box like the one at right, but that sort of box does not lend itself well to putting it on a narrow shelf. I always found the drill index a little awkward to use in its original case, and I never ended up taking it out of the shop. Mostly, the case just ended up getting wood shavings lodged into it. So I cut up the metal case, and made a wooden base that the rows of drills are inserted in to. My brad point drill set on the other hand came in a plastic case. I cut the bottom part of it off, and hot glued it onto a piece of wood to keep it from tipping over. Much easier. My forstner bit set, with drills going up to 2" in diameter came in a nice wooden case. But keeping it near the drill press, it always became filled with wood shavings. So I finally decided to just make a shelf to hold all these drills. For the larger drills, I drilled a really shallow hole at the base of each one so that it's easy to check which sized drill goes in which hole. I don't use the larger drills all that often, so I decided to make more holes for more drills and accessories in front of those. On the left side, there's a bit of room which I may well drill more holes into to hold more stuff. For the time being, it's a place to put the brad point drill index. All the holes for the drills are drilled through to the bottom, but with the bottom part of the hole a smaller diameter. That way, any wood chips that might get into the holes can fall through to the bottom, without allowing the drills to fall through the holes. A holder for some carving tools. I wanted the bottom of the tools to be visible, so I know which tool I'm grabbing. But at the same time , didn't want the sharp ends to stick out of the bottom of the holder. So this holder has a sort of C profile. The bottom part is really just there as a guard. Holders for some squares. The right square is a machinist square. The left square is a rafter gauge. Both very trustworthy as squares. The rafter one is cheap but very trustworthy as a square, seeing that it would have to be totally wrecked to ever go out of square. In the middle is my small palm plane. I use this one a lot - mostly for putting a slight chamfer on the edges of work pieces. Chamfering the edges makes furniture feel much nicer to the touch, and it's a lot faster than sanding the edges round. Even for sanded round edges, it's less sanding to start with a chamfer. A holder for the drill press vise. Just two hooks on a piece of plywood. The piece is screwed onto the backing through the hooks. That way, the hooks are not prone to breaking off with the relatively heavy vise. And a holder for the small bar clamps. This isn't on the same wall as the rest of the tools holders. Note the profile of the top piece (see edge at left). It's shaped that so the small clamps nestle nicely in the top and stay vertical. And an overall view of how this fits together with my workbench and the drill press. There's still some free wall space. In time, I'm sure I'll use every bit of it.... ... That was in 2008. As of 2012, that wall has gotten quite full. Update 2014: I added another drill index to my walll, thos one of forstner bits. I extracted the drill holder from the index to make the mount. And this time And this time, I took the opportunity to make a video about the drill holders. Update 2017: On moving to the country, I took this tool wall with me because it was made for my best tools, swapping out these ones to make room for it. See also: Making tool holders part 1 and part 2 A better hand plane wall tool holder Chisel holder for my tool wall #shorts Builing a workbenchlike the one above An interesting tool chest design My basement workshopin 2009 and 2012 Workbench drawers Some nice homemadetool chests Parts sorting tray To my Woodworking website
Shop Laydown Threading Insert: 4ER3.0SAGE VTX, Carbide at MSC Direct top provider of high quality products.
Apr 11, 2020 — Cutting speed is defined as the rate at which the material is removed from the workpiece during machining. Cutting Speed = πDN / 1000 m/min.
Holders for some squares. The right square is a machinist square. The left square is a rafter gauge. Both very trustworthy as squares. The rafter one is cheap but very trustworthy as a square, seeing that it would have to be totally wrecked to ever go out of square. In the middle is my small palm plane. I use this one a lot - mostly for putting a slight chamfer on the edges of work pieces. Chamfering the edges makes furniture feel much nicer to the touch, and it's a lot faster than sanding the edges round. Even for sanded round edges, it's less sanding to start with a chamfer. A holder for the drill press vise. Just two hooks on a piece of plywood. The piece is screwed onto the backing through the hooks. That way, the hooks are not prone to breaking off with the relatively heavy vise. And a holder for the small bar clamps. This isn't on the same wall as the rest of the tools holders. Note the profile of the top piece (see edge at left). It's shaped that so the small clamps nestle nicely in the top and stay vertical. And an overall view of how this fits together with my workbench and the drill press. There's still some free wall space. In time, I'm sure I'll use every bit of it.... ... That was in 2008. As of 2012, that wall has gotten quite full. Update 2014: I added another drill index to my walll, thos one of forstner bits. I extracted the drill holder from the index to make the mount. And this time And this time, I took the opportunity to make a video about the drill holders. Update 2017: On moving to the country, I took this tool wall with me because it was made for my best tools, swapping out these ones to make room for it. See also: Making tool holders part 1 and part 2 A better hand plane wall tool holder Chisel holder for my tool wall #shorts Builing a workbenchlike the one above An interesting tool chest design My basement workshopin 2009 and 2012 Workbench drawers Some nice homemadetool chests Parts sorting tray To my Woodworking website
And a holder for the small bar clamps. This isn't on the same wall as the rest of the tools holders. Note the profile of the top piece (see edge at left). It's shaped that so the small clamps nestle nicely in the top and stay vertical.


 0086-813-8127573