
What is Depth of Cut in Machining? Its Unit, Value, Effects ... - depth of cut
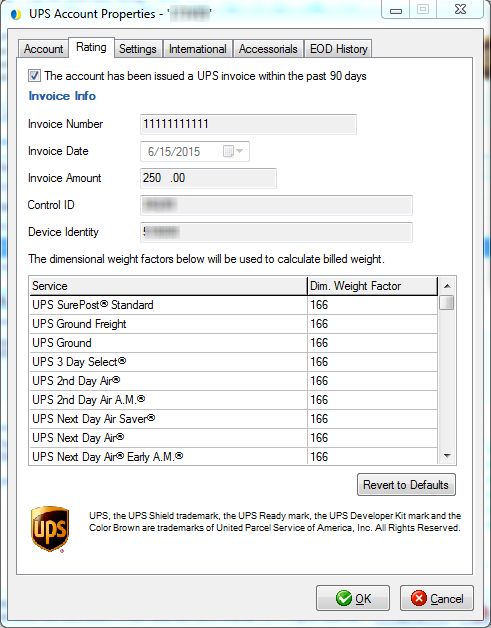
UPS Domestic Dimensional Weight Divisor = 166 cubic inches per pound; International Dimensional Weight Factor = 139 cubic inches per pound
Circle crop
If the package is 5,184 cubic inches (3 cu ft) or larger, dimensional weight is : Length x Height x Width (in inches) Dimensional Weight Divisor
Crop image
When I’m cropping a character to a shape, there’s two different things that I’m trying to do. One, I might want to have the character enclosed inside of a circle, and the other would be I might want to have that head overlap where the circle might be.
So let me just hold shift, draw that, and let’s say I want to left nudge it there, and then move it down a little bit, so that’s how much I want to cut the head over. Now what I want to do is hold shift, and I can do another circle crop here, and it will join the two of them together. So if I just grab that, you’ll see that became a single – a single thing, and maybe I’ll nudge that up to the right just a little bit. And that looks pretty good.
For each UPS service, you can enter custom dimensional weight divisors that are used to calculate the billed weight. Although UPS calculates and returns both the list (published) and custom rates, only the list value of the billed weight is returned. The dimensional weight factors defined in Setup > Carrier Interface > UPS (under Settings for the UPS Account) are used by StarShip to calculate and display the custom billed weight value on the Ship screen. The factors default to list (published) values, but can be modified to reflect contract rates. This will not affect the charges, only the billed weight that shows on-screen. So, for example, If you have any freight rules that use the billed weight field, it will be updated so that freight rules work correctly.
So now, the reason that I cropped that first is it’s going to pull the edges really tight, and that helps me with my sizing. But now I want to remove the shirt, so I’m going to select the inverse, on a PC that’s control, shift I. And it selected the inverse, and now I can just hit backspace.
Remove background
Today I am going to show you how to do a crop to shape in Photoshop. For example, cropping to a circle shape and there are two different techniques I’ll show you how to do.
You’ll want to click and hold that, it will open up some more options and choose the elliptical marquee tool. Then it will do a circle, you’ll want to keep the aspect the ratio the same, so you’re going to hold shift, and then just drag what you want to crop.
And then actually there are two different techniques that are based on the same base skills, I’ll walk through each of those right now. So here I am within Photoshop, and you’ll actually just be using the regular marquee tool here that you’ll normally use to crop shapes, but you’ll see it starts but default as a rectangular marquee tool.
Cropping in a circle is an interesting visual effect, and is pretty easy to do in Photoshop once you learn these simple techniques. In this video tutorial, we’ll show you 2 different ways to crop in a circle in Photoshop. In one, you’ll enclose the entire image in a circle. In the other, we’ll show you how to allow a picture of a person to overlap the edge of the circle for an interesting effect.
US visa photo tool
And you’ll see I didn’t’ get it quite centered right. I can just use my left arrow to nudge it over. And what I like to do now is just get the sizing right. I’ll go to crop it right now, and you’ll see we still have the parts of the shirt here that we don’t want.
And now I can just do a save as and we’ll have a nice clean, circular cut along the head there. Now let’s say I want to do this second option where I have the head kind of poking out over the circle. And the reason you can’t just move that shape up, or move the person up is that the ratios will change and you’ll end up getting weird trimming along the edge.
Image online


Now I follow the same steps. I’ll just go ahead and crop it, and that’s to pull it tight along the edges there, and then I’ll select the inverse, backspace that gets rid of it, and then I can just save the – save the file.
So you’ll have to do something special here in Photoshop. So you’ll actually start with the same technique here. You’re going to go back to your elliptical marquee tool, you’re going to hold shift to lock the aspect ratio, but you’ll want to leave a little bit of room so – where the head will be poking over, so you’ll want to do your crop a little lower.
For UPS air shipments (including UPS 3 Day Select), freight charges are sometimes calculated using dimensional weight instead of the actual package weight. Dimensional weight may apply to all UPS domestic and international services. Billed weight is the weight used to calculate the rate. For domestic and international services, the billable weight will be the greater of the dimensional weight as compared to actual weight.


 0086-813-8127573