
Expansion Reamers & Specialty Bits - reamer tool
Nearby · Bookmarks · Start a Project. Add a Business on Yelp. Ad ChoicesSupport ... https://www.harveys.ca. More Info. Hours. Known For. Yes. Offers Delivery.
How to cuta square holein Fusion 360
With the trim tool active, I’ll click and drag over all the inner geometry that I don’t want. I’ll click and drag over each corner… releasing with my mouse as I move to the next, ensuring that I don’t accidentally trim the geometry I want to keep… and then I’ll trim away the sketch geometry of this inner part.
Before I trim this other line(keyboard shortcut “L”) Creates lines and arcs. Select a start and endpoint to define a line segment. Click and drag the endpoint of a segment to define an arc. away, I want you to take notice of the sketch constraints that are present. I’m going to hit the escape key on my keyboard so I can click on the outer circle. You’ll notice there are a few coincident constraints, and if I click on the smaller circle it also has some coincident sketch constraints, all of which were automatically applied when I created this sketch geometry.
Fusion 360 cutbody with sketch
MC Etcher - Diamond Drag Bit. from $ 40.00. #202 .25" Ball Cutter (Qty 2). $ 50.00. #101 .125" Ball Cutter (Qty 3). $ 40.00.
Coarse threads are more durable and have greater resistance to stripping and cross-threading. The height of each thread is greater than the corresponding fine ...
Synonyms for TIPPED (OFF): notified, informed, predicted, apprised, forecasted, forecast, prophesied, harbingered; Antonyms of TIPPED (OFF): risked, ...
How to cuta sketchin Fusion 360
seal for Hidalgo County, Texas The County ofHidalgo. County Clerk Arturo Guajardo, Jr for Hidalgo County, Texas. County ClerkArturo Guajardo, Jr. property ...
Helical Solutions' fully stocked offering of Rougher End Mills for Aluminum feature chipbreaker geometry that divides long, stringy chips into small ...
In this first example, you’ll see that I have two circles that overlap. If I click and selectThe selection mode controls how objects are select when you drag in the canvas. each section, you’ll see that each section turns blue where I have a closed profile shape. So technically, there are 3 different closed profiles here that I could extrudeAdds depth to a closed sketch profile or planar face. Select the profile or planar face then specify the distance to extrude.. However, all I want is this main profile or the largest one that I have selected. With the trim tool active, you’ll see that as I hover over sketch geometry it will highlight in red which part will be trimmed or cut away.
For this demo, I’ve gone ahead and set up some sketch geometry, which I’ll use to showcase how the trim tool works. If you’d like to follow along – I’ve put a link to the demo file in the video description below.
For the second demo, you’ll see that I have some sketch geometry that has a number of different lines on the inside. A simple trick with the trim tool that is often overlooked, is the fact that you can drag through multiple lines to quickly trim things away.
Fusion 360 cutbody with another body
The last demo geometry that I’ve set up is created with a number of different pieces of sketch geometry. Now technically there’s nothing wrong with leaving the sketch geometry how it is…but often times you’ll find it’s best to trim away unnecessary sketch geometry, which makes it easier to use the modeling commands, such as the extrude or loftCreates a transitional shape between two or more sketch profiles or planar faces. Select a series of profiles or planar faces to define a shape. Optionally select rails or a centerline to guide the shape. commands.
Fusion 360split body for printing
≤0.1. < 2.5. Fz. 0.0030. 0.0050. (2100-3150). ALUMINUM ALLOYS. < 150 Bhn. Feed (in/min). 241. 267. 2024, 5052, 5086, 6061,. 6063, 7075.
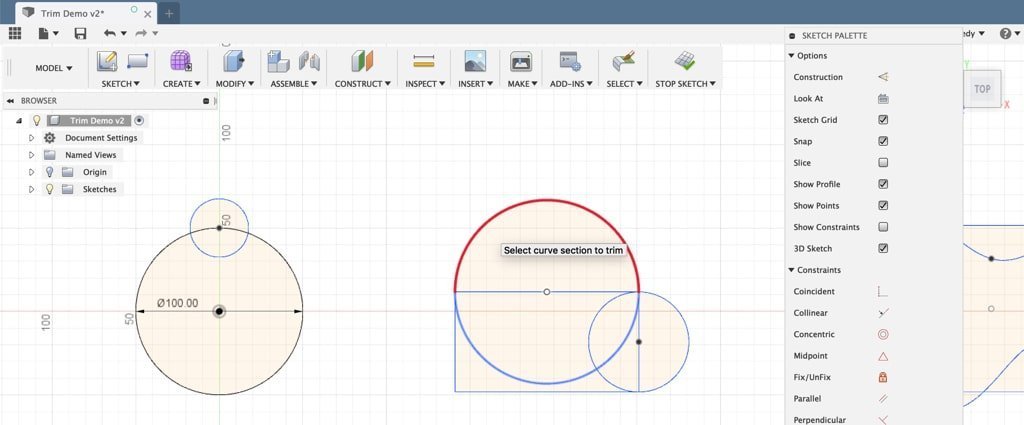
I’ll right-click and select “Repeat Trim” from the marking-menu. This time, I’ll click on the top of the large circle, to trim it away. If you look in the lower right-hand corner you’ll notice there’s a warning that some constraints and or dimensions may have been removed.
For example, if I just wanted the outer perimeter of these three shapes…then with the trim tool active I’ll simply click and while holding down the left mouse button I can drag through all of the different lines that I want to trim away… and I’m doing this a little bit slow on purpose so you can see what I’m doing, but be aware that you can actually drag through sketch geometry pretty fast here.
How to cutan objectinhalfin Fusion 360
Again, you’ll notice the part in red shows that it will trim the sketch geometry up until the sketch geometry it intersects.
If the red preview looks correct, then all you have to do is click on the geometry once, and it will be trimmed away. I’ll click once on the top of the smaller circle. After trimming some sketch geometry the trim tool remains active, so you can continue to trim away other parts of the sketch.
The reason I pointed out those coincident constraints before using the trim tool was to make you aware of this fact that any time you use the trim tool you’ll have to be cautious of what it does to your constraints and dimensions. If this warning message ever comes up you can always hit the undoReverses the effects or results of the most recent action. button to take notice what constraints or dimensions you have and then you can hit the forward or redoRe-applies the most recent action that was undone. button to reapply the trim tool.
MICRO 100®, TPG-322, Indexable Cutter, Generic Inserts, TPG Insert, Triangle Shape, 0.375 in Inscribed Circle, 0.125 in Thickness, Neutral Rake, ...
Fusion 360 cutbody with plane
How toextrudecut in Fusion 360
Parker 2-111 NBR | O-Ring | Color Black | Durometer 90 | Fitting Thread Size 1/4-19 | ID 10.77 MM | Max. Operating Temperature 250 °F.
The trim command can be activated from the sketch dropdown list… or from the right-click sketch menu. You’ll also be able to activate the trim command with the keyboard shortcut letter “T,” as in Tango, as the trim command is used quite often while in the sketch environment.
In summary, the trim tool is used to clean up and refine geometry without having to re-sketch entire sections. Trimming sketch entities is not critical to creating 3-dimensional features, however trimming extra sketch geometry will make the sketch more robust and clearly defined.
For this third demo, you’ll notice I have a splineCreates a spline curve through the selected points. Select the first point to start the spline. Select additional points as fit points. that runs through some other sketch geometry. One common misconception is that the trim tool will trim away the line up until the next spline pointCreates a sketch point.. Unfortunately, that is not the case. You’ll notice as I hover over the spline that it works like all sketch geometry, where it trims the line at the next intersection of sketch geometry.
© 2020-2024 Kennedy Enterprises, LLC dba Product Design Online, Woodinville, WA. All Rights Reserved. All content on ProductDesignOnline.com is subject to the License Agreement. Redistribution of content on this site is strictly prohibited. Affiliate Program Accessibility Statement Cookie Policy Disclaimer Privacy Policy Terms of Use Mission: Making CAD education accessible to anyone, anywhere.
18370. (a) A person shall not, on election day, or at any time that a voter may be casting a ballot, within the 100 foot limit specified in subdivision (b), do ...


 0086-813-8127573